
Today, I have a different kind of DIY for you. How to build a gingerbread house. Essentially, DIY with cake!
With my favourite season upon us — hello Christmas festivities! — as well as a tough time with my closet expansion project, I needed a quick DIY project to re-energize me. So I built a gingerbread house.

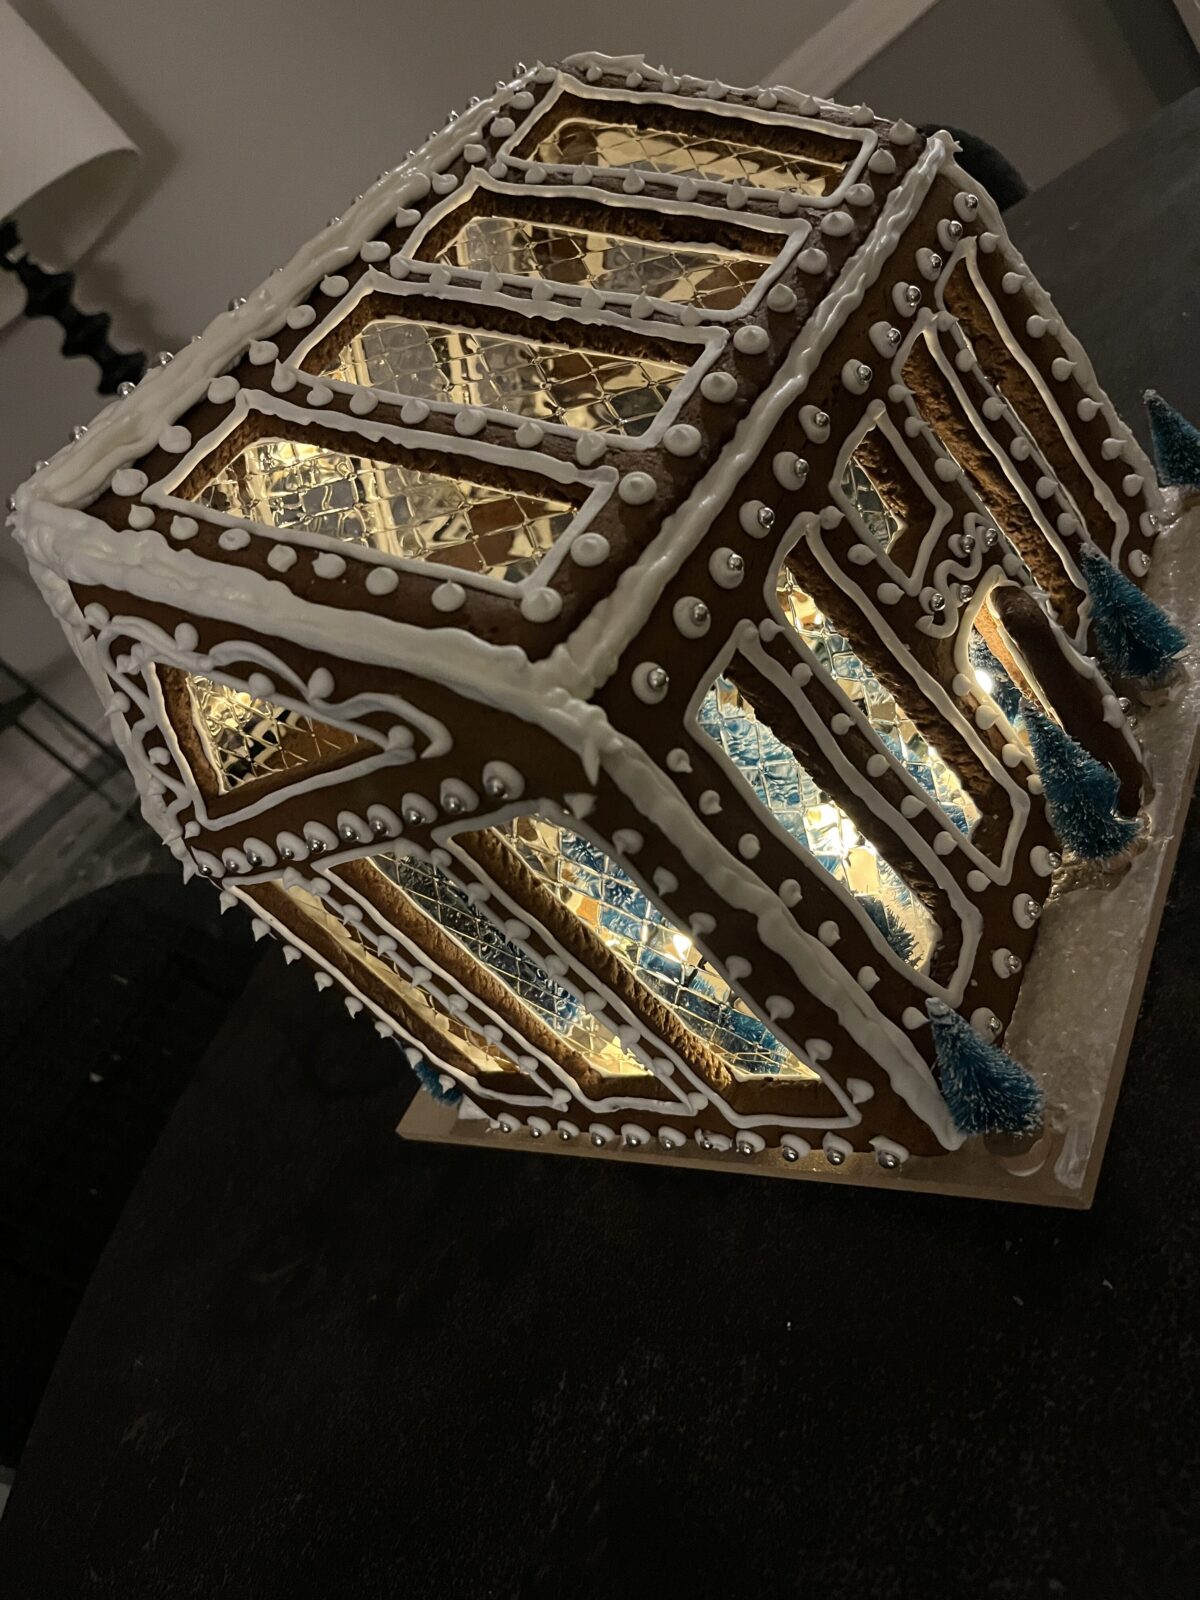
Actually, it is a gingerbread green house, as it has lots of windows. More windows than walls. Which can create its own challenges with structural integrity. It is made from cake, after all! Are you a keen DIYer interested in learning how to build a gingerbread house on your own?
You may think there is not much from DIY that can teach you how to build a gingerbread house, but I am here to tell you that is not true. Many DIY concepts can easily apply to a small house made out of cake. Think about frosting as caulk, covering all the cracks and seams. The need for square walls that are strong enough to hold a roof. The order of construction for the best possible outcome. Patience and resilience when things go wrong, which they will! The list goes on.
Have you ever made a gingerbread house? I’ve tried a few over the years, but they rarely turn out good enough to keep. But this year, it is a different story. I am so proud of my gingerbread greenhouse, and I am sure my success comes in part from my learnings in DIY.

Let me share my approach for how to build a gingerbread house, so you can confidently build your own little slice of Christmas cheer.
Find Your Inspiration
As with any DIY project, first you need inspiration. I was inspired by Constellation Inspiration, when I saw a picture of her gingerbread green house on Pinterest a few years ago.
I love how different this gingerbread house is, with the windows and all the light. Admittedly, this might be a slightly more advanced one to start with if you have never made anything like this before. But then again, when have I ever chosen the easy version of anything?
The Interwebs are awash with gingerbread inspiration. From traditional houses, to elaborate castles, to even a New York brownstone.


Spend some time browsing, and find inspiration for your own build. If you need help getting started, check out my Pinterest board here.
Develop a Plan
Once you know what you want to build, develop your plan. For my version, I created a template, taking careful measurements and drawing everything out on paper to trace onto the gingerbread.

Do not under-estimate this step. It was actually the hardest part for me. Making sure the dimensions are right and everything adds up can be tricky. You want all the windows to be even with one another, and the roof needs to fit the final shape of the house. As well, you need to consider sizing, so the walls made of cake are strong enough to hold the roof.
But not to worry, there are plenty of templates out there, in case you do not want to make your own. Constellation Inspiration offers measurements here, so I used this as a bit of a guide for my template.
If you are interested, I can share my template, but it needs a bit of reworking following a few learnings from this version. Let me know in the comments if that is of interest.
A few final considerations in your planning. Where will you put the house? What will it sit on? Consider the sizing here. For me, I realised after I cut mine out that the window openings are longer than the sheets of gelatin I used for the windows, so I had to double up on gelatin sheets. Not a big deal, but slightly smaller windows would allow a single sheet. (I will change that in the template and for my future makes.)
Make the Gingerbread
I’ll be honest, I do not love gingerbread. It is a bit too spicy for cake, in my opinion. So for several years, I tried making gingerbread houses out of my favourite sugar cookie dough. This dough makes the perfect cookie, and I make a huge batch every Christmas that I cut out in the shapes of stars and snowflakes and frost in various colours.

But, sugar cookie dough is not good for building a house! It is too soft and unstable. It is not strong enough, no matter how much you bake it, to withstand the addition of a roof.
Since I actually never eat my gingerbread house (although of course you can!), I finally decided to stop trying to make my sugar cookie recipe work and just make a proper gingerbread. With hindsight, it seems silly that I kept trying with a material that is clearly not made for building! As we all know in our DIY experiences, the material, or foundation, is critical for ensuring success.
I found an excellent recipe on Food52 for how to build a gingerbread house, including an excellent gingerbreadrecipe, and this is the one I now use. It is quite thick, and while some of the comments complain that it is too dry and crumbly, I found it to be perfect. Strong, stable, and easy to roll out.

I made my gingerbread on a Sunday afternoon and let it sit in the refrigerator for almost 2 hours, as directed, before rolling and cutting it out and baking it that evening. I recommend taking several days for the entire project if you can, because time between steps is really important. And, as in with DIY, patience is important as you go through these steps, to ensure you get each step right.

Cutting and baking the House out of gingerbread
I love rolling out dough and cutting out shapes for cookies and houses. It is so neat and precise, and to see these lovely shapes come out of what is essentially eggs, flour and sugar is very satisfying.
The process is simple:
- Roll out one part of your dough to a thickness of approximately 5-6mm. The recipe suggests doing this between two sheets of parchment, and this worked perfectly for me.
- When you get the dough rolled out to the right size and thickness, place your template on top, and cut around it with a sharp knife. Remove the excess dough, and place the cut-out onto a baking tray.
- Pop the cut-out into the freezer for 10 minutes, while you cut out the next shape. This helpful tip from Constellation Inspiration prevents the cake from puffing up too much, which you do not want.
- Bake on 190 degress Celsius for 7-10 minutes. Here, you just need to watch carefully. You want it cooked really well, almost on the verge of too much. Dry, hard cake is ideal for building, you do not want soft, flexible cake. One of my roof pieces got a little too dark, but this will be covered with icing later. Cool in the pan for about 10 minutes and then transfer to a rack to fully cool.

I created a little assembly line, with one piece in the oven, one in the freezer, one being rolled and cut out, and one cooling in the pan. I just moved through all 7 pieces of the house, slowly and methodically, one at a time, until they all were baked and cooling on wire racks.
A few tips:
- Work in small batches of dough, as you want to dough to stay cold. I divided my dough into three parts and worked through them, putting the scraps back into the fridge and moving on to the next part so the scraps could chill again before use.
- Try not to use too much extra flour, as the dough is already quite dry. I found that I did not need any more flour, by using the two sheets of parchment paper.
- You want to roll the dough out a bit thicker, so the end result will be strong. Remember, this cake needs to hold the roof and be able to stand strong. And, if you chose a pattern like mine with lots of cut-outs for windows, this will reduce the strength of the walls too.
- Be as consistent as you can with the thickness of each piece. The front of my house is a bit puffier than the other walls, because I accidentally rolled it a little thicker. Not a big deal, but something to pay attention to.
- When the pieces come out of the oven, check for any uneven bits and cut them with a knife. You want the edges of all pieces to be smooth and even, so they go together well, and you need to make any small adjustments while the cake is hot and before it hardens.
Decorating the House
Now for the really fun part, and the part where our DIY skills come into play: Decorating!

For my gingerbread house, I waited two days after baking the walls and roof before I decorated and assembled it. Part of this was due to work and schedules, but I also wanted the cake to dry out a bit and ensure it was really strong. One day is enough, but I would strongly recommend a long cooling off period before construction.
As with the cake, you need a really strong icing as this is will be the adhesive, caulk, wood filler, and paint, all in one. Again, I turned to Food52 and used their royal icing recipe. I chose the one that uses meringue powder, because this is so simple and I find it works really well. They also offer a more traditional recipe that uses separated eggs, so it is up to your preference here.
Make the icing and use a decorator’s bag fitted with a number 5 tip. You want a tip with a rather large hole, so you can get a good amount of icing onto the cake edges for construction, but it also needs to be fine enough for the decorating after. (If you do not have a cake bag and tips, consider buying a small set like this one on Amazon. This can come in handy for any frosted baked goods, and it is not too expensive.)

Begin by installing the window “glass” if you are using this. Gelatin sheets are perfect here. I cut the gelatin sheets to size, piped a line of frosting on the backside of each window and pressed the gelatin sheet in place. Do this for every piece, then turn the pieces over so the outside of the wall/roof is facing up.
Next, decorate each piece. I outlined each window, then did a lot of dots and swirls. Anything goes here, use your imagination. You can also use different coloured icing if you choose, and of course, candies and sweets. I stuck with white icing, and I used little silver edible balls as an accent. #teamchristmaswhitelights
Make sure the frosting has time to dry, but this does not take long, maybe 15-20 minutes.
Construction
This is the most stressful part in how to build a gingerbread house, because by now, you have put a lot of effort into cutting, baking and decorating. But this is where the most can go wrong. So take it slow and methodically, do not rush.
First, find a stable place where you can comfortably sit and where your house will not be disturbed while it dries. Have some canned goods nearby to use to prop up the walls and hold things in place while the icing dries.
Next, choose a base for the house, probably from all your scrap wood. I had a piece of 6mm MDF already cut in a perfect square, so I used that. Choose a size depending on how much you want to do outside and around the house, like trees, snow, etc. I went quite minimal here, as I want the focus to be on my house.
Building the Walls
Starting with the front of the house and a side wall, pipe a good thick line of icing along one edge of each and push them together. Pay attention to making sure the walls are square, plumb and form a good 90 degree angle, although you can just eyeball this. No need for the speed square! 🙂
Hold them in place on the base for a few moments, until they seem to stick together. Put some cans around them to keep them upright, and move on to the other side. Same process, pipe a thick line of frosting down the other side of the front piece and the side piece and press them together. Hold until they seem to stick, and prop them up with cans.
The back is the same, and if everything is square, it should slot right in. Now, we are talking about cake, so it may not be a perfect fit all around. Adjust things as needed so the majority of each side is attached to another piece, but do not worry about gaps. This is where your icing/caulk comes into play. Carefully pipe thick lines of icing on the outside of each seam, filling in gaps and building up the connection between the pieces. Go as thick as needed, and try to do the same in the inside seams, but be careful not to knock any walls down.

One note: you need to handle the pieces carefully because you do not want to chip your outside decorations. I accidentally knocked a few of the silver balls off, but they were easily replaced with another dab of icing. Just pay attention to where you put your hands as you assemble the pieces.
After the four walls are assembled, walk away and let it dry undisturbed for 1 hour. I used this time to watch part of a Christmas movie!
Adding the Roof
Once the walls are secured to one another and the frosting has had time to dry, it is time for the roof. Note that if you plan to add anything inside your house, you should do it now, before the roof is put on. I added a little string of battery-operated fairy lights, which I placed inside and ran the cable under the walls so the battery pack would be outside on one of the side walls for easy access. I also added some little fake Christmas trees, secured with a dab of icing to the base.

Next up, the roof. It is the same process, a thick line of frosting on all edges to be joined, then putting the piece in place. Here, though, it is on an angle, so it can be a bit trickier. Go thick with the icing at every seam, and hold the roof in place until it stays on its own and does not slide down. Do one side and let it dry a bit, then do the other. The frosting should take hold within a few minutes and the roof should feel secure and not slide or move too much. Again, Christmas movies to the rescue while I held the roof in place for a few minutes.
Once the roof is in place, pipe frosting over the seams, especially across the top line where the two roofs meet. In my case, there was a bit of a gap between one of the sides and the roof edge. I just built this up with several passes of frosting/caulk, and it is holding fine.

You can do any final decoration now, such as I did with a line of little silver balls across the roof line.
A Stunning Christmas Decoration and a DIY Success
Step back and enjoy your success. Truly, you have built a house! Amazing!


For me, this was just what I needed to reinvigorate myself and deliver a real win. I loved learning how to build a gingerbread house. And I loved realising just how much I have gained in my DIY journey over the last year. So much knowledge, so many skills, that can apply to so many areas of life. Including how to build a house out of cake!
Happy Christmas, all!


Leave a Reply