Today, I am back with an update on the never-ending closet expansion project. Sadly, it is not much of a progress update. Rather, today is about the lack of progress and facing failures in DIY over the last weeks.
But, I believe it is just as important (maybe more?) to explore our failures. After all, they are the way we learn the most.
When we last left off, I had completed one of the frames, and it looks fantastic.

This success really buoyed my confidence, and I tackled the second square closet opening, expecting the same result. Sadly, this did not happen, and after nailing the frame in place and stepping back, I could see how uneven it was. At that point, I stepped away to reflect and refresh before continuing.

Isn’t that always the way? We make one big step forward, and then suddenly, it is two steps back. Failures in DIY are real, and they are frustrating. To say I was discouraged by the second frame is an understatement. And, because of a busy schedule, it took time to get back to the project.
Returning to the Project
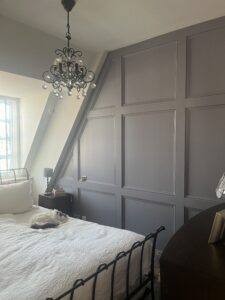
I was finally able to return to it this past week, and happily, I completed closet three, the angled opening in the bedroom. Like the other bedroom closet opening, it slotted right in and looks great, with minimal challenges.

Although you might note that I installed the top piece of the frame upside down, with the unprimed side facing out. Not really an issue, since I can simply prime it, but a good reminder to pay close attention.

I am really pleased with this progress, since the angled openings are so challenging. And, these two completed openings look really good and match up perfectly. As they are in the bedroom, it is easy to stare up at them from the bed and bask in my success.

I love being in my bedroom. If I am not staring at the closets, I am staring at the opposite wall, my purple feature wall!

Success Followed By Failure
Encouraged again by the progress and having overcome my feelings of defeat over the failed closet opening, I confidently moved back to the office to complete the angled closet and replace the uneven square frame.
Sadly, the angled frame is a complete disaster.

It is not square at the top, despite seeming square when I check it with T-square. It could be that without the long angled piece in place, gravity pulls it down, but when I prop it up, it is not even with the wall. There might be an issue with the cut drywall not being even.

Also, I ran out of long pieces of the MDF frame for the angled side. I put two shorter pieces together, which works (although I do not like the seam), but I’ve not cut it perfectly, so this needs to be redone. So frustrating, because it was too long, and I was really careful cutting it, but now it is too short. I have not even bothered to attach the two pieces since they need to be re-cut.
And, even with these challenges, when I slot the frame in, there are multiple issues with the drywall, with some of the inside wall cut too much and not helping provide needed stability. The frame does not sit evenly, with the left side coming out further than the right side, no matter how much I adjust it.
Confession time
I got a little lazy/rushed/impatient and did not build up the inside between the walls enough, thinking I could still make it work. But this provides the necessary structure and is probably a big part of why I am facing all these challenges. Will I ever learn?
You also may note that I skipped adding the architrave temporarily as my clear outline for cutting the frame. I put one piece along the bottom but then jumped ahead. I thought I did not need it after doing the others, but once again, will I ever learn? Follow the process! This also most certainly helped result in the inaccuracies, as the architrave makes the measurements more precise than trusting the uneven drywall. The architrave also provides a bit of the structure needed for the frame when putting it in place.
So, I now have two closet frames complete and really looking good, but two are complete failures and need to be redone.


Despair Takes Over
Enter top levels of discouragement following these failures in my DIY projects. Self-doubt, frustration, irritation at myself, and honestly, a bit of despair. I’ve taken on something too big for me and have lost confidence that I can complete this one.
Also, I am incredibly tired of working on this project, and there is still so much to do. (I dread building the doors, although I am excited to follow WoodshopDiary’s excellent tutorial.) I’m dreaming of all the other projects I want to take on that I cannot start yet. (I’ve promised my husband and myself to not start anything new until this is complete, which can be even more discouraging. It would be helpful to do a simple project and give myself a little boost!) And time is limited, as we enter the Christmas season and my calendar is quite full the last 6 weeks of the year. (6 weeks??? Where did this year go?)
Very practically, I also am out of supplies and need to order more MDF for the frames. Unfortunately, the place where I last ordered them have stopped taking non-trade orders, and an exact match for the MDF panels is not easy to find. This adds to my stress too.
How to Overcome
So what is a girl to do? How do I overcome these failures in DIY projects? Not to mention all these negative emotions and loss of confidence. How do I carry on? In fact, do I carry on or do I throw in the towel and call for professional help?
Fortunately or unfortunately, this is not my first failure! And it certainly won’t be my last.
As I face the situation and try to decide what to do, let me share a few tips and tricks I’ve learned in my own, albeit short, DIY journey for overcoming self-doubt and despair. Perhaps my tips can help you too, because failure is inevitable. But it is not the end of the story. It is often one of the best parts of the story, once you are through it and can look back with appreciation for what you gained from it.

1. Walk away
The first thing I do when I hit a wall that I just cannot overcome is walk away. Yes! Down tools and walk away. If you are anything like me, you will be too discouraged, too frustrated, too irritated, too (fill in prevalent negative emotion) to really be able to move forward. Plus, time is a great healer, so a bit of time can provide clarity and insight on what might have gone wrong and how to fix it.
I find that after some time away, I often come up with reasons I had not seen for why something failed. And these revelations come to me in the most unexpected places, never while standing in front of my failure. In fact, it was only as I was writing this post that I realised how my little cheats may be the cause of of the failed angled closet openings.
2. Put things in perspective
While you are away from the project, and when you are feeling especially low, put things in perspective. For me, that looks something like:
“Stacey, this is not as bad as it seems. First of all, we are talking about some wood, drywall, MDF, and a bit of your time. You’ve learned a lot along the way, and honestly, you’ve done two of the closets really well. 50% of the project is really good! If you can do two, you can do two more. These things happen, and you’ve proven you’ve got this. You just need to shake it off and get back on that ladder.”
It sounds a bit cheesy, I know. But it is surprisingly therapeutic! Just being grateful for the chance to even try these types of projects can also really help me to remember what is at stake here, vs some of the other much bigger problems in the world.
If that doesn’t work for me, I take to writing. There is a concept called stream of consciousness writing, where you just sit and write whatever comes to mind. It can be used to overcome writer’s block, but I use it to problem solve. I start writing, with no end in mind and no need for perfectly crafted sentences. Rather, it is all about getting my thoughts out. Once I start, I am always surprised by how suddenly, the words start flowing, and solutions come. Or if not solutions, at least clarity on how to think about the challenge. Give it a try for one of your DIY failures or honestly, any other issue in life!
3. Calmly and rationally assess the situation and seek solutions
At this stage, some time should have passed, and you are feeling a bit clearer and a bit less emotional. At this stage, I’ve often fallen asleep over several nights thinking about the issue and trying to find solutions. I find some of my best solves come just before sleep. I am not sure why. Perhaps it is how relaxed I am or the fact that I cannot do anything except think about the problem when no action is allowed.
Another approach that works for me is just standing in front of the problem project and thinking through the steps methodically. I might have my notebook and write down the steps I need to take. But this is only after some time has passed and you are feeling calmer about the whole situation.
At this stage, there are still no tools. This is a thinking exercise, before jumping back in.
4. Get back to it
Finally, it is time to get back to it. I sometimes find this the hardest part, because I may still lack confidence that I can actually do it. So I start small. I find a small amount of time to take the first step, with no ambition to do more than a single step or two. If this goes well, I continue on if time permits. If I need to stop, at least I’ve made some progress, and going back to it later feels a bit better, since I had some small wins.
Where I Am Right Now
With the closet openings, I’ve gone through all of these steps, except getting back to it. I’ve been so busy with various other priorities, so the two outstanding frames are sitting there waiting for me. I am hoping to get back to it this weekend, and my plan is to cut the architrave and build up the inner wall studs for the angled closet. If I can do these two things, perhaps then the frame will be easier. (By the way, I did find a new supplier and ordered more of the MDF panels, so that has also helped me feel more optimistic.)
Let’s see how I get on. I’ll report back soon!
A final thought to anyone out there who can identify with this post and what I’ve been going through on the closet expansion project. Go easy on yourself! I am notoriously hard on myself, often expecting perfection when even a professional may not achieve perfection. This goes back to putting things in perspective and being grateful for all that I’ve accomplished already.
And remember, this is only wood, drywall, tile, or whatever your medium may be. It will all be okay!!!


Leave a Reply