
The sun has been shining in the UK, and you can see a spring in peoples’ steps. Bring on the outdoor fun, as we all get excited for warmer weather, blue skies and sun! To kick the season off, I am installing a privacy screen for the terrace.
As I shared at the beginning of the year, one of my planned projects for 2025 is to update the terrace.

Like our flat, our terrace is small. Only 2.5 x 3 metres. Just enough space for a comfortable sofa, a few small tables, a sun brollie and some plants. While it is small, it is more than adequate, and I am grateful to have the outdoor space.
When we first moved in to the flat, it was a bit hard to see the potential of the space.

We set about making some updates by adding some flooring from IKEA and installing a privacy screen for the terrace with some of the often-used bamboo rolls sold in the big box stores. When we later purchased the flat, we added a comfy L-shaped sofa and two benches, one which doubles as a small table.


After a few years and lots of use, as well as plenty of UK rain, the terrace needs a refresh. The flooring has begun to fall apart. And the bamboo screens, which were never my favourite, have seen better days. We especially need a good option for a privacy screen for the terrace.

Join me as I refresh the terrace over the next few weeks. Today, we are starting with a new and improved privacy screen for the terrace. This will replace the faded and falling apart bamboo screens.
For my inspiration, I want to re-create the slatted walls in gardens all around my neighbourhood.

I set about to build my own slatted wall to serve as a privacy screen for the terrace, but with some important adjustments.
First up, the terrace is ours to use, but we are not allowed to build anything permanent onto it. That means anything I do must be self-supporting and cannot include attaching anything to the concrete flooring. It also needs to be secure, so it doesn’t blow over in the wind and rain. And finally, it should not cost much, in case I do need to take it down at some point.
The Plan
Here is my plan for the privacy screen for the terrace. It will cover two of the three walls (the fourth being the building itself). I am planning something a little different for the third wall. I will share this in a separate post next week.
For the privacy screen, I will create vertical posts that are affixed to the metal railings, secure but easily removable. Then, I will attach horizontal slats to the verticals, with screws and nails to ensure a safe and secure fence.
After a bit of research, I decided to use roofing battens for the project. They are not terribly expensive, and they are the perfect size, at 25 x 50 mm. They come in multiple lengths, but I went with the longest ones, to be cut down for my project.
I ordered them from Fulham Timber, and they came within days of ordering. Super easy! The battens are treated to resist rot and insects. I also plan to stain and seal them to help protect them.
When they arrived, they were a bit longer than I realised. Getting them up to our top-floor flat was rather funny, as we needed to carry them up the fire escape; they were too long for the interior stairwell.

My neighbour took pictures of us getting them up to the top floor. We look like we are having fun, but I will admit to really questioning my sanity at this point. To be honest, both my husband and I were thinking I might have taken on a bit too much for a terrace that we do not even have the right to build into.
But once the battens were upstairs and I got started, we both began to see what a good idea this project was.
Let me share with you how I created this fantastic privacy screen for the terrace, in case you want to do the same for your own outdoor space.
The Tools Needed
- Roofing battens
- Nails (I used my nail gun with 40mm nails)
- Screws: 40mm and 25mm screws, both for outdoor use
- Saddle clips for securing to the existing railing (I used 28mm; choose the right size for you if this is how you will affix your posts)
- Drill
- Mitre saw
- Spirit level
- Spare wood to use as a spacer
- Screw driver
How to Build a Privacy Screen
Prepare the Area
First up, prepare the area to be screened. In my case, this meant clearing out the old bamboo screens and the old flooring.
We took the opportunity to replace the flooring with new IKEA outdoor tiles, in a mix of acacia wood tiles and faux grass. This is what we had before, but we changed the layout. There is now a row of grass at the door to the house, for wiping your shoes before entering.

I really like these tiles. They are good value for money, especially for a small space. The previous tiles lasted seven years, although the last year probably should not count as they were in terrible shape. I did nothing to care for them, otherwise, they might have lasted longer. This time, I am planning on cleaning and re-staining the wooden ones each season to see how long they will last.
My only complaint is how hard it is to connect them to one another. They have a plastic layer underneath that locks together, but it is really tricky to get them attached. Especially connecting two different formats with the wood and the faux grass. We discovered that using a rubber mallet made the job much easier. But even with this, I still found them a bit tricky. And normally, I love assembling IKEA furniture!!! 🙂 (Shhhhh, don’t tell anyone!)
Cut the Roofing Battens to Size
The next step is to prepare the battens for installation. I spent one evening after work cutting all the battens to size, so I could tackle the install all in one go.

I made up my drawings and cut list, based on 50mm battens with 5mm spacing between each one.
To determine your cut list, measure the height you want the privacy screen to be. We went for 1200mm high on the left side and two-thirds of the back wall. For the right side and one-third of the back wall, we went for 1800mm high. This gives us a bit more privacy from a window into the main hallway of the building.
Based on the height and the sizing of the battens combined with the spacing between battens, I needed 24 battens for the left and back wall, and 36 battens for the right and back wall.
However, I also decided to cut the length of each batten in half, so I had a seam on each wall. I did this to use as much of each length of batten as I could and limit waste. Also, I wanted to ensure the walls were not too heavy, since I cannot permanently affix the walls in place. I am not sure this makes them less heavy, but certainly, if they were to blow over, the break-apart at the seam might limit any damage.

So, I doubled the number of battens for each wall, but at half the length of the wall. I did keep a single longer batten for the bottom of each wall. This creates a sort of foundation and provides extra stability.
Also, don’t forget to account for the vertical posts. In my case, I had 4 verticals for each side wall and five for the back wall, due to the two different heights.
And finally, pro tip: Make sure you label all the pieces of wood, to make install of the privacy screen for the terrace just a bit easier.
Install the Verticals
The first step of the install begins with the verticals. Because I could not install these permanently, I needed to affix them to the railings around the terrace in a secure way that could also be easily removed. If you can install permanently, use concrete, and consider proper fence posts if space allows.
I found some saddle clips, which are designed to hold piping in place for plumbing projects. These clips are half-rounds with screws on either side. They can encircle the pipe and affix it to a wall. They were perfect for the same purpose but with my vertical boards and the terrace railings. I ordered two per vertical batten from Screwfix.

Starting on the left side of the terrace, I installed four verticals, one at either end and two in the centre of the wall. It was a bit tricky because I had to do it from the terrace side, slipping hands and tools through the railings without dropping them! Two floors below is another terrace, so I could not access the other side of the railings any other way.

I then did the same for the back wall. But here, I had three verticals at 1200mm high, and two verticals at 1800mm high, for the higher privacy screen. Importantly, the terrace floor is not perfectly level and square, with some raised bits around the railing posts and where the concrete meets the house. So the verticals were not exactly at an even height once installed, but no matter, this will be solved later. The important thing will be for the horizontals to be perfectly level.
The verticals on the back and right wall were much easier to install, because I could walk on the large fire escape to install them. The right wall went in super easy, with another four verticals spaced at the ends and in the centre of the wall.

The saddle clips were installed on the back side, with the battens in front if the railing on our side of the terrace. I probably could have gone with slightly smaller saddle clips, but I wanted to ensure they would go around the railings completely.
Installing the Horizontals
With all the vertical posts installed, now the privacy screen for the terrace will really start to take shape, with the installation of the horizontal battens. This is precise work, but made quick with the use of a spacer to get the sizing right between each batten.
To begin, I installed a long batten the length of the left wall at the bottom near the floor. I left a bit of space between the floor and batten, so the wood doesn’t rest on the flooring or allow water to pool alongside it.
For this batten, which helps create a bit of the frame, I screwed it into the verticals using 40mm deck screws, so they go through both the horizontal and vertical battens and hold securely in place. This helps further secure the entire wall in place.
I then used a piece of 9mm MDF that I had laying around as a spacer between the horizontal battens. First, I laid it on top of the bottom batten, then laid one of the battens on top of the spacer. Next, I nailed the batten into one of the verticals using my nail gun. Finally, I moved the spacer down to the other end of the batten, checked it was level, and then nailed the other end to the other vertical.
So quite a methodical process: batten, spacer, nail, level, nail. Repeat to the top of the wall.
At this stage, I used just one nail per end, so I could check the spacing and overall look. I would go back later once I was happy with the spacing and use more nails.
I went about halfway up the left side, with the first column of battens, then checked the look.
It was a bit dense, providing lots of privacy but not much light. I was a bit worried we would end up feeling like we were sitting in a wooden cell once I completed all three sides. Not quite the feel we were going for!

This is an important step, to get the space between the battens just right. While this 9mm spacing is quite similar to my inspiration fence, it feels a bit too tight for such a small space like we have. We decided to go a bit wider, with 20mm between each batten.
So I pulled out the horizontal battens (easily done with just one nail in each end!), and used an 18mm board as a spacer.
The left wall went up quite quickly, once I got the spacing right and got into a groove with the install.
Batten, spacer, nail, level, nail. Repeat.
Because of the increased spacing, I needed fewer battens per wall, but this will be helpful later when I get to the third wall. More to come on that.
The back wall took just a tiny bit longer, as one-third of the wall went higher, as we need a bit more privacy here.

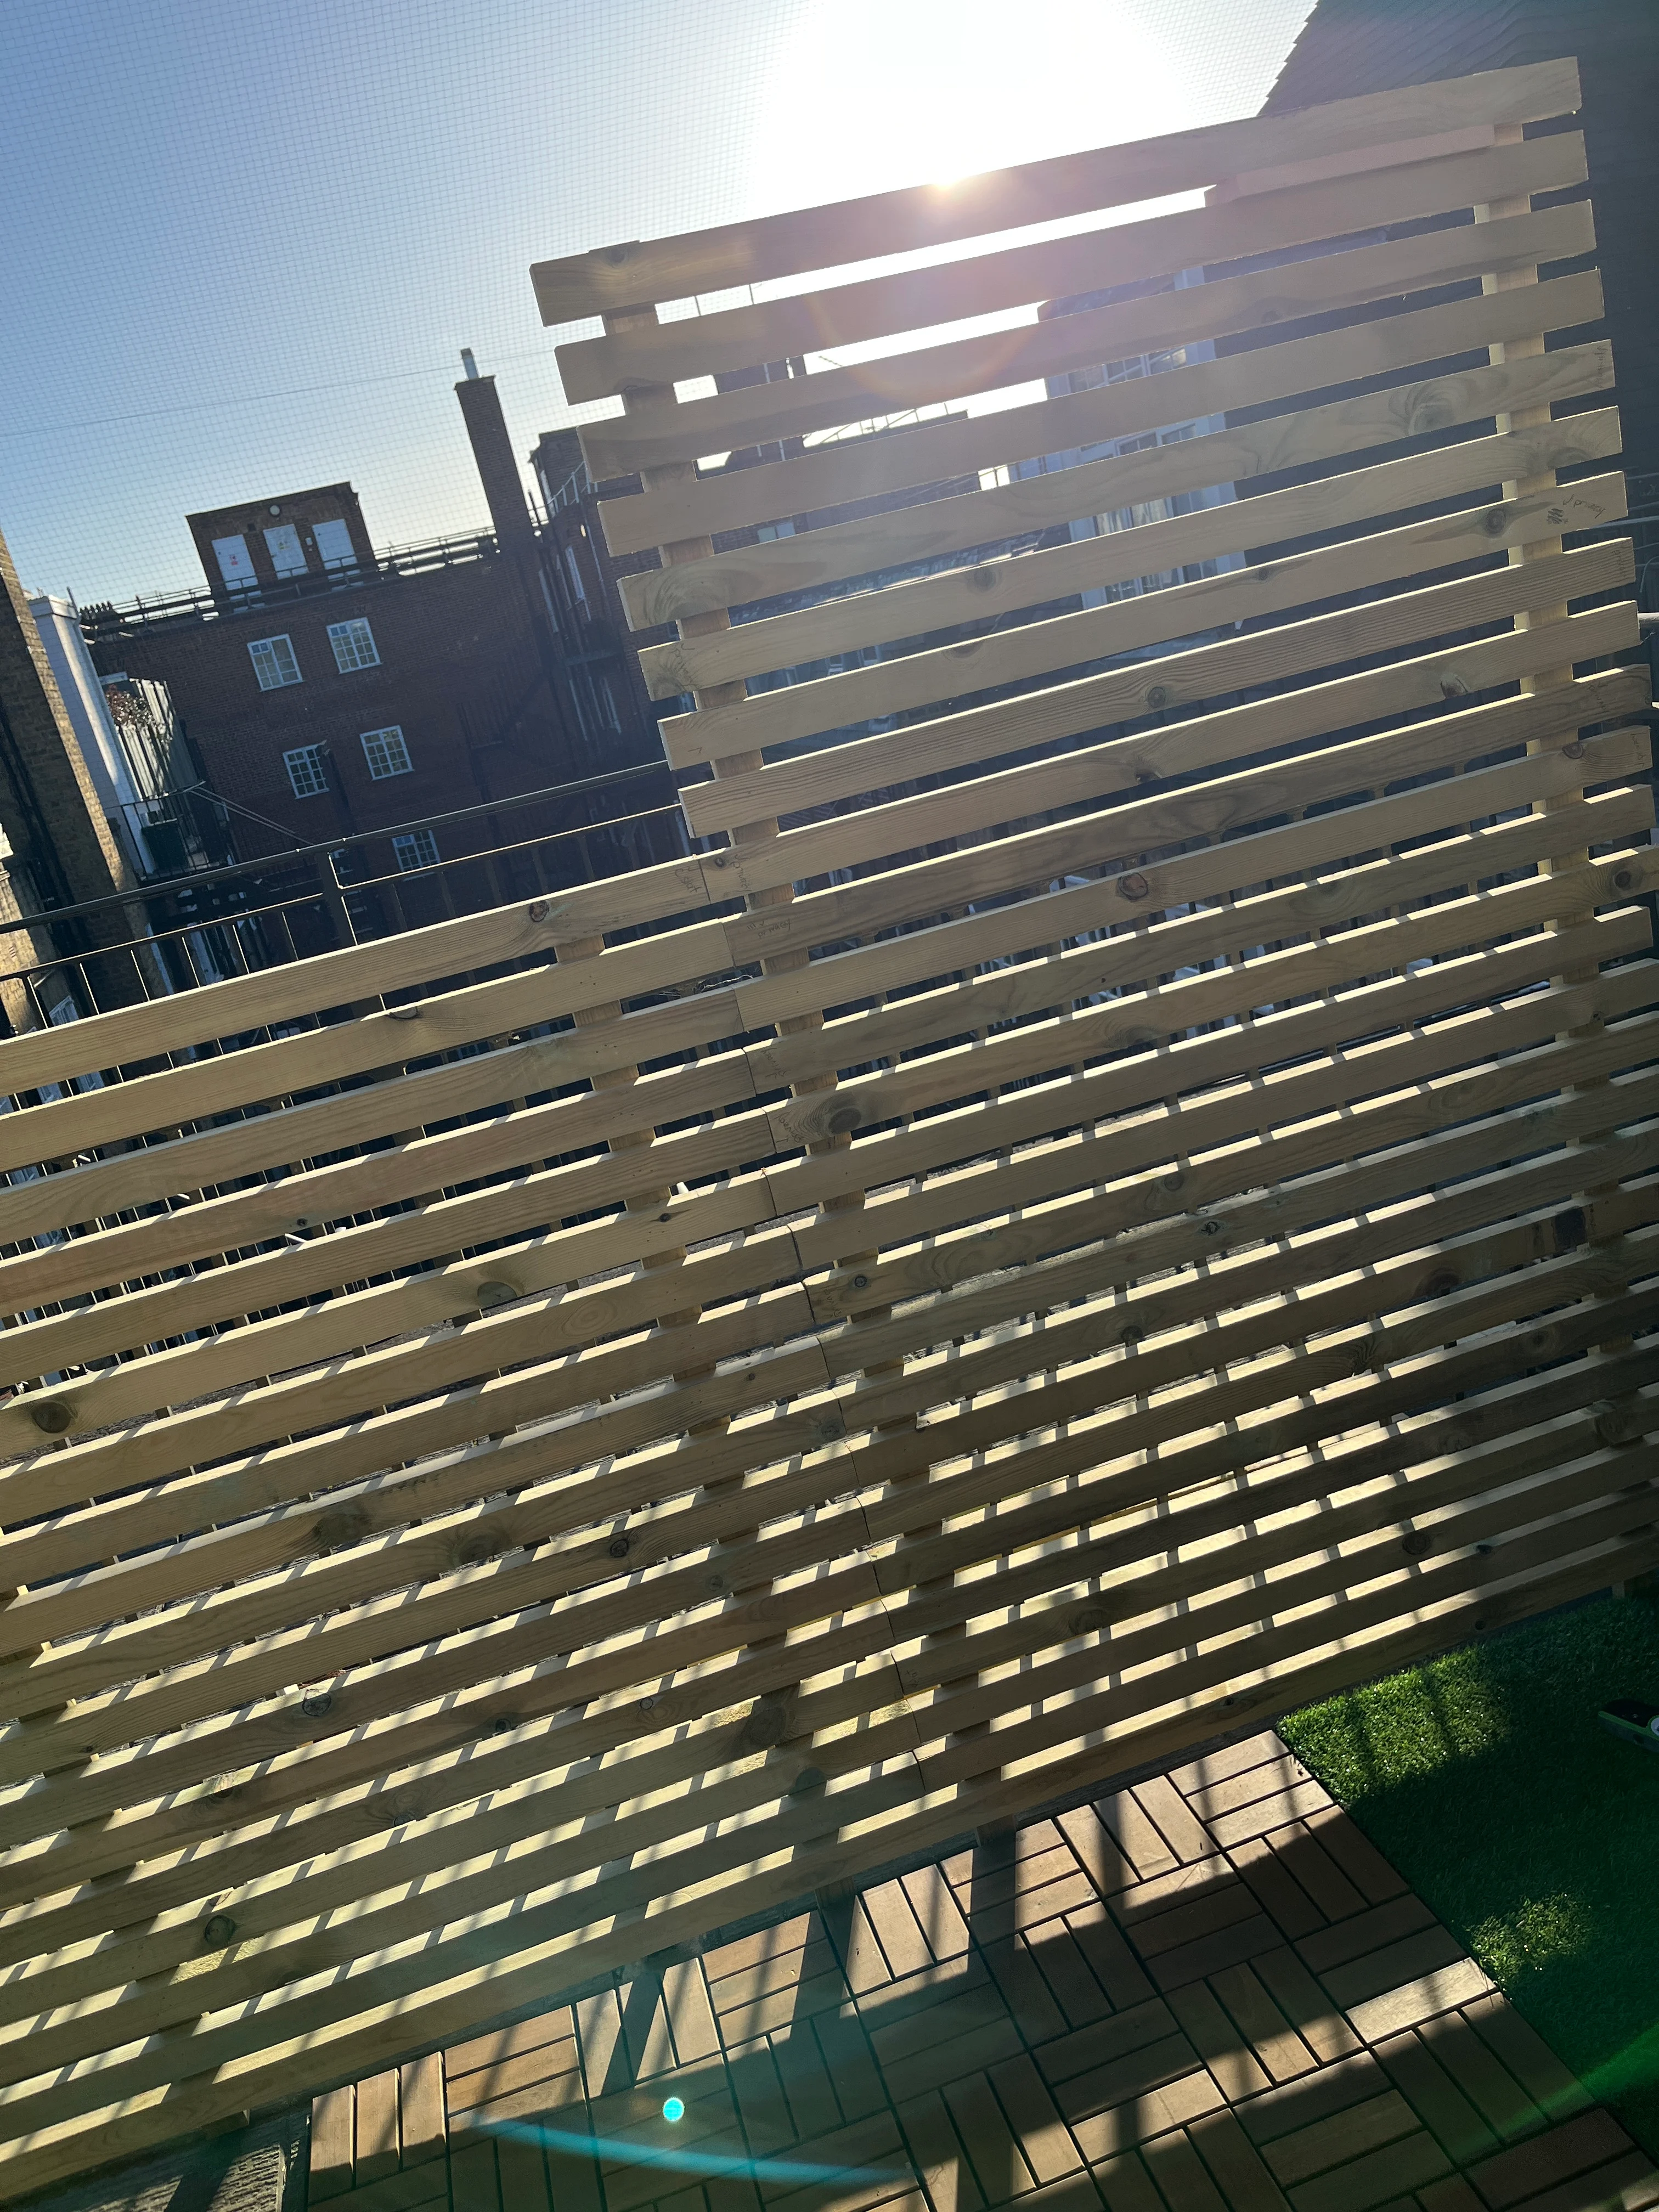
With these two walls up, you can really start to see what an impact this new privacy screen for the terrace will deliver. So much better than the bamboo attached with plastic ties.
Up Next: The Third Wall and Finishing
This is already a long post, and I ran into a few challenges on the third wall, so I will come back next week with the rest of the story on the new privacy screens for the terrace. I need to complete the surprise third wall and finish all the things that take a project from good to great. Sanding, wood filler, finishing trim, etc.
Stay tuned for the conclusion next week, and in the meantime, I’m off to enjoy the semi-privacy and the full sun of our work-in-progress terrace!
Happy DIY-ing!


Leave a Reply