Following my success cutting into the walls to expand my closets, this week I am removing the metal studs.
As I tackle this project, I am learning a lot. I’ve never framed a door or closet before, and I probably took on a bigger task than I realised. In fact, I think there might have been a better, albeit far more invasive, approach. The professionals might have taken down all the drywall and reframed the wall and opening before adding new drywall. But, I’m too far in now to change the approach. I will find a way to make it work, even it is not how the professionals might do it!
Oh well! That seems to be how I DIY … I don’t know my limitations until it is too late, and I always start with the most difficult version of a project. At least I am consistent with my personal brand with this project!
Last week, I shared about how I cut into the drywall to make the openings for the new closets. I cut the outer wall of all four closets and the inner wall of one of the closets. But the inner wall was quite imprecise, so I wanted to find a better way before tackling the other three.


This week, I’ve focused on removing the metal studs running through the openings, cutting the inner drywall and preparing for frame installation by hanging the architrave temporarily, to help ensure precision with the cuts and frame.
It has been slow going, with lots of changes in direction, but I think I have found my way. At least for now!
Removing the Metal Studs
This is the step that I have been most worried about. I have no idea how to work with metal studs, and there are not a lot of tutorials out there. But, I’ve learned a lot this week!
First and very importantly, I ensured the studs were not load bearing. I knew they were not because most did not even reach the horizontal stud above. None of them had any weight on them from the top. They were clearly put in to hold up the drywall.
I considered unscrewing the studs from the other studs they were attached to. Maybe this would be the best way, but the screws were covered over by drywall. I did not want to cut away more drywall than was necessary, as this would require significant patching. (Again, this might be where a professional would remove a huge portion of the wall and reconfigure the studs. But that is beyond what I am prepared or able to do myself.)
Plan A: Hacksaw
For my first attempt to remove the studs, I took a hacksaw to the base, near the drywall opening. This did not really work because I could not get to the stud at the right angle. I considered using the multi-tool with a metal cutting blade, but I worry about the sparks created near a closet full of clothes.
Plan B: Metal Snips
Instead, I decided to try tin snips, purchased especially for this project. The snips worked great, although cutting precisely with the drywall still covering part of the stud was not easy and certainly not neat. I managed to cut the stud cut at the bottom, fairly level with the drywall that remained.
I did the same at the top, and finally, the stud was out, and the full opening revealed.
Yay! One closet down, 3 to go!
Continuing the Same Process Removing the Metal Studs in Different Configurations
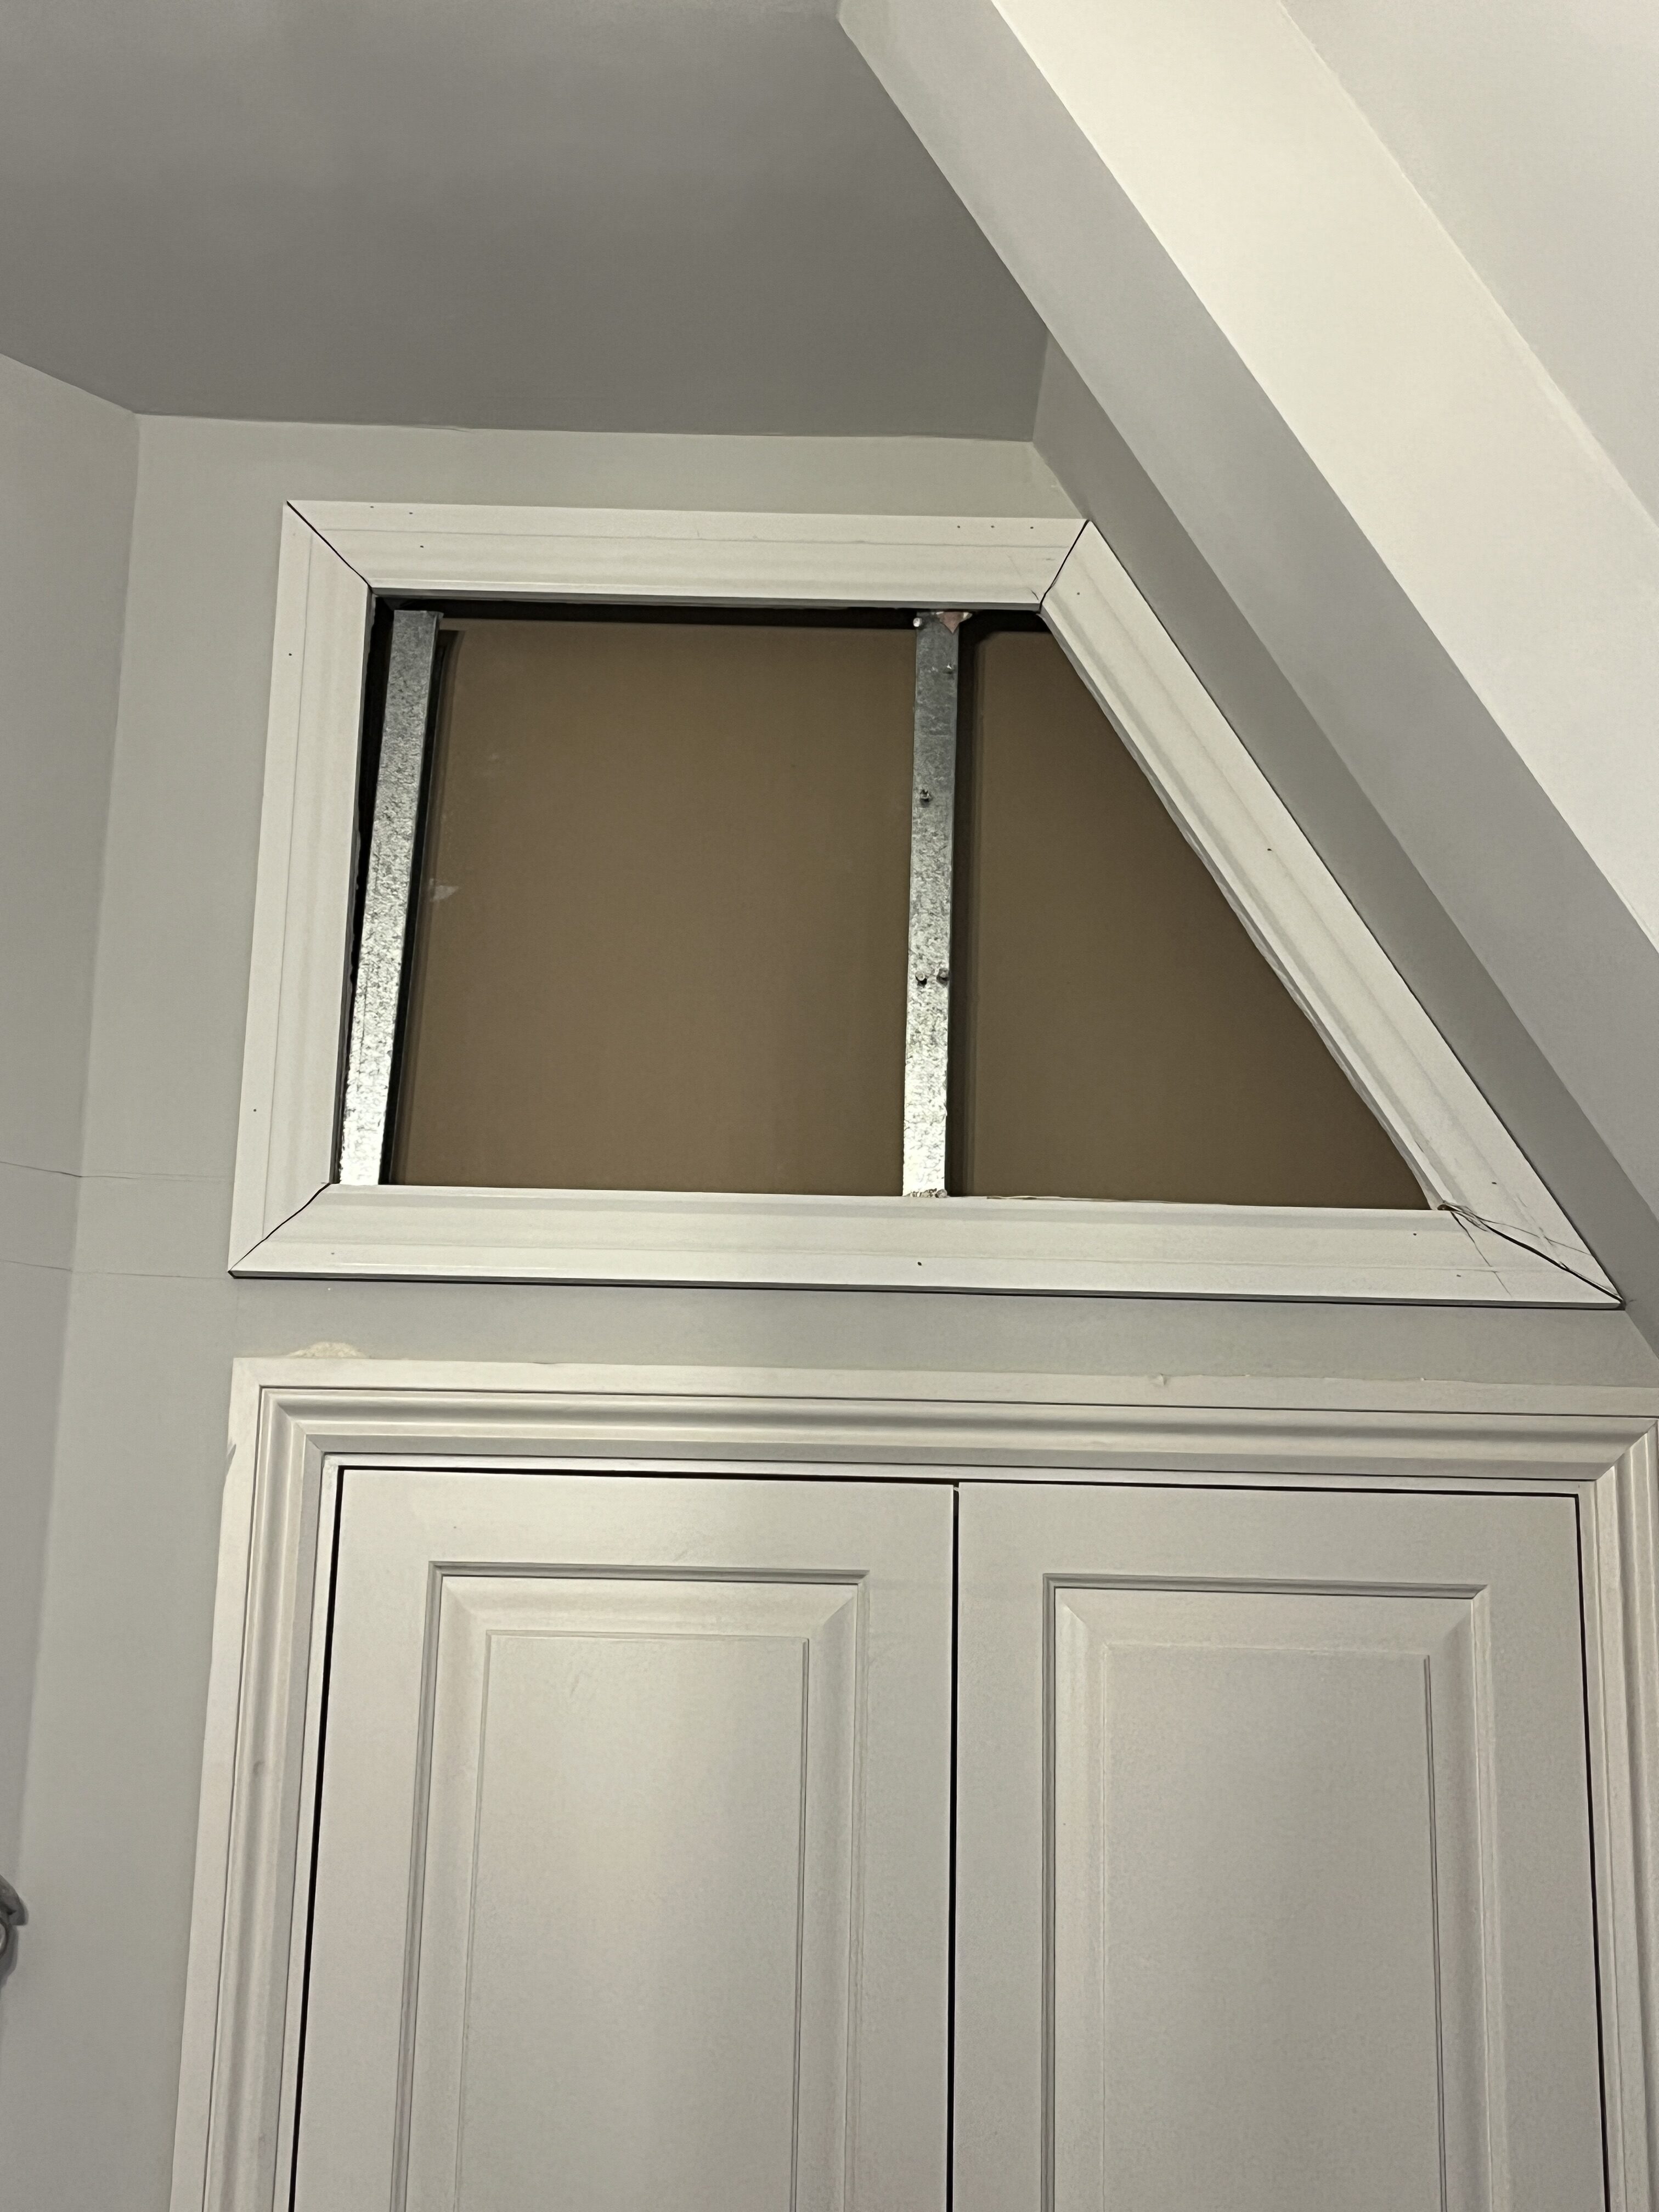
Every closet is different and the metal studs are in different places. I left the metal studs along the edges of the opening, to give necessary support for the frame. I removed any studs that interfere with the opening.
In one case, the stud was quite short and was screwed into another stud, running along one side. I could access the screw heads, so I removed them and it came right out, with no cutting required. But I needed to cut out most of the metal studs, leaving some sharp edges. I worked to ensure all cuts were below the drywall edge, so they would not interfere with the frame.

in most cases, once I cut part of the stud, I could use pliers to grasp the metal and bend it back and forth, until it broke off. The metal is surprisingly thin and cuts rather easily, so I do wonder how metal studs can be strong enough for the work they must do in holding up a house. Clearly, I need to get smarter about this approach to building since I will face metal studs in all my DIY projects in my flat.

Generally, once I had figured out the approach, it was quite easy to remove the studs. But one set of studs was causing me some worry. You may have noticed in the first opening, I was not able to follow along my outline at the top, because I hit a horizontal stud about 10mm below the line, running across the planned opening. At first, I assumed it must be necessary, so I started thinking about adjustments to align with the other closets.
However, when the electrician came to remove the closet light wiring, he cut a hole along the upper line for the wires. I could see that the space was open, so I decided to cut in above the stud.
Using the opening the electrician had made, I started cutting the drywall along my original line, using the jab saw. Once I had cut the full line and pulled the drywall away from the stud, I uncovered the entire stud running horizontally across the opening. In fact, there were two studs, one on top of the other.

As with the other studs, I could see that these were not load-bearing studs. They ran the length between two vertical studs, but they did not run beyond these two studs and there were no other studs attached to them. They appeared to be there for holding the drywall, although none of the other closets had the same horizontal stud.
I cut the bottom stud in the middle, using the snips, and then worked on each half. To start, I pried the lower one away from the upper one (they were stuck together, but not screwed together). I could see where the stud was screwed into the vertical stud behind the drywall with the screw head just barely inaccessible. Next, I cut away the drywall on the outer wall, until I could reach the screw head, and I unscrewed it. Then I pried the stud away from the drywall. It slowly began wiggling, until finally, I could pull it out.

I did the same on the other side, and then again with the upper stud. Finally, I had made the opening the size originally planned, with just a bit of damage to the drywall but which would be covered by the architrave.

Let me tell you, I was feeling quite invincible after removing all the metal studs, especially the horizontal ones. This was hugely satisfying, given that before a few weeks ago, I had never cut into drywall, much less removed studs. And metal ones at that!
Cutting the Inner Drywall
With each stud removal, I also cut out the back or inner drywall. I never found a very good way to improve my precision here. I tried drawing out lines, but the wall was hard to reach and the base of the stud was often in the way. One option would be to clear out the closet below, remove the existing shelf and cut the wall from inside the closet. But again, I am doing this in the evenings and weekends, and clearing out these closets that are jam-packed would leave even more clutter that just would not be worth it to our daily lives.
Instead, I did my best to keep the jab saw level with the front cut, which was fairly precise given the outlines I had drawn. I know I’ll have to do some work to even things out when we get ready to frame, but overall, the cuts are not too bad. Again, the jab saw is more precise than the multi-tool.
Any tips here, give me a shout, I would love to hear!
Adding the Architrave … Temporarily
Before I build and install the frame, I had one more idea to try: adding the architrave, temporarily. Given the precision needed so all the closets matched each other in width and height, I thought this would be a great way of checking things before I got too far in.
My theory here is that having a clear outline of the hole where the frame needs to sit could help ensure everything lines up. It also helps ensure more precise measuring, since the drywall edges are a bit jagged. The archnitrave creates a definite and clear boundary to work with.
I tried my theory out on one closet, the easiest one, with a square opening. Having removed the metal stud, I cut the architrave with mitred corners and installed it, using just a few nails along the length of each piece. I then used masking tape to further secure the architrave to the wall and opening. I learned this tip from my tiling course, as a way to help hold the tile to the wall around an opening where the tile has nothing to sit on while the adhesive dries. This worked a treat, because the few nails were not enough by themselves to hold the architrave in place.

With the architrave added, I could see a few high areas in the drywall that needed to be evened out before installing the frame. And, I could get a sense of the finished look and how everything would match up. I made some adjustments, shaving down parts of the drywall edge until it was even and ready for the frame.
I added the rest of the architrave on the other three openings. Which meant needing to cut the angles again for the two slanted openings! UGH!
For these, I first cut the bottom piece to butt up against the wall at an angle and then have the side slanted piece butt up against the bottom piece. Angles, but not mitred angles, so a bit easier.
But this looked awful! Very amateur and clearly not the way to hang architrave. So I ripped it out and did it properly, with mitred angles along the angled wall. It looked so bad that I forgot to get a picture in my rush to remove it. Honestly, I’m glad not to have any photographic evidence of this one!

The challenge here, beyond figuring out the angles, is that I need a jig to help cut angles greater than 50 degrees on the mitre saw. I’ve seen a number of videos on how to build one, and I just need to do it. But until then, I am using the hand saw or jig saw for these cuts which is not the most precise. But it works.
I’ll do a post in the future on cutting unique angles. I’ve found a few different ways, all of which work to varying degrees but which also have certain drawbacks. Let me know if that would be of interest to you, dear readers. I seem to face a lot of angles in my DIY projects!


Once I measured, cut and hung the angled architrave, I adjusted the openings as needed, shaving off the drywall and making everything level and even. This step helped me have confidence that the new openings matched the existing closets and each other, and that everything would work together.

Fortunately, everything does work together! While I still have a long way to go with this project, it is looking good. I am feeling like this difficult project just might have a good outcome. Let’s remember, before a few weeks ago, I had no idea what was required for removing the metal studs. Now, I have some real experience under my tool belt!
Of course, there is still the framing, installing shelves and building custom doors, so let’s not get too excited just yet. I still have a lot to do and plenty of mistakes ahead of me, I am sure!
This has been a long post, so let’s stop there for now, with cutting both the inner and outer walls, removing the metal studs and adding temporary architrave installed on all four openings. Next week: building and installing the frames.
Join me, won’t you, to see how it goes! Even if this is not a project that you would tackle, I hope it inspires you to try something you did not think you could do. Who knows how it might turn out?!


Leave a Reply