

And that’s a wrap! The project for refreshing the shelves in the lounge is complete. And the impact is everything I had hoped it would be!
What was supposed to be a quick little detour from more time-consuming and difficult projects has actually had many of its own challenges. I had hoped to spend only a few weeks refreshing the shelves in the lounge. But these things always seem to take on a life of their own. And this one was no exception.

I began by adding in some much needed organisation of the hidden storage in the base cabinets. Then I moved on to the addition of accent lighting, which was so much harder than expected. This week, I finally finished refreshing the shelves by adding new trim, coving, and a fresh coat of paint.


Where We Began
I was already so proud of these shelves, which were one of my first big DIY projects. These shelves helped me to realise that anything is possible if I am willing to try. I am still so proud of this significant effort.

But with some additional skills under my tool belt, I knew refreshing the shelves could make them even better. And I was right.
If you are just joining me, you can read more about the original shelves. If you want to see the entire build, see parts 1, 2, 3, 4 and 5. The inspiration post is here.
Today, I want to wrap up this project by sharing how I updated the shelves with new trim, coving, and a different paint finish.
Updating the Trim
First up in this final step of refreshing the shelves, I changed out the trim for something more substantial. While I really liked the simplicity of the original trim, my husband felt it was a little too plain. He had not offered any clear opinions into what he was looking for in the original design, beyond the inspiration shelves we had in our Paris flat a few years ago.

With the new and improved shelves, I chose a slightly wider trim piece for the vertical and horizontal pieces. Previously, the horizontal pieces were quite a bit more narrow than the verticals. Both of the new pieces are a bit thicker as well, to help give the shelves a little more presence.
I also decided to use MDF for the trim, as it is lighter in weight, perfectly straight, and already primed. Previously, I had purchased a mix of thin wood strips and thicker boards for the edges of the shelves.
Using MDF will result in perfectly straight trim that is light and easy to afix to the shelves. I will use nails only and avoid glue, in case I need to adjust the lighting connections tucked into the cavities behind the trim.
Choosing Trim
While I did not want anything too ornate, I did want some trim with a bit of additional ooomph. I ordered both the trim and coving pieces from Skirting Boards Direct, which offers a great selection of trims, made to order.
In the end, I decided to go with a simple profile with rounded edges and a flat panel down the centre.

I liked that I could choose different widths for the horizontal and vertical pieces. I also liked the simple raised bit in the middle of the strip, and the sizing works perfectly. For the verticals, I chose 60mm width, to cover the space between each shelf (where the lights are hidden). The thinner 40mm profile is perfect for the verticals.
For the coving, I chose a simple but elegant version to top the shelves.

While I like the overall product and the selection available from SkirtingBoardsDirect, it took over two weeks to receive the pieces. And there was no communication at all beyond one email when I placed the order and one email when it shipped. I realise I’m probably spoiled with overnight delivery and very specific and frequent updates, but I do think a little more communication would have helped my experience. But otherwise, I am really happy with the product quality and importantly, the selection of profiles is unbeatable. I am sure I will be ordering again for future projects.
Installation
The install of the trim was quite simple. I had actually planned to assemble the trim as a one-piece frame and then add it to the front, but there were two problems with this:
- I want to be able to remove the vertical trim pieces dividing the shelves to access the cavities in case of issues with the lights. If I attach the verticals to the horizontals in a pre-made frame, this will not be possible without removing the entire frame.
- I live in a small flat and there was absolutely no where that I could feasibly build the frame on the ground before installation.
So, I installed the trim just as I did previously, each piece attached directly to the shelves. I did not use glue as noted previously, but my trusty nail gun was a perfect tool for the job.
With one exception. Because the shelves are made of 18mm plywood, there is not a huge surface area for afixing the horizontal trim pieces. I kept coming through the shelf base with the nails and having to remove them and start over. This must have happened about eight times! I finally realised that I was not always holding the nail gun straight, so the nails were protruding out the top of the shelf.
It was easy enough to pull the nails out and re-do the trim, but it was frustrating. I blame it on how heavy and big the nail gun is. It is really not easy for my small hands to hold the nail gun securely and ensure my aim is perfect. And I rarely have a free hand, since my other hand is holding the piece to be nailed in place! While perching on the ladder!
I still love the nail gun and think it is so much better than hammer and nails, but I am looking forward to the day when they make a nail gun designed for the significant portion of female DIYers who tend to have smaller hands!
Coving
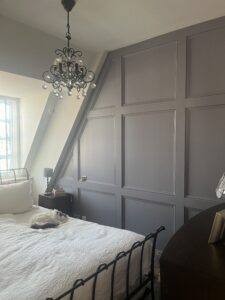
My original shelves were quite plain across the top too, with a simple straight board as the coving. I liked the simplicity, but I do love the detail that coving adds. We cannot really add coving to most of our rooms due to all the angled ceilings (if anyone knows how this can be done, let me know!). But here, we were able to add coving, with an angled edge under the sloping ceiling. It looks great and adds a nice finish in my efforts refreshing the shelves.

I do need to work on my measuring and cutting mitred corners, but easy enough for wood filler to help cover the slight imperfections.
Caulk, Wood Filler and Paint for the Win
The final step in refreshing the shelves is the all-important finishing. Wood filler for the nail holes and gaps, caulk for all the seams, and a fresh cost of paint. As noted in my post on adding lighting, I had already painted the insides of the shelves themselves, before installing the lighting strips. So all that was left was to paint the new trim and the base cabinets.
I don’t want to minimize this step of finishing. It is critical for a truly professional finish. And it takes time. Especially caulking. Messy, time-consuming, and easy to mess up! But so important.
I could not finish all the caulking in one night, so I took some photos in mid-process. The left side has been caulked at the seams, while the right has not. Even without paint, the caulk already elevates the shelves and makes them look so much more finished. And it covers any mistakes too!

For paint, I used the same colour, F&B’s Wevet, a creamy white that I am using on the trim throughout the house, but in a shinier finish. This gives it a bit more presence, along with the more substantial trim and the lights. And it helps reflect more light, which is always good in a small space.

I did two coats of paint, to ensure good coverage across the shelves, and I did a very light sanding with 240-grit between coats to ensure a smooth finish.
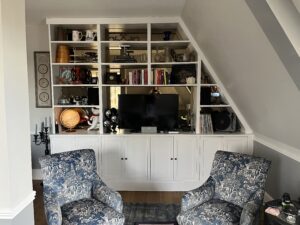
The Final Reveal
And here they are, the new and improved shelves in all their glory.


I am so pleased with the end result. They were good before, now they are really special.
The lighting really adds impact, and I love how it reflects off the mirrors as well as the many glass decorations. It is soft and cozy, but also impactful. I’m still not sure if it was worth it, but now that it is done, I do really love it!
We did decide that putting a small strip in front of the lighting strips on the bottom might be good to help diffuse the light a bit, as it is highly visible, unlike the other shelves. I’ve added that to the list for another day.
(Note: I had hoped to share a few images of the final shelves with trim and the lighting, but today, one of the strips came unpaired from the remote control, so I cannot change the light intensity. I am in touch with the company to try and get this storted. Stay tuned for photos to come once this is sorted. #alwayssomething)
The trim is also really nice, bringing a bit more presence to the shelves. I would love to find a way to add a small piece like in the shelves below at the bottom of each vertical. Is this a corbel? I am not sure. But I like the added touch. I have not really found anything that can work, but I will keep looking.

But even without this additional decorative detail, the new trim with the raised panel, as well as the addition of coving, brings a lovely finish to the shelves. And with the glossier paint, the shelves bring a whole new feel to the room.

Well, that’s a wrap. I undertook this project of refreshing the shelves as a quick detour from the closet framing, and it was a great escape for a short time. The lights proved more difficult than I hoped, and as always, it took longer than I planned! But we got there in the end.
Back to the closets now. I am going to finish the final closet, where I’ve struggled with the frame. And then, it is time to build doors for all four closets, as well as for the appliance garage in the kitchen. I need to get my router game up, so I am watching lots of videos and reading lots of tutorials. I’ll be back soon on this and several other updates going on around here!
Happy DIY-ing!


Leave a Reply