
Anyone who spends any time on Instagram these days will come across hundreds of posts about paneling. I am not sure what is driving the craze and I hate to be a cliche, but I want to share the results of my latest DIY. You guessed it: a feature wall of recessed paneling in our master bedroom.

I’ve always loved the look of wall paneling. It has such a luxurious, high-end look.
It never occurred to me that I could actually create this look myself,. And then I came across several posts from one of my favourite blogs, Jenna Sue Design. She has several different types of paneling, and her recessed, or fancy, paneling is my favourite.
Never one to start small and simple, I decided to tackle this version for my first attempt.
The Starting Point
One of the first things I did when we purchased the flat was to paint one bedroom wall a beautiful aubergine colour. This is Farrow & Ball’s Brassica, and I painted the other walls and ceilings F&B’s Ammonite, a silvery grey colour.

I love purple, and being able to use it in my home makes me so happy. A feature wall is just enough, but not too much, of what can be a rather bold colour.
It looks great, but I wanted something a bit more special, and it seemed the perfect blank canvas for paneling.
I considered doing a partial wall of paneling, with a slim shelf across the top, but I could not figure out a way to maximize the purple colour. Typically, the paneling is one colour and the wall above the shelf a different colour. Honestly, this was just not enough purple for me.
Making a Paneling Plan
After many measurements and looking at various examples on the interwebs, I decided on 10cm wide battens. I selected a thickness of 1.8cm. Most kits at B&Q and other stores have thin MDF panels of .9cm, half the depth I was looking for. I wanted something more substantial. This depth gives some nice dimension, and it will allow me to add the shoe molding inside each square, which makes it so-called “fancy” or recessed paneling.
The hardest part of the project might have been determining sizing and placement of the panels. I used tape to map out several options, including consistent sizing across the entire wall, or a larger square running horizontally across the middle with smaller squares at top and bottom.

I came across an excellent on-line calculator that helped ensure the maths are correct. This was a real life-saver, because it calculates the lengths and widths of the battens. And it offers the best placement according to the number of rows or columns you want to have.
Taping the squares out helped me to visualise much more than just drawing it out on paper. I played around with the sizing and finally arrived at 3 rows, making the top and bottom squares 2/3rd the size of the middle one, at 66cm and 99cm respectively. Four columns spanned the length of the wall, with two of the columns perfect squares before reaching the angled ceiling.

Pro-Tip: Take Your Time!
Learn from me: Take your time here. I originally drew out a plan with 4 rows and 5 columns. But once we taped it on the wall, we realised it would be too small. For this type of paneling, you really want to make an impact, so bigger is better, in my opinion. I also found the different sizing for the top and bottom rows to be a bit more elegant, which surprised me. I tend to like symmetry, but when I saw it taped out, it really looked better.

Ordering the Paneling Supplies
With my measurements decided, I was able to draw up my cut list. Again, Jenna Sue Designs to the rescue with a plan that ensured maximum use of all pieces and limited waste. I shamelessly copied this, for an efficient amount of wood.

I purchased 10 square shaker wall panels in primed MDF, with a width of 10cm and a depth of 1.8cm. For efficiency, I chose the longest panels they offered, at 305cm.
I purchased the battens from Building Materials Nationwide. It was surprisingly hard to find the panels pre-cut in the width and depth I wanted. None of my preferred vendors offered them. But Nationwide had exactly what I needed, and with delivery, it ended up being a great experience. I am sure to use them again.
I also chose a very nice trim for the inner boxes, which I picked up at B&Q. Here, I needed to see and feel the trim, to decide the best look. Sadly, I did not do a good job estimating the amounts, and I made a few cutting mistakes on the angled boxes. I ended up making 3 trips to B&Q to buy trim as I kept running out.
Pro-Tip: Learn from me
I chose a trim that has an outer edge and an inner edge. It is not symmetrical, so this meant I needed to be very intentional about my miter cuts. Each time I made a cut, I needed to ensure the outer edge, which went against the MDF panel, was positioned correctly in the miter saw. This resulted in a bit of waste, as a miter cut for one corner could not be turned and used for the other corners and needed to be re-cut. I really like the look of the trim I chose, so it was not an issue for me, but it is something to watch out for if you take on a similar project and are looking to keep costs low.

A Good Excuse for a New Tool!
I used this project as a good excuse to invest in a nail gun. I have wanted one for awhile, but it felt like a huge investment for limited need. Nail guns are not cheap! This was quite a splurge. But, I had my heart set on this project, and honestly, I could not see myself doing it without a nail gun.

I chose Ryobi, as the price was good and the reviews even better. Sadly, I do not own any other Ryobi products, so I also had to buy the battery. But I am really pleased with it and can highly recommend it. I’ll share more in a future post on the nail gun.
Paneling Installation
Outline the Room
I began by installing the top batten horizontally against the ceiling, then another down the right side. Next, a third batten down the angled left side.
Controversially, I did not remove the baseboard but left it as my bottom batten. I did not want it to look different from the rest of the room, and it worked well with our baseboard. (I included this in my calculations; remember to account for the baseboard if you keep it or if you remove it.)
Place the Verticals
Then, I placed the 3 vertical battens across the wall, spaced at 78.2cm between battens, as directed by my calculations.
Note the angled cut on the left, to account for the angled wall.

Caulk will cover the gaps where the walls are not perfectly straight.

Pro-tip: Counter Sinking Needs to Be Set Properly
I used glue and the nail gun, but please learn from my mistake: early on, the nails were not countersinking, and I realised I needed to increase the pressure of the gun quite significantly. Finally, I got this adjusted, but I had about 10-12 nails protruding from the wood.
My thought was to use a countersink to adjust them later, but this proved impossible. I think that because the nails have some glue on them to hold them together, they do not move once in the wood. I could not sink them or pull them out, so I ended up having to cut them off and sand them down. Time consuming and quite frustrating, so learn from me and ensure you have the right pressure to ensure the nails are sunk the first time.
Add the Horizontals
Once the verticals were in place, I began installing the horizontal pieces. The two columns on the right went quickly, and then I reached the dreaded angles. I spent a lot of time trying to figure out the maths, but finally, I started holding the pieces to the wall and just drawing the cuts, before aligning them on the miter saw. I really need to get better at angles, but how my maths have escaped me!

Adding Inner Trim (Optional)
Next up, the inner trim. This is what really sets this paneling apart. It looks great without the inner trim, but with it, it is next level. For these pieces, miter cuts were required at all joins, and again, the 45 degree angles for the squares were easily done. But there were quite a few really difficult angles that caused me a lot of effort and several wasted cuts. But I got there in the end, and even without paint, the effect looks amazing.


Finishing
Next up, all the necessary finishing to really make the wall look professional.
Sanding
First up, sanding. I had a few joins that were not flush with one another, so I started with 120 grit sandpaper and my orbital sander and worked all the joins to be smooth to the touch. The key is to run your finger over the seam and not feel it. This took awhile to get them smooth and even, but it is really worth it. I finished with 220-grit, to ensure a good smooth finish. This of course took some of the primer off the MDF, so I needed to re-prime these areas, but I also needed to prime the inner trim which was raw wood, so this was no problem.
Wood Filler and Patching
Next up, wood filler at the seams and in the nail holes. At this stage, I tackled the nails that had not countersunk. I used nail pullers to try and cut the proud head, and for some, I needed to sand them down. I sanded everything again, making sure all seams felt smooth.
Priming, Caulking and Painting
Then, I primed everything that was not already primed.
Finally, it was time to caulk. UGH! Caulk is so messy. I love how it finishes everything so nicely, but it was quite the job. I needed to caulk the inner square of each panel, then between the MDF battens and the inner trim, which was tricky to ensure a smooth finish. Also, I needed to caulk between the ceiling and battens and down the angled wall, which had a gap due to the uneven wall, so this took a few runs.

My caulk skills still need some work, and about halfway through, I learned a tip that would have made it all a lot neater, especially for the tricky bits between the MDF and inner trim. You can line the area to be caulked with painter’s tape on either side, leaving the bit to be caulked open. Run the caulking gun along this line, then smooth with your finger. Let it dry slightly, then pull away the tape. All the excess stays with the tape and leaves even edges.
I used this tip in a few of my messier places and it helped smooth everything out. In the end, I did have to redo a few areas using this approach, but next time, I will be using this method on the entire wall, even though taping will take awhile. I think it will be worth it and it certainly ensures a much better finish than I seem able to achieve!
And finally, ready to paint the lovely aubergine colour. The wall had already been painted, so the inside squares only needed one coat, but two coats for the MDF and inner trim, then some touch-ups of the grey paint on the ceiling and adjacent walls, and it is done.

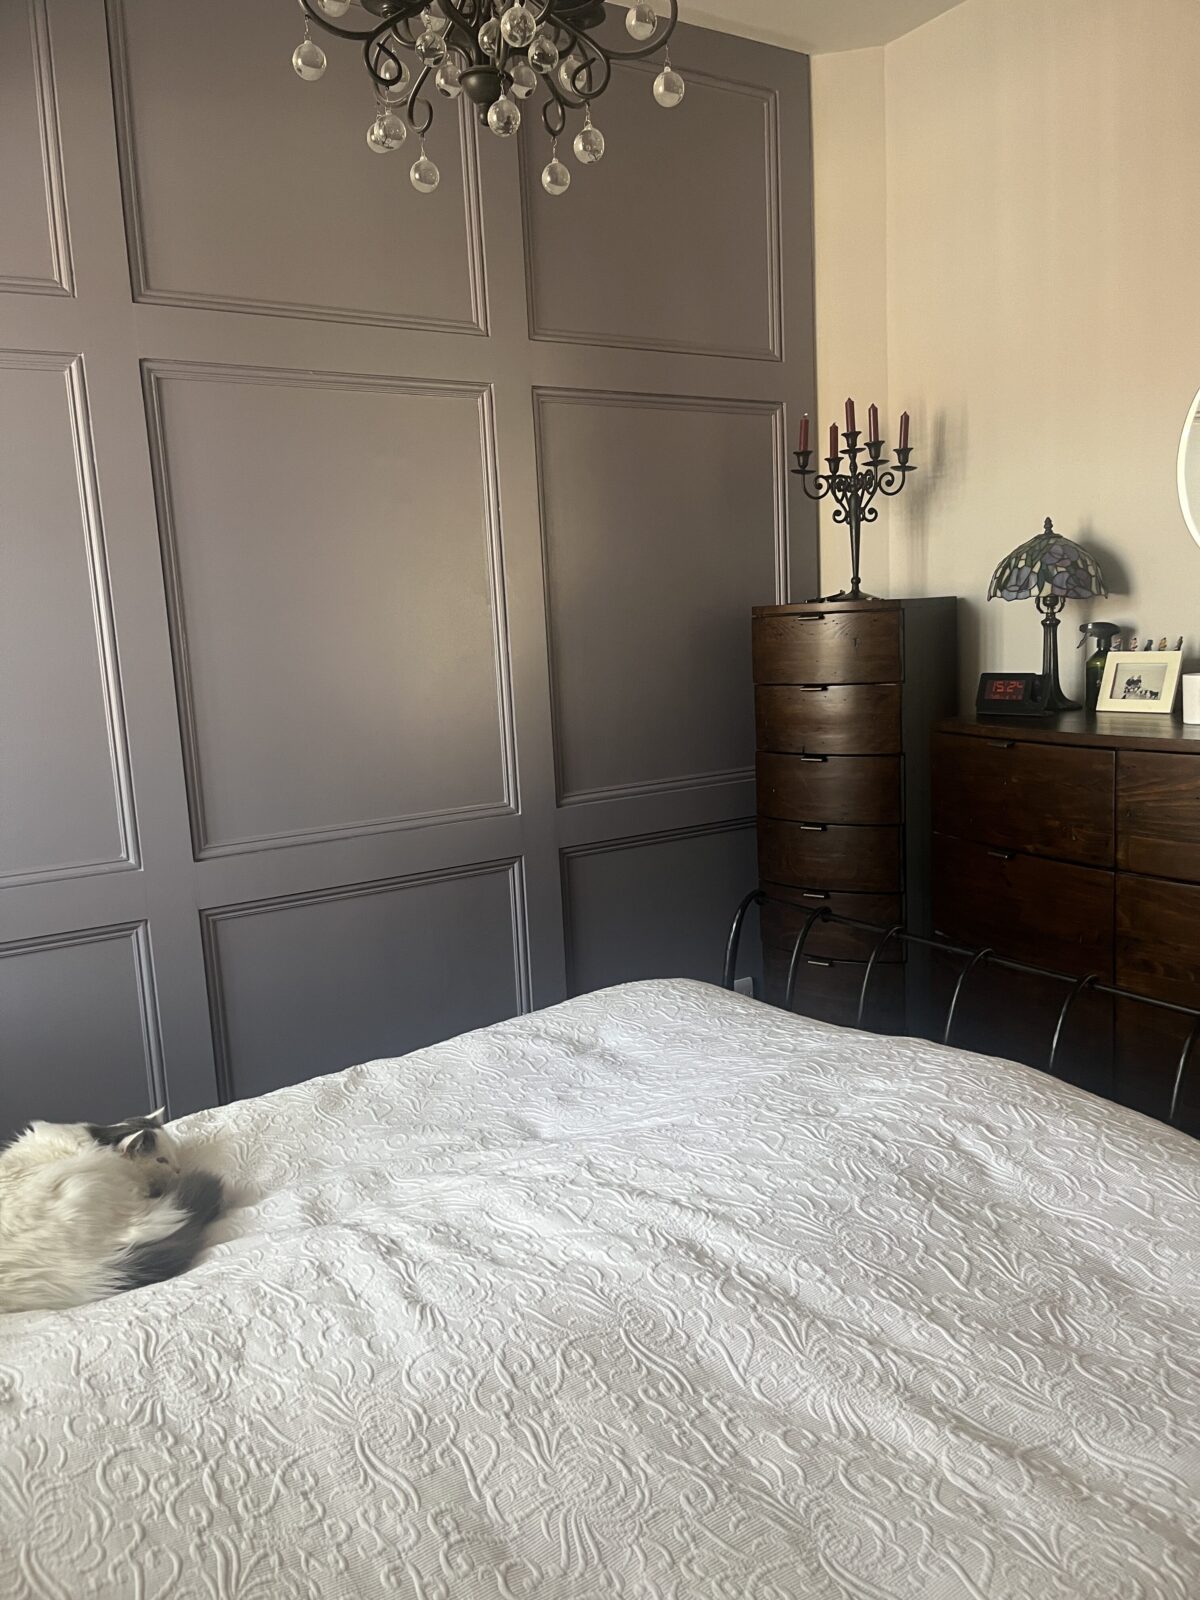
The Finished Result
I am so pleased. The wall looks amazing and it really takes the room to a new level. I will admit, this took me a long time. I thought I could complete it over a 3-day bank holiday weekend, but it ended up taking me about 4 weeks off and on to complete. Between work, travel, and a few setbacks, it was a longer-than-expected DIY. But, I really took my time, I needed to do a lot of sanding, and I have to get better at calculating and cutting angles. My miter saw blade also gave out mid-way through, which took a few days to replace.
But in the end, it is so worth it. I learned so much through the process and got a beautiful new feature wall from it too. I hope you can learn from my success and my mistakes; let me know if you’ve done something similar or if this inspires you to tackle paneling in your home.
Now, for a few more pictures of the finished room, including the rug I restored as well. What do you think?


Tell me, would you try such a project? Go ahead, do it. And share your results with me, I’d love to see.


Thank you for your post. I really enjoyed reading it, especially because it addressed my issue. It helped me a…