
Are your kitchen counters free and clear from clutter? Or do you have appliances everywhere? I hate all the clutter on our kitchen counters, and my dream is to add a DIY appliance garage.
Picture it: Water kettle, coffee machines, coffee grinder, stand mixer, sparkling water maker, air fryer, toaster, blender. All hidden away but easily accessible.
Our kitchen is nowhere big enough for so many appliances. But we use each and every one of them quite regularly, so they need a place.
Some of these devices are counter worthy, like the stand mixer, sparkling water machine and our coffee machines. Everything else, I would love to have hidden away in an appliance garage.

What do you think of having your own appliance garage?

This one is especially beautiful, from Chris loves Julia. I love the idea of mirrored subway tiles. How luxurious!
There are many types of appliance storage solutions all over the interwebs, with so much inspiration out there. Remember, I am doing a budget renovation that is temporary, until we are ready to do a full kitchen renovation. So no mirrored subway tiles right now.
A DIY appliance garage can offer a budget-friendly option than can help clear the clutter. For my version, I decided to build slide-out drawers where the tiny fridge and freezer used to live.

Using wood and supplies I already had on hand, I made 4 sliding shelves and 1 drawer. I needed to buy drawer slides, which were not cheap, but I can re-use these in the remodel when it happens. I chose these slides from Amazon; they came highly recommended and are very good quality, so far.

For the DIY appliance garage, I first built a side wall for the left side of the opening, where the fridge used to be. There was a partial wall but not enough for installing the full slider, so I cut down a piece of 18mm plywood and installed it using pocket holes.
Building 4 Sliding Shelves
I then measured the bottom shelf, a small distance above the toe kick, and installed slides on both sides. For the shelf, I made a small edge at the front with spare wood. Then I added the slide arm to the shelf on both sides, aligned to the front of the shelf. Clicking it in and testing the fit, the slide is quiet and smooth, and there is quite a satisfying click when you install the slide arm into the body.

I repeated this three more times, measuring the height of the appliances to store in the DIY appliance garage, to ensure a good fit.

Adding a Drawer
I also planned for a drawer, which is the same as a shelf but with higher sides all around. I used the plinth boards from the IKEA cabinets I bought for the custom shelves in the lounge. (If you remember, I built a base and covered it with molding, so I did not need these pieces.) They were the perfect size for the drawer, and since this mini-renovation is all about using left-over wood where possible, they were perfect! I used pocket holes to ensure a secure fit.
I sanded and painted everything, but as these will be hidden, I was not overly worried with perfection.

My plan was to put the two cabinet doors that had covered the appliances back on, but I had not accounted for the clearance needed for the drawers with the door. Ooops.
I debated building drawer fronts for the sliding shelves, out of the existing doors that covered the fridge and freezer previously. I had one spare door and tried cutting it down and re-assembling it. But after several hours and a very poor result, I decided it might be faster to build new fronts. The existing doors are surprisingly intricate and well built, and disassembly was much more challenging than expected!
As is typical for me, because it takes awhile between work and life to complete my DIY projects, I tend to change direction a few times! Which can be a good thing, as I usually reach a better outcome.
After a bit more thought on the drawer covers, I decided that I would actually cut the sliding shelves down and add wood to form a clearance for the hinges, so I could add the doors back on. Building drawer fronts or adding back the doors with this modification are good options, and both take about the same amount of work. But given that this is a temporary renovation, using the existing doors will be just a bit easier. I still need to do this step, so stay tuned for that update in a future post.
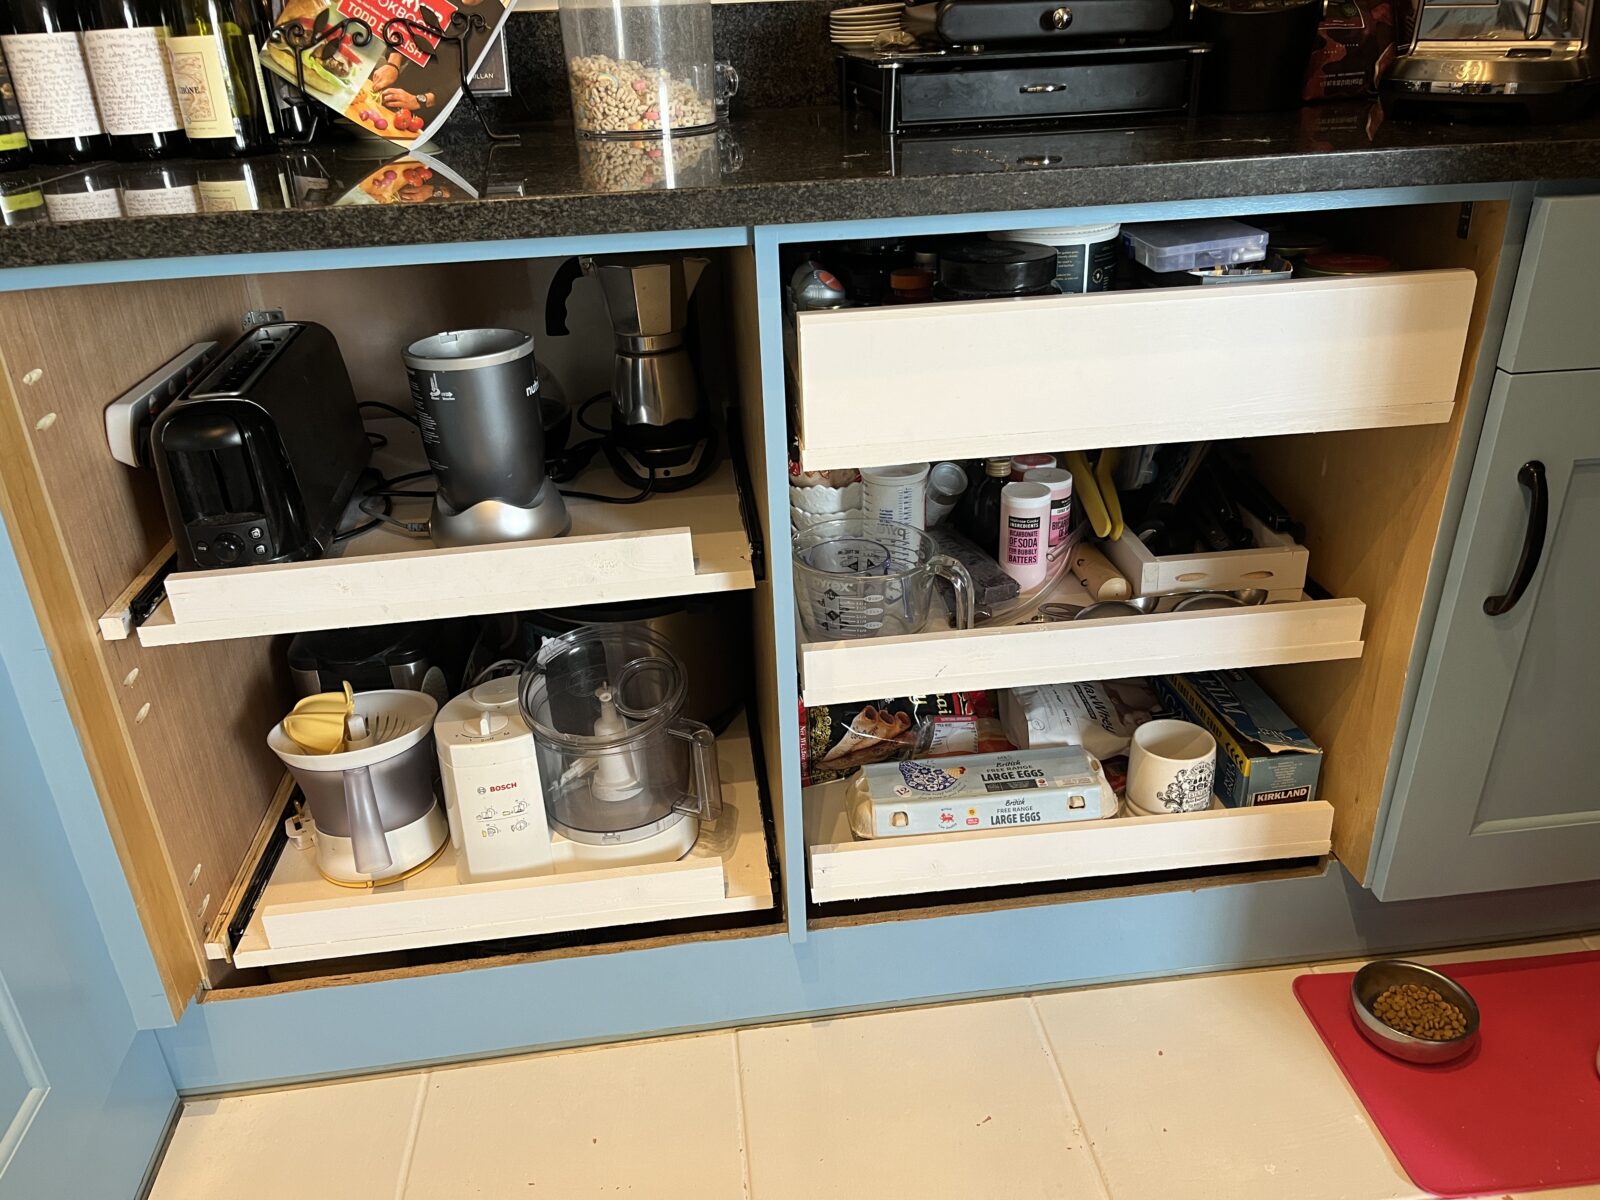
For now, I’ve painted everything white, and I have installed a power strip on the side wall at the top left shelf, where I have the toaster, water kettle, blender and our egg poacher all plugged in and easy to use, while being off the counter.

The bottom shelf has other big appliances like the InstantPot, the food processor and the hand blender. (These are not plugged in but easily moved to the counter for short-term use and then put back.)

On the right side, we have spare dishes, pantry items, and baking supplies. In the drawer, we keep our vitamins, nuts, grains, and protein powders, etc. for smoothies and yogurt. This is a great place to prepare everything for a smoothie as it is right between the blender on the left and the fridge on the right.

Perfection! Without doors. But those will come soon enough.
What do you think? A fairly simple make-over of some great space, and my counters have never been so clear! How would you use this space if it were in your kitchen?
Let’s look again at the before and after.
I’ll share the update when I get the doors added back on. (I am planning to use my newly purchased Kreg jig for hinges, so will update you on my experience there).
Next week: the final kitchen reveal, with everything complete for this mini-renovation, using existing supplies as much as possible to save costs.
Stay tuned!
Follow the Full Kitchen Mini-Renovation Here

Kitchen Mini-Renovation
My Dream Kitchen … In My Dreams

Kitchen Mini-Renovation
Building More Storage in the Dead Space

Kitchen Mini-Renovation
The Magic of Painting Kitchen Cabinets

Kitchen Mini-Renovation
Keeping Things Spicy: A DIY Spice Rack

Kitchen Mini-Renovation
A Luxurious Appliance Garage

Kitchen Mini-Renovation


Leave a Reply