
Do you have too many spices for the space you have? Is there dead space in your kitchen that you are not sure what to do with? Well, a DIY spice rack could be just the answer. It certainly was for us with our kitchen mini-renovation.
I wanted to make maximum use of dead space between the dish washer and sink.

The area was probably meant for tall, flat items, such as baking trays and cutting boards. We have used it in this way in the past, but it does not hold very much. And because it is open, things seem to constantly be sticking out of it, which is not a great look.
My inspiration for the space: a pull-out spice drawer. Below is an example from my Pinterest Kitchen Inspiration Board:

I needed to make some modifications to my version, because the space is in a corner. A two-sided option does not really work. You cannot access the side closest to the sink, so this needs adjustment. The width of my space is also bigger.
DIY Spice Rack: Plan A
I started with a plan for 3 separate drawers that could each pull out on their own. I planned to attach the covering panel to the bottom drawer, so when you opened it, the bottom drawer would pull out. The other two drawers could be pulled out as needed by hand.
However, after building the 3 separate shelves, I discovered that this was going to be challenging. Installing the slides into such a small space with any level of accuracy was nearly impossible. My drill would not fit in the small space, so I was making small nail holes to start a hole before hand screwing in the screws. It was difficult, and there really was not space for hammering either.
I found a flexible bit for the drill that lets you get into tight spaces, but as this is a renovation on a budget, I did not want to purchase a new tool just for this. But this will probably be something to purchase in the future.
DIY Spice Rack: Plan B
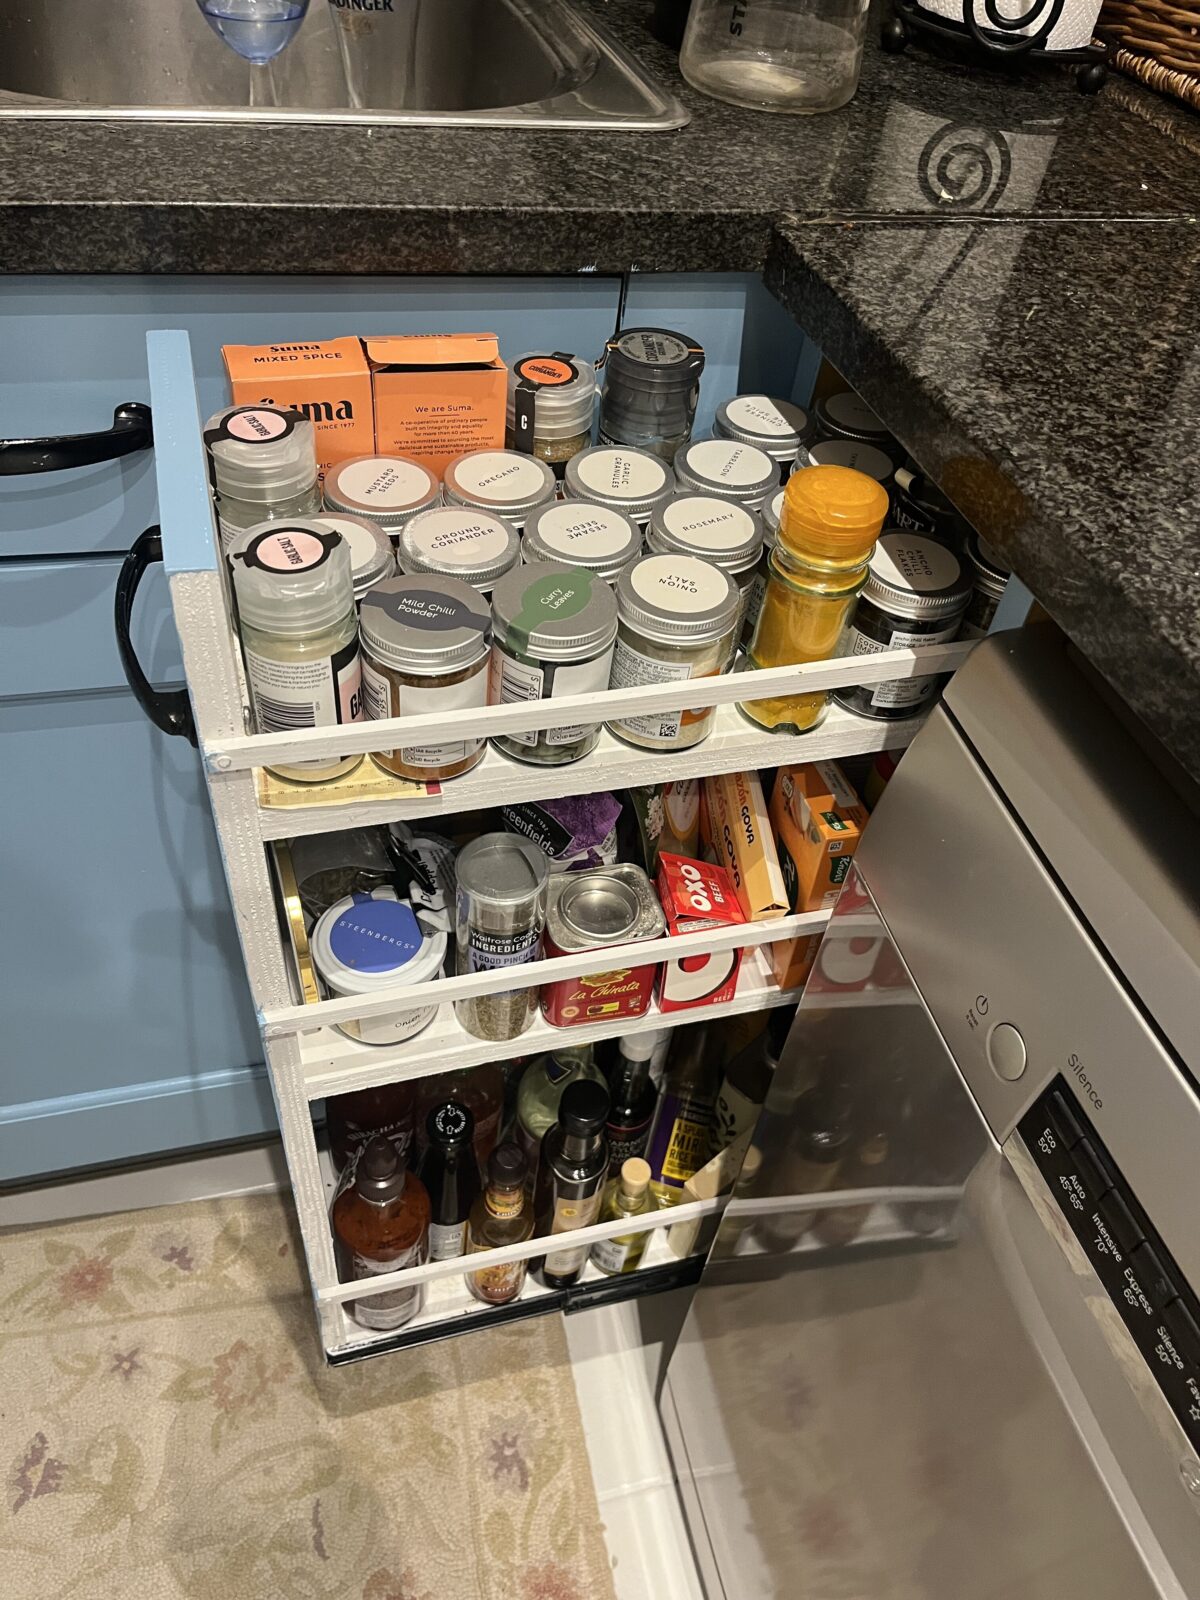
After building the 3 shelves and seeing they would not work, I moved to Plan B: a single unit that required only one set of slides to be installed for the entire shelf to slide out. I built a single unit, with a front and back, and 3 shelves spaced out according to what we plan to store in the cabinet. The top 2 shelves are for spice jars, and the bottom shelf is for taller bottles of oils, vinegars and other condiments.

The spacing of the shelves needed to account for putting bottles and jars into the spice rack, with only one side accessible. I used small strips of trim halfway up the sides to hold the items in place.
The Build
For the actual build, and remembering this mini renovation is about using wood and supplies I already have on hand, I used leftover pieces of 18mm plywood and cut them to size with my jigsaw and miter saw. The front and back panels are 690mm tall x 195mm wide, and each shelf is 464mm long x 195mm wide, which is the depth of the dead space, minus the front and back panel depth (36mm) and a little wiggle room in case the back of the space is not even. The width across allows for the slides to be installed as well.

I built the shelves with pocket holes, using my trusty Kreg jig and Kreg screws. I placed the holes on the undersides of the shelves. My favourite right angle clamps ensured everything fits together as it should. And I placed small pieces of square trim molding that I had on hand halfway up each shelf to hold items in place but still allow for easy access.
Sanding, filling holes and painting of course, and I then installed the pair of slides on the bottom shelf. I used these slides, ordered from Amazon. Because I used left-over wood and supplies, I only spend money on the slides themselves.

And the shelf in place, before loading it up.

Honestly, I should add a second set of slides, as the shelf, once filled, is quite heavy. But installation was near impossible, so I am hoping these heavy duty slides will be able to manage on their own. I can always go back and add them later if needed.
Installation
I installed the DIY spice rack, and it fits perfectly. It slides out and offers a great use of the previously unusable space.


In hindsight, I should have reduced the depth a bit more, so it sits further back in the frame. This would allow me to add a wider facing board to cover the sides more. But, the space is quite tight, and this could create some rubbing on the nearby cabinet.
Let’s watch it in action, shall we?
I could have added edge banding to the entire piece, and I can see from these photos that a bit of touch-up paint is needed. While not the most professional addition to the kitchen, again, as a mini-renovation, it will hold us over until we do a proper one. I can live with this. And, the additional space is being put to great use.
I am considering adding some thin strips around the front edge to better match the rest of the cabinets with a more shaker look, but we will see. What do you think?
A drawer pull in black completes the project, and we have good use of the dead space, and nice organisation of our spices and condiments for now, as a part of our mini-DIY of the kitchen.
What do you think? Would you build something similar? Any suggestions for improvements? Tell me in the comments.
Pin for later:


Thank you for your post. I really enjoyed reading it, especially because it addressed my issue. It helped me a…