
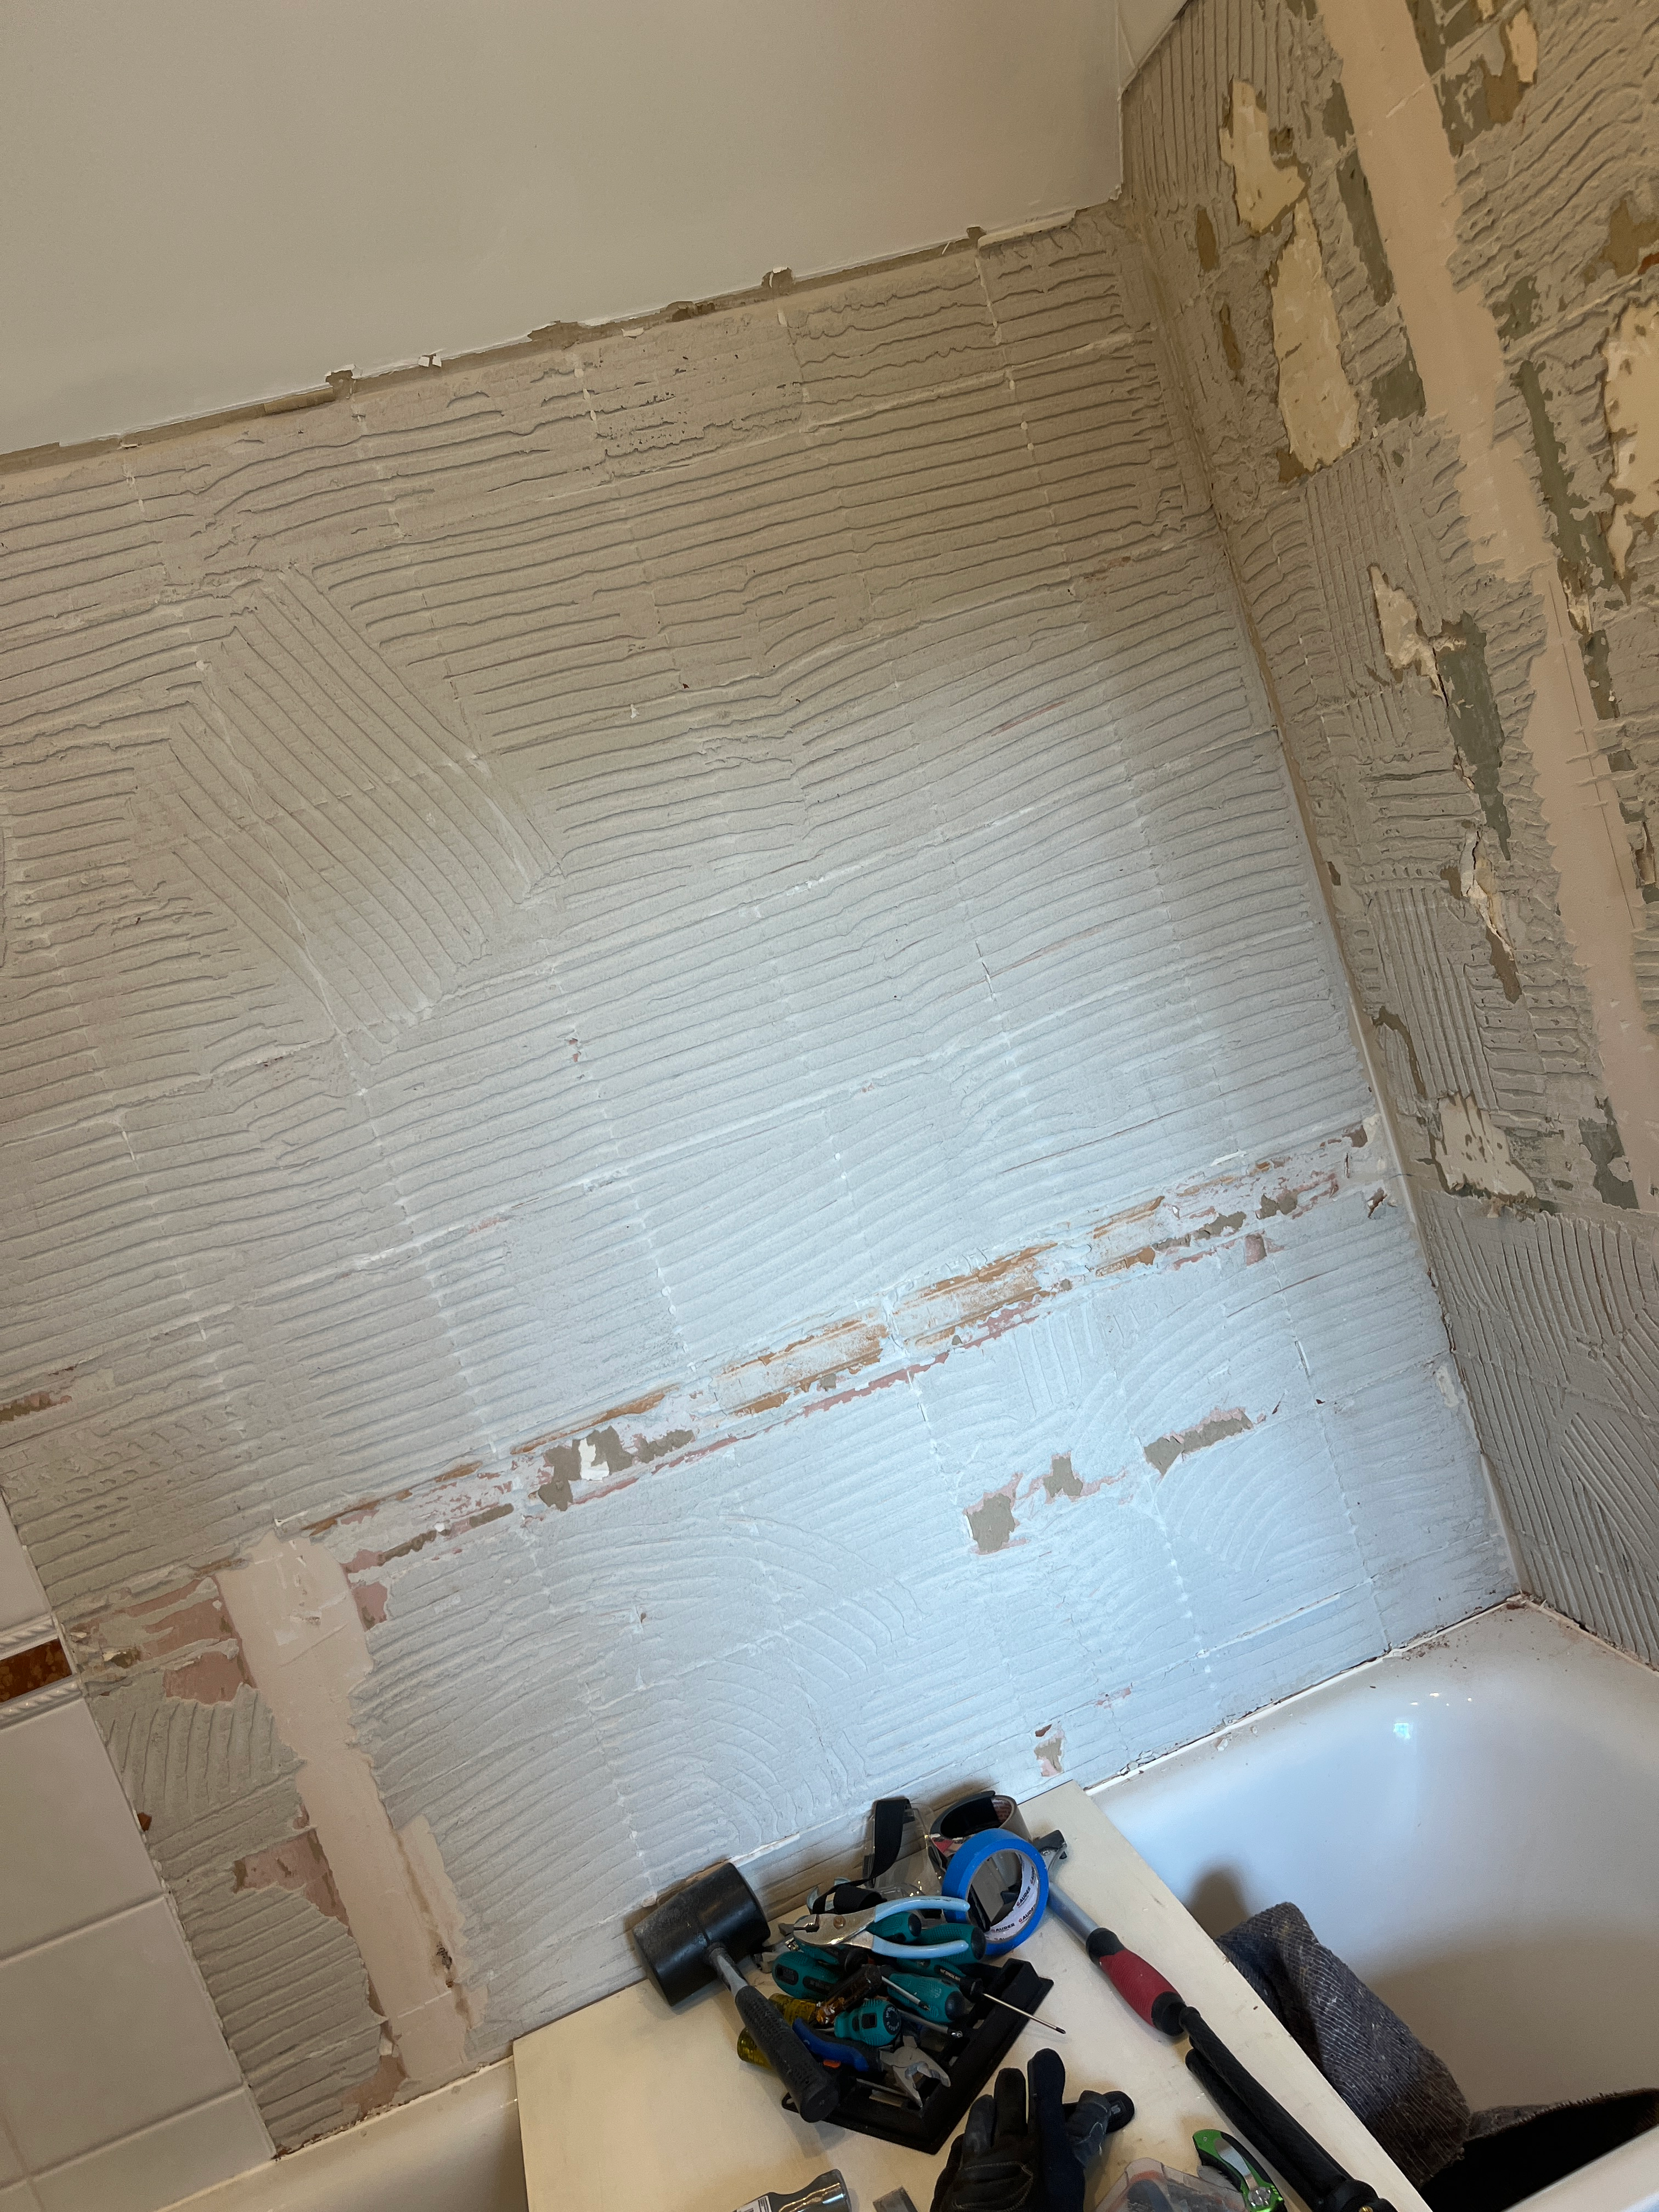
Yes, you read the headline correctly. Removing wall and floor tiles during a bathroom renovation can bring emotional benefits as well as the expected DIY benefits. There is something both meditative and calming about pulling tiles off the wall. And it is a great way to release frustration too!
My bathroom renovation is in full swing. Today, I want to share the second step of demolition, following last week’s removal of the glued-on wall mirror. It is all about removing wall and floor tiles. This step will be a part of almost any bathroom renovation, as nearly every bathroom has tiles somewhere.

With the right tools and the right attitude, removing wall and floor tiles can actually be — dare I say it — fun! I found the experience both energizing and calming, and I was almost sad when the last tile was off the wall. There is just something about knocking and prying tiles off the walls and floor. And it is a great way to relieve stress, frustration or even boredom! (Floor tiles are a different story, but we’ll get to that!)
Disclaimer: Not all user experiences will be the same. I cannot guarantee that you will find tile removal to be in any way relaxing or enjoyable. But, here’s hoping you do!
Let’s get started!
Are You Considering a Bathroom Upgrade?
Get a step-by-step guide and tons of tips and tricks from my own experience renovating my bathroom. From demolition, to water-proofing, tiling, and installing fixtures, this is your ultimate guide through the process.

The Tools Needed
It’s a short list, as you do not need much for this step in the demolition.
- Hammer
- Chisel
- Work gloves
- Eye protection
The Process for Removing Wall and Floor Tiles
The process for both types of tiles is the same: you need to get your chisel or the claw of your hammer up under a portion of the tile and pry it away from the wall. It is really that simple.
Now, the actual experience differs from tile to tile. Some tiles come off almost like there was no mortar used, while others seem super-glued to the wall. Some tiles come off in one complete piece, while others break into a few pieces or shatter into many small slivers. Either way, the end result is the same; the tile is removed, and you can move on to the next one.
In my case, I needed to remove tile throughout the bath tub, on three walls, as well as behind the sink and toilet, where there was a band of tiles running across the top of the vanity.

I also had a smaller line of decorative orange tiles across the top of the vanity and running horizontally through the middle of the shower. To start, I decided to begin at the vanity with these, just to get a feel for removing tiles and how hard it might be.

Getting Started
Getting started is usually the hardest part. But before tackling your first tile, ensure you are wearing protective eye covering, as shards of tile may go flying. You may also want to wear work gloves, as broken tiles can be quite sharp.
Once you are properly protected, it is time to begin. If you are lucky enough to be able to access an open edge of tile, you can start there. If not, simply crack a tile with the hammer and pry off some of the shards to gain access to underneath the tile.
In my bathroom, there were clear edges for me to access, so I had multiple options for starting the process. I decided to start over the vanity. I first cut the thick line of silicone caulk along all the edges of the tile. This will help in releasing the tiles from the surrounding walls.

I tapped the head of the chisel, flat side against the wall, under the tile a few centimetres. As I did this, I could feel the tile releasing from the wall slightly. The more I tapped, the more it would release. I levered the chisel forward, toward the tile. This also helped loosen the bond between the tile, mortar and wall. Then I moved the chisel along various spots on the edge of the tile, doing the same steps. Eventually, I could feel the tile either breaking or releasing in full.
There is a moment when you can feel the tile releasing from the wall. It is almost like the release of a suction. It is a very satisfying feeling!
Once the tile is freed, try and catch it from falling. Or if you do not mind it dropping to the ground, let it fall. Just be careful of the floors, pipes and fixtures. Falling tile is inevitable and will damage your fixtures and floor, so cover anything you do not want damaged. And again, make sure you are wearing eye covering.
Once you have one tile out, the next one should be easier because you have more access to the edges. Building on each successive tile that is removed, work across the row or column, removing tiles one by one.
Tips From My Experience
One caution: As you lever the chisel forward to release the tiles, be careful not to dig into the wall behind. A few times, I struggled to get the tile to loosen, and I punctured the plasterboard behind the tile. It is fine, as I can patch it later, but it is something to watch out for. If you can feel the chisel going into the wall behind, just move to another spot and keep working at it. Sometimes, wall damage will be unavoidable though.

Once I got into a bit of a groove, I began to really enjoy the process. It is methodical and repetitive, and in my case, most of the wall tiles came away quite easily. They were fairly thin, so if they broke, it was not too difficult to get the rest of the tile off with the same process. Most of the wall tiles came off in one or two pieces.
As you remove the tiles, be flexible about your approach. You’ll need to adapt as you go, according to the room and the situation. For example, I started with the tiles along the vanity, but I quickly realised that the orange marble countertop had been set over the tiles behind it. I needed to remove the counter before I could remove the tiles, unless I wanted to break them, which seemed unnecessarily hard. Removing the countertop required detaching the sink and pulling it out, which I was not ready to do. So I moved away from the vanity and worked on the area over the bath tub.
In the bath tub, I started on the back wall where there are no pipes or running water. Removing the back wall was quite easy, so I moved to the long wall along the side of the tub. In a few hours after work one evening, I had removed almost all the tiles over the two walls above the tub.

When I got to the front wall of the tub, I needed to tread more carefully. Here, we have the shower head and taps, with pipes behind the wall. Even though I was working on the surface of the wall, I was careful to avoid any tiles that touched the taps or shower head. You should certainly disconnect these before taking the tile down. But, you need to remove some of the tiles to access the wall and pipes behind. It is a balancing act.

The hardest part of the wall tile removal was that blasted orange tile running across the middle of the shower. It seemed to have a lot more mortar on it. It crumbled into small pieces and almost dust when I tried to remove it. In some places, the tile just came off in thin layers. It took a lot of time for such a small piece. Fortunately, the ratio of these small decorative tiles to the easier-to-remove wall tiles was about one in 30.
I really enjoyed taking the wall tiles down and truly found it to be a relaxing and zen-like experience. Aside from the noise of hammering, shattering and falling tiles, I really got into a nice little groove, and especially after a hard day at work, it felt good to take any frustration out on the tiles.
The Floor Tiles Were a Bit Trickier
With almost all of the wall tiles removed, I next took the time to remove all the fixtures, which I will share more on in my next post. After that, it was time for removing the floor tiles. And the zen-like experience came crashing down.
Floor tiles are naturally a bit thicker and heavier, to withstand all the weight and wear. This may make them a bit harder to remove. The process is the same, it just takes a bit more effort and patience.
The first row of floor tiles was actually quite easy and came up as I was removing the built-in vanity frame. It was almost like they were just sitting there, with no mortar or adhesive. This set my expectation that the floor would go quickly, but alas, it did not.
The rest of the floor was set in quite securely, and I only managed to remove two or three tiles in one whole piece. Every other tile came away in small chucks, and getting the tile to release from the sub-flooring was really challenging. Two rows took me forever, and I really thought I might be missing a better tool.

For some guidance, I went to my favourite DIY shoppe to ask, and as always, they had the answers for me. My shoppe takes such good care of me and my DIY projects. They often will not sell me a tool if they do not think I need it, and whenever I make a purchase, they always remind me of their generous return policy and encourage me to come back if it does not work or if I need anything else. And, they offer me loads of tips and advice. I once tried to hire them for some work I did not think I could do, and they insisted I could do it myself and walked me through the process. A truly amazing resource that I am grateful for!
When I told them what I was doing to remove the tile and inquired after a better tool than the chisel, they confirmed that I was doing it exactly right and it just takes patience. That was exactly what I needed, just some positive affirmation that I was going in the right direction.

It took me about three nights to get the floor removed. I set myself little goals each night for removing a certain number of tiles, and when I met or exceeded that, I felt good about my progress.
One other point on removing the floor: If possible, remove the baseboards before removing the floor tiles. The baseboards probably sit atop the tiles, so it will be easier to remove the tiles if the baseboards have been taken up.

In my case, I have a radiator that my plumber needs to remove for me, as the valves are not working, so I cannot drain and remove it myself. The pipes go through the baseboard, and I do not want to risk doing any damage. I was able to pull the tiles out from under the boards, with some effort, and a few of them broke off, with parts of the tile still embedded under the baseboard. I’ll get these pieces once I remove the baseboards.
Dealing with the Mortar Left Behind
Once you are done removing the wall and floor tiles, you will likely have a lot of the mortar or cement adhesive left behind. I have some particularly thick places on the walls above the bath tub.

It can be quite hard to remove the mortar or tile adhesive, so you have a few options:
- Replace the cement board, plywood or plaster board that the tile was affixed to. Depending on the amount of mortar and the plans for your room, you might consider replacing the boards. If you are tiling or painting and the wall is fairly damaged, this might be a good option, although it is a lot of work. You’ll need to cut the boards off the studs, using the multi-tool or a drywall saw and replace them with new boards.
- Cover over the boards with another board. You can also affix a new cement or plaster board over the ones covered in mortar. You need to ensure you can make the new board flat and secure, so you may need to scrape any high points in the mortar to ensure a flat surface. This obviously will make your room slightly smaller, as you are adding to the walls, but depending on how much of the room you need to do, it may not be very noticeable. You also need to pay attention to the surrounding walls and ensure you can make an even transition to the wall areas where you do not need to add boards.
- Scrape away the mortar. Here, this might be difficult, and certainly time-consuming. Some tips include spraying the mortar down with warm water or using a wallpaper steamer to help soften it.
In my case, I first thought about adding a cement board over the long side wall of the tub, where the mortar is thick and hard. But I do not love this idea for two reasons: it is very think with lots of high spots, and it will take up room in my already small bathroom. It is not a lot of space to add another board, but every millimetre — or 12 millimetres — counts.
I decided to try scraping away the mortar and attempted every possible trick in the book, but after spending two afternoons and having very little to show for it, I’ve decided to replace the boards. There are two layers of plasterboard, so I am going to try and just remove one and see if that works. If it does, I’ll replace it with a cement board, and I should not have any issue with transitions to the existing walls.
This was an unexpected addition to the demolition, so let’s see how it goes over the next weeks. I’ll keep you posted. Stay tuned!
Clean-Up and Removal of the Tile
The final step of removing wall and floor tiles is getting rid of the tiles. No one really talks about cleaning up after a DIY project, but wow, this is a big job. I had some moving boxes that I lined with plastic bags and then dumped the tile into them. I got carried away and overfilled them, so I later had to go back and separate them into a few more boxes so they could be moved.
I’ve also learned after mixing tiles and plaster board that all plasterboard needs to be separated and kept away from other debris. I had to go back and sort the plasterboard and put it into marked bags so it can be dealt with according to the regulations.
I’ve taken some of the debris to the tip, but I have a Man and a Van service coming to get the rest of the tiles, along with the fixtures.

Next up: removing the fixtures. I worked on the tile removal and the fixture removal together, moving from one to the other as needed, but I’m breaking the work into two posts, so stay tuned for everything you need to know about removing a toilet, basin and bath tub with next week’s post. Until then …
Happy DIY-ing!








Leave a Reply