
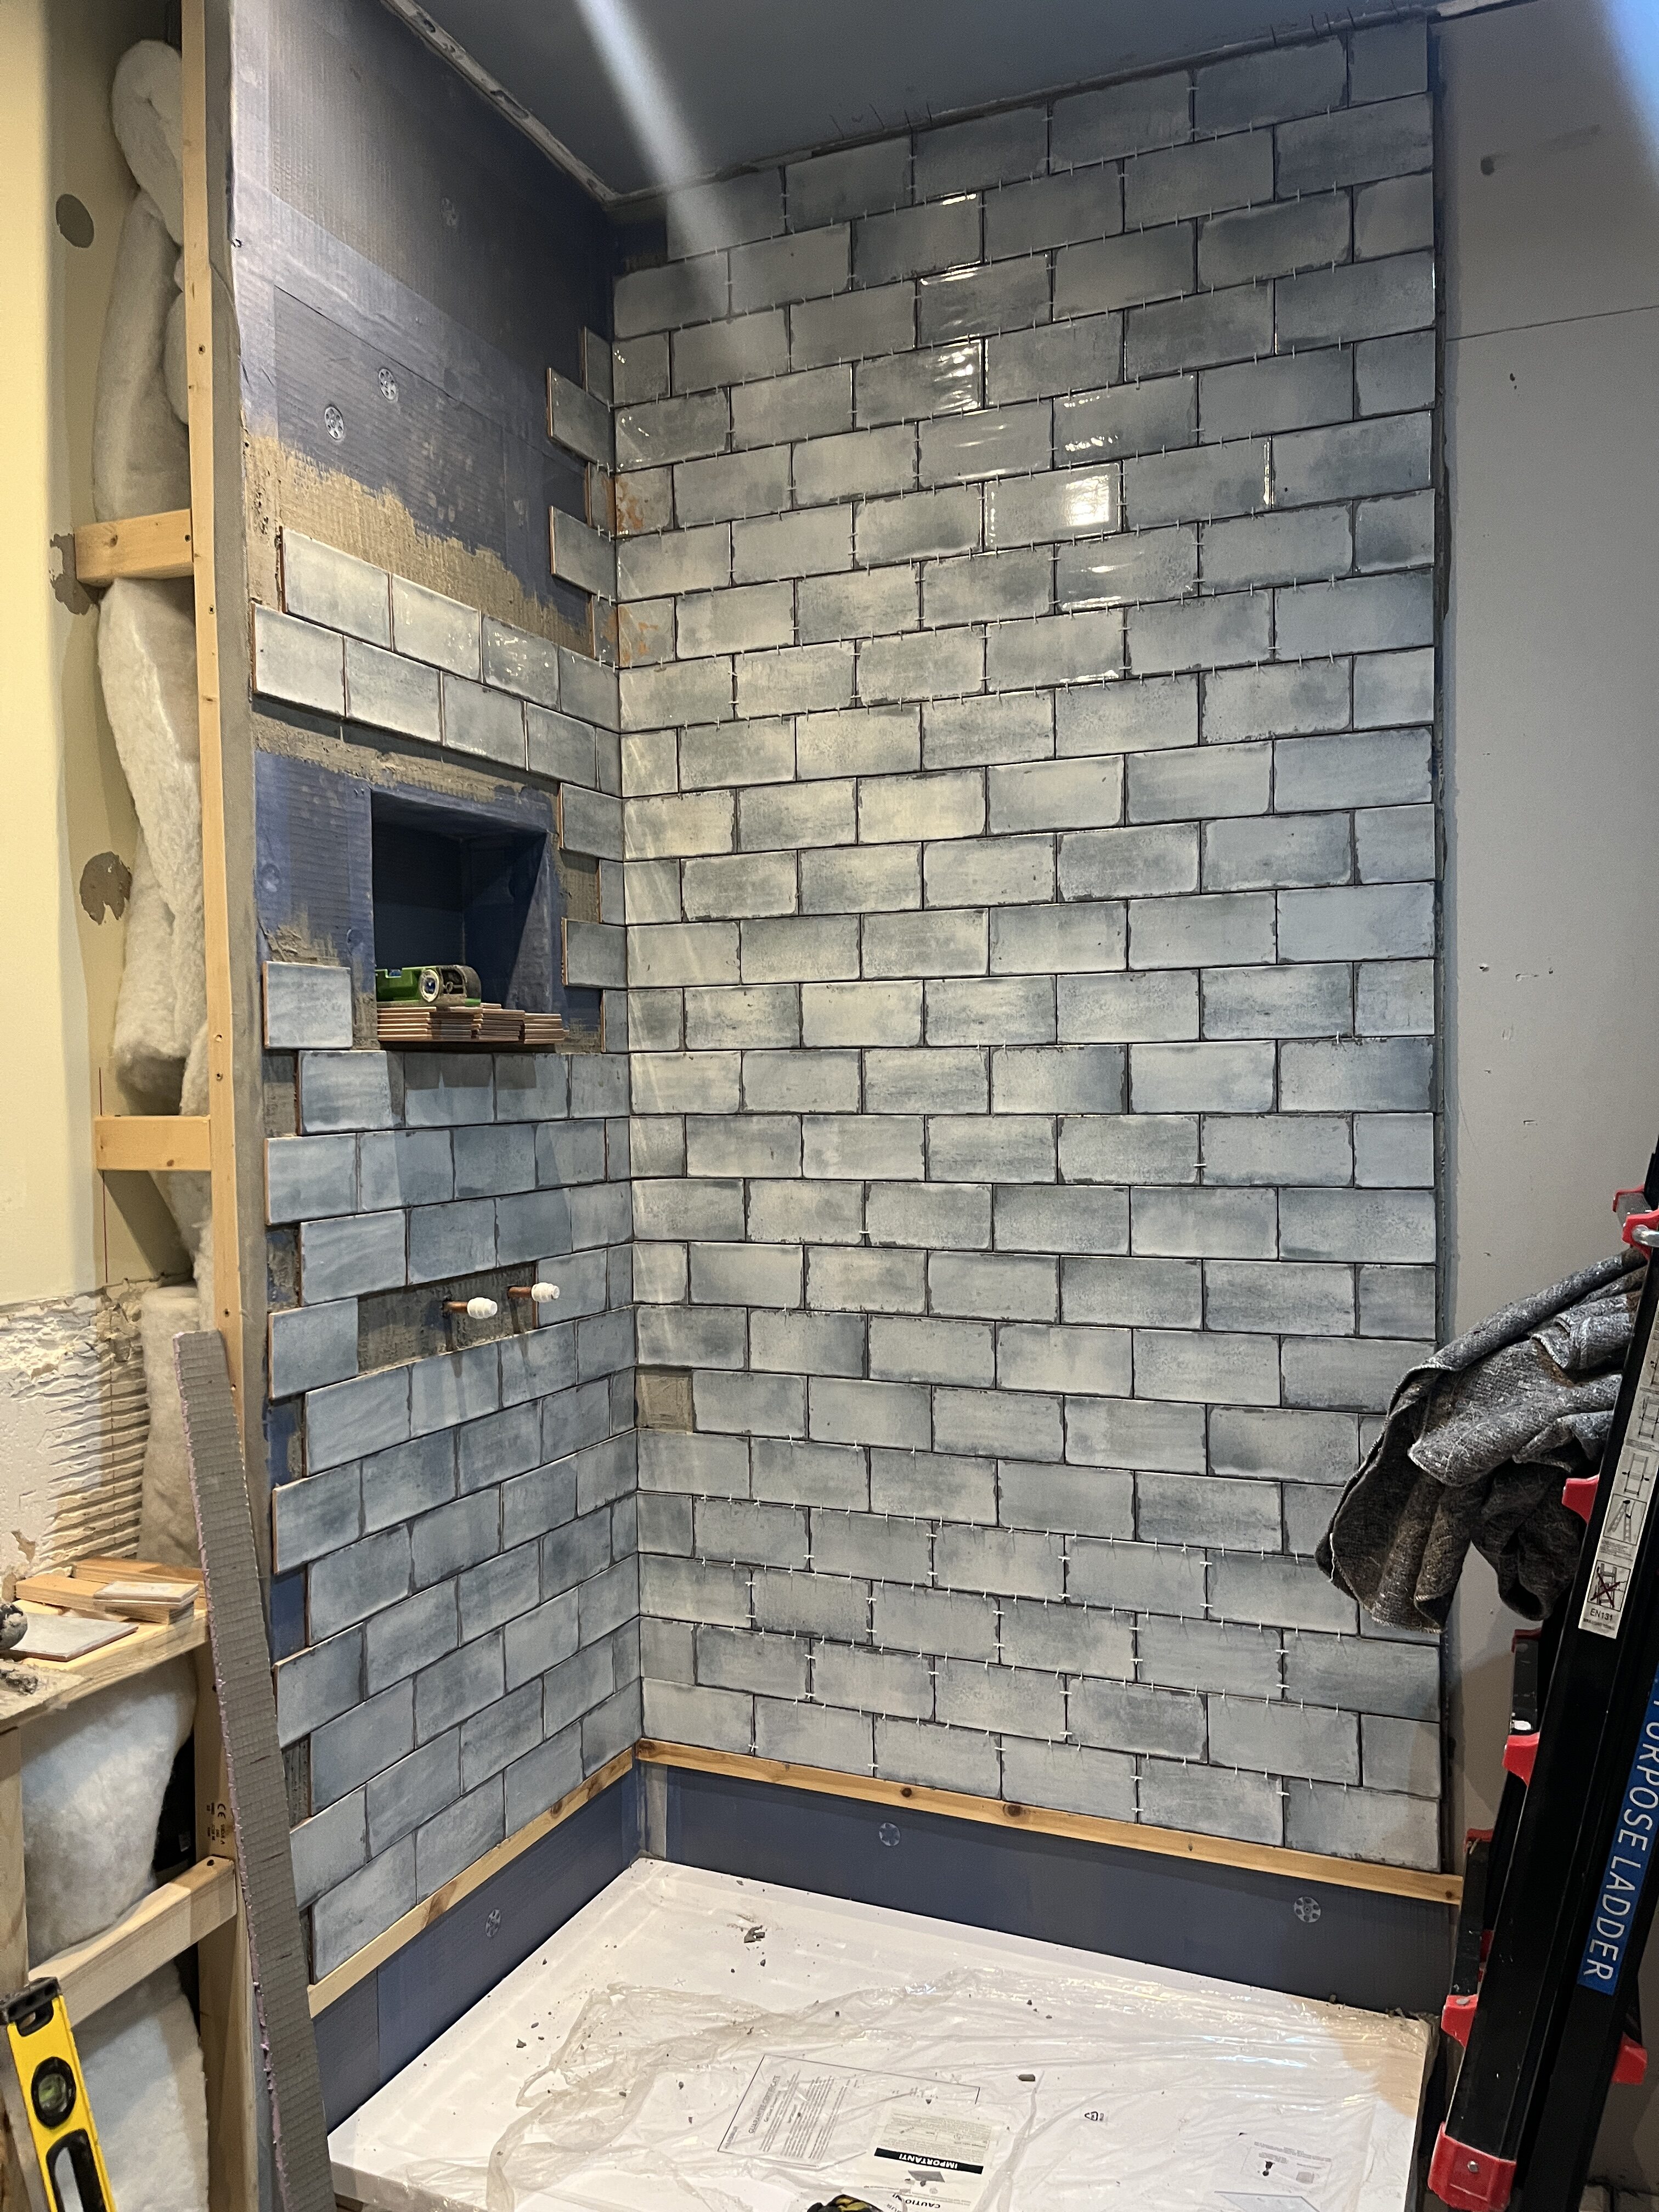
A few weeks back, I shared with you the techniques for planning your tile layout. This week, I am here to share a specific tiling topic: shower niche problems. Because once again, learnings from my own experience in the master bath can help you, as I am facing an error with my shower niche. Today, let’s look at how to avoid shower niche problems, and equally important, how to recover from any mistakes when measuring for the shower niche.
Because I do not want you to make the same mistake I made. Despite my best efforts, my tile measurements were a bit off, resulting in some challenges with the tiles around the niche. I’m sharing what I did and what I learned from the experience, to encourage those of you who have also made mistakes. The fact is, for those of us doing this DIY thing, we are not experts. We are learning as we go, often doing it in our spare time, around a full life. Mistakes are going to happen — the key is how we deal with them, finding a way to correct them, and learning a little something along the way.
So What Happened?
I followed all of my own techniques when planning the shower tile layouts. First, I made a measuring stick for both the horizontal and vertical layouts. Then, I tried a variety of starting points, finally landing on the right location for the horizontal plane, including the offset second row in my brick bond pattern and how the tiles would carry over to the adjacent wall. Finally, I measured the vertical layout, making sure to consider the niche in particular, as this is the most visible obstacle to tile around.
And then, I started tiling. I began a few rows up from the bottom, with a batten to hold the tiles in place.

And all went beautifully. The layout looks good. There is a small-ish cut on the outer edge, but it works. On the main wall with the water pipes and niche, there are three full tiles per row, with cuts on either end.
I made great progress, and all was going as planned … until I reached the niche.

Can you see the problem? The row that intersects the niche results in a small sliver of tile along the bottom. Not at all what I planned for. I actually planned for the tile to intersect in the middle of the height of the tile, which then would lead to two full-height tiles before reaching the top of the niche, with that tile also intersecting about half-way through.
The top row that intersects the niche is fine, because the majority of the tile remains. And the sides of the niche are also fine, with reasonably sized cuts. It is just the bottom, where there will be a tiny sliver of tile. Right at eye level and very noticeable. UGH!

What happened? Where did I go wrong? And more importantly, how am I going to fix it.
Tile Measurements Off by a few millimetres
Remember in my tile planning guide that I cautioned you to be very precise on the measurements. Well, this is because I was not. Learn from me! I got off by just 1-2mm in my measurements, but this adds up.
My niche is 12 rows up from where I started tiling (which is approximately two rows above the shower pan). That means that being even 1mm off in my measurements results in 12mm, or 1.2cm, by the time I reached the niche. That is about a fifth of a tile’s height! It is a small amount on its own, but it matters.

Had my measurements been right, I would have had a little less than half of the tile intersect the niche, which would have looked great. It also would have meant the top of the niche was at about the halfway point of the tile’s height.
I achieved this look with my guest bath, as you can see. It could probably be a bit more centred horizontally, but it is not bad. And certainly not noticeable.

Precise Measurements Are Critical
It is clear that I have got to get better about measurements. I will admit, I am not always precise down to 1mm, which is not good. The little marks on the tape measure are so small. And the marker I use for marking probably does not help, as it is easily a millimetre wide itself, which contributes to being off.
I took a woodworking intensive a few years back, and we spent a week crafting a small wooden X, done entirely with hand tools. Planing the wood to a smooth finish, sawing the two pieces to a precise height, and chiseling the cutout for the two pieces to fit together. The purpose: learning precision. The work required exact measurements down to the 10th of a millimetre. This was precision. No fudging, no cheating. Because the exact measurements mattered.

I learned a lot, and I certainly know the value of precise measurements. But the reality of achieving that precision is easier said than done. Taking exact measurements down to the millimetre (much less to the 10th of a millimetre!) is hard. I need more practice. And, I need to be more diligent.
So learn from me, and make sure you are are precise as possible with your measurements. It really makes a difference.
How to Recover From Shower Niche Problems
I do not yet know what I am going to do to fix the situation. I am in my thinking phase of problem-solving, so I am weighing my various options for the shower niche. You can see that despite the issue, I chose to go ahead with the tiling. I had limited time to complete the work and this project is already so delayed, that I decided to keep going and work on the solution later. This may have been a mistake, but only time will tell.

As regular readers know, I have faced a lot of challenges with the master bath, so this latest challenge is a bit frustrating, on top of everything else. (You can read all about my recent challenges, including re-boarding the shower wall, re-doing the self-leveling compound, and having to lay the tile floor not once but twice. I hope you find my honesty about these failures refreshing and something you can learn from! That is why I share them.)
So, I have a big issue, and I know what I did wrong. But, what am I going to do to fix the issues? Right now, I can see four possible fixes for the niche situation:
Option 1: Re-Tile
This is the least appealing for obvious reasons, and I do not plan on doing this unless I absolutely have to. It is the most dramatic option, and very honestly, I do not think it is worth it. If I were to re-tile, I would lose two days of work from what I’ve already done, plus all the time to rip out the tiles, re-board the wall for a third time, and re-tile. This would require more supplies, which would mean more costs, and quite honestly, it might be just a bit too much for me mentally after my previous failures.
The good news is, I do not think it will be necessary. But, we will see. I won’t rule anything out until I actually do the work.

Option 2: Adjust the placement of the niche
That might sound a little crazy. How on earth can I adjust the niche? It is already set into the wall, with tiles all around. My idea is that I could bulk up the floor of the niche a little, reducing the overall height and giving myself a little more wall to tile onto below the niche.
My thinking is that by adding another layer of tile backer board flat on the floor of the niche, I could add 12mm height (the thickness of the backer board) to the bottom and increase the sliver by the amount I miscalculated. If I glue and screw the board in, add seam tape and tanking, it will not be noticeable once I tile over it. It also will be waterproof and secure. And importantly, this will give me a bit more tile on the wall at the bottom of the niche.
I think this can work, because the height of the niche is 35cm, which is more than sufficient for my needs. We have plenty of headroom in the guest bath niche, which is the same height. So 1.2cm added to the floor makes little difference to the utility of the niche. But it might make a huge difference to the overall look of the tiles.
I could even consider adding a second tile backer board to the top of the niche to better centre the tiles there too. This is starting to cut it close, and I need to make sure I do not take away too much of the height or create a shape that does not look proportional. So I need to try a few things out before I commit to this approach.
Option 3: Keep It as Is
There is always the option of leaving it as it is and seeing how it looks once it is tiled. This is a little risky, because if I do not like it, I might create more issues in ripping it out and could be back to option 1 of a complete re-do. Which I really want to avoid!
But, I also could cut the tile pieces and add them with the tiniest blob of adhesive just to see how it looks. This will waste a few tiles, but I have more than enough. And with a small amount of adhesive, it is easily removed without much damage. Especially if I make my decision quickly, before the adhesive cures — it will be easily fixed if I do not like it.

Option 4: Fill in the niche and just tile right over it
This last option is also a dramatic option, but it would keep me from re-doing the entire wall of tiles. I could just board the niche up as if it were never there and tile straight across it. This would eliminate the difficult cut-out and ensure I do not need to re-do anything.
But honestly, this is my least favourite option. I find a shower niche is not a luxury, but a must-have. Without a niche, we are left to lining bottles along the edge of the shower pan or purchasing some dreadful metal rack to hold everything. For which we either need to drill into the tiles to secure it in place, making it a permanent fixture, or rely on suction cups or adhesive tape, which never work.
So no, not having a niche is not an option for me … But let’s see how I feel if the final solution is between ripping everything out and starting over or living without a niche. I don’t think it will come to that, but one never knows.

How Would You Solve My Shower Niche Problems?
So, which of these four options would you choose? Or do you have another idea? None are ideal, but they are where I am. Which is not unusual when you are a DIYer. We often have to adjust and accommodate, learning as we go. Being intrepid in all we do!
I console myself with the idea that, oftentimes, it’s the mistakes that teach us more than any success. I remember the mistakes, the missteps, the disasters, and they help me in the future. Sadly, they do not prevent me from making other mistakes. The circle of learning is never-ending!
I will be working on the fix to the shower niche this week. I think I will try option 3, testing the look of the tile cuts, then option 2, bulking up the floor (and ceiling?) of the niche. Hopefully, one of these less dramatic options will work, and I will not need to resort to options 1 or 4, a complete re-do or covering over the niche.
If you are interested in finding out how I solve this dilemma, subscribe to my email list and get the update straight to your in-box! I am hoping to have good news within the week!
Happy DIY-ing!








Leave a Reply