
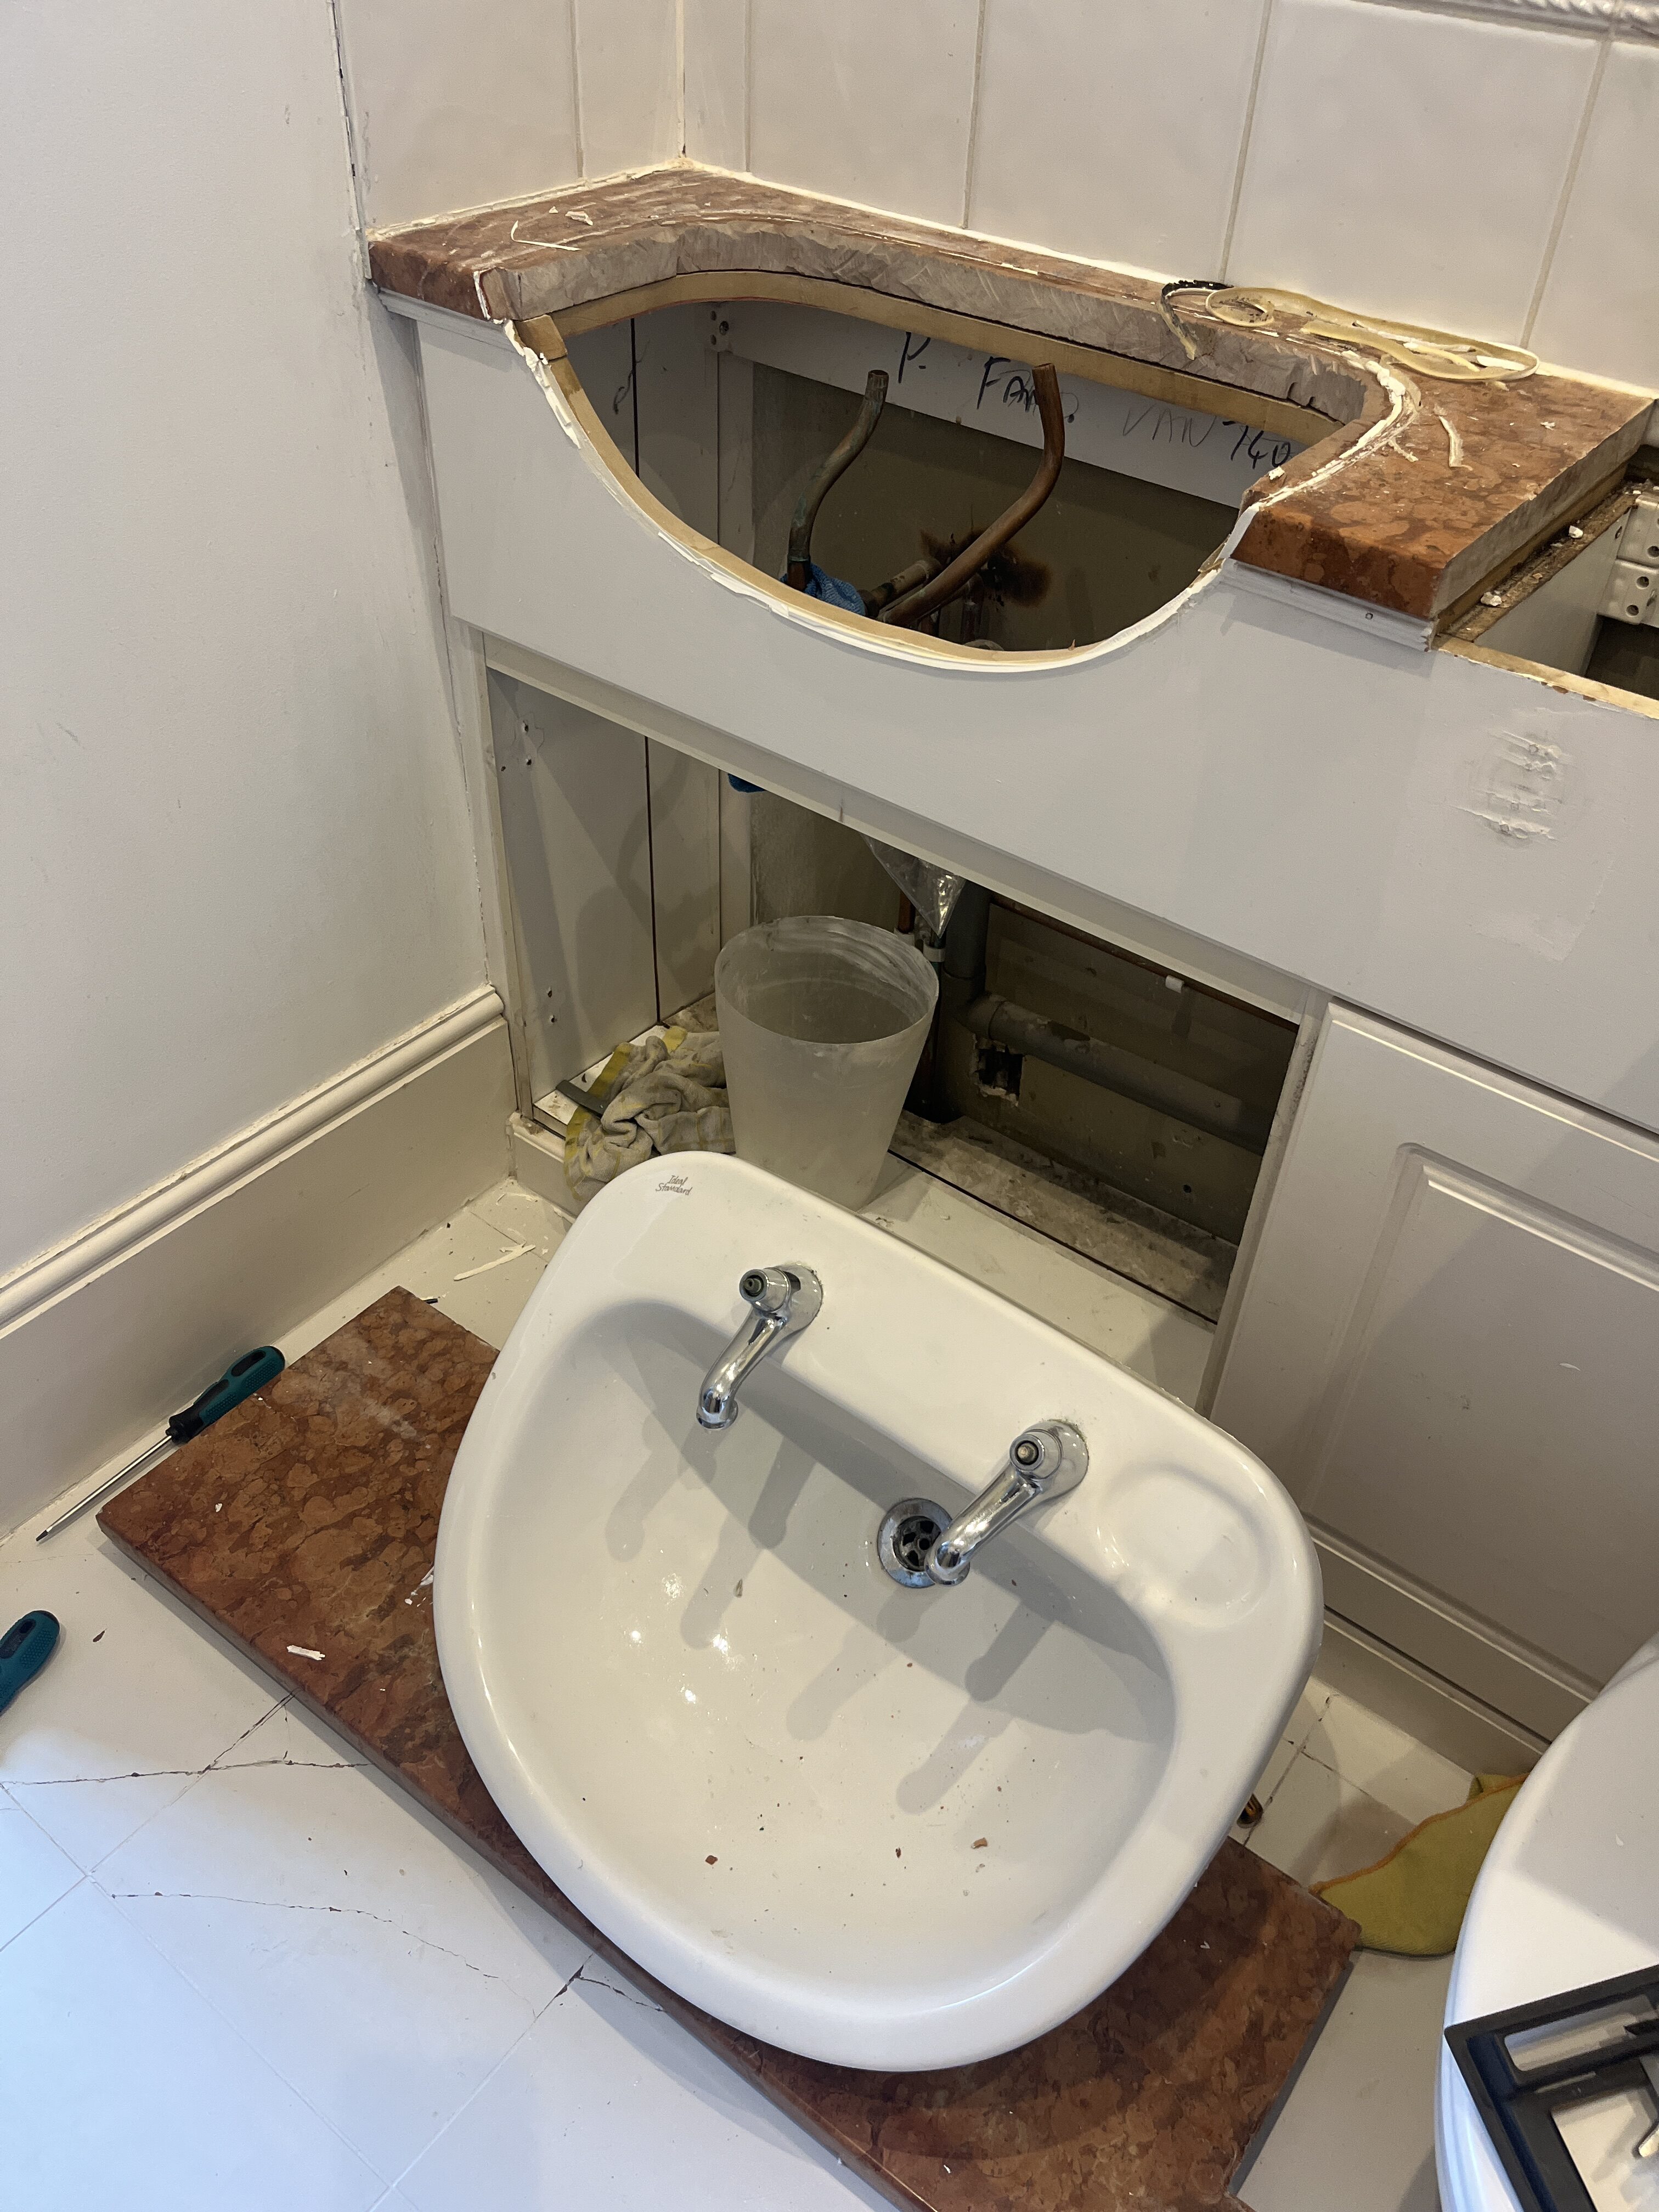
I am not going to lie: I feel like a superhero! I’ve just finished removing bathroom fixtures as a part of the bathroom renovation. And I am so pleased with my newfound skills!
I know, I know, people remove bathroom fixtures every day. Basins, toilets, showers, bath tubs, it is all well-covered territory. But until you do it yourself, you have no idea what a sense of accomplishment this is.
In the midst of the bathroom renovation, my biggest DIY yet, I admit to sometimes feeling overwhelmed. This is big, people! But, I also have many moments of sheer joy, when I’ve conquered a new skill that I never thought possible. I’ve removed a huge glued-on wall mirror, I’ve taken out wall and floor tiles, and now, I’ve removed a basin, toilet and bath tub.
Today, let me share with you what I’ve learned from removing bathroom fixtures in my home. While every situation is different, I have some tips and insights that may help your own renovation journey.
Are You Considering a Bathroom Upgrade?
Get a step-by-step guide and tons of tips and tricks from my own experience renovating my bathroom. From demolition, to water-proofing, tiling, and installing fixtures, this is your ultimate guide through the process.

Important First Step
Before you even think about removing bathroom fixtures, turn the water off! You are about to open up the pipes, so it probably goes without saying, but let me say it anyway. Turn the water off.
You can do this one of two ways. Either at the mains, which will leave you without water in the entire house. Or you may have an isolation valve on each pipe that you can close. No water will run past the valve on that pipe, while keeping the water flowing in the rest of the house.

With the water off, you are ready for removing the bathroom fixtures.
Removing the Basin
I started with the basin because it felt like the easiest one to tackle. I had previously tried to change the bathroom taps in my other bath, but had not succeeded for a variety of reasons. That failure prompted me to take a plumbing class last summer. I’ve since learned a lot and am ready to take the basin on. Or should I say take it out!
Our basin is sitting within a heavy orange marble countertop. It is caulked in place and held with some brackets. Below the counter is a built-in vanity with a cabinet. The basin is a two-hole basin, which means I have two separate taps for hot and cold water. I am planning on getting rid of all the fixtures, so I do not need to be careful to save any of the parts.

The first step in removing bathroom fixtures like a basin is to detach the water taps below the sink. Hold the water pipe with the wrench to keep it steady. Use the spanner to twist the nut that holds the tap in place. This can be tricky, because you are usually lying on your back under the sink, reaching above you and not able to see everything very well. It also can be tricky if the nut is a bit rusted or if you just cannot get a good grasp on it. It can be a tight space with little room to move.
After trying for awhile, I gave up and applied some learnings from my plumbing course. I physically cut the hot and cold water pipes. I knew we would be making some adjustments to the pipes anyway, so I was comfortable to cut them. To do this, use a pipe cutter, which is a small round disc with an opening that has a blade in it. You simply push the disc onto the pipe and rotate it around until the blade has fully cut the pipe.


Make sure you cut above the isolation valve. And it is good practice to hold the pipe that will remain in place with a wrench, just to ensure it does not move or rotate too much.
Once the water pipes are detached, whether by removing the taps or cutting the pies, you also need to remove the waste pipe connection. This is the pipe coming from the basin drain. It is a bit larger in diameter than the water pipes, and it is usually plastic/PVC piping. Simply unscrew the pipe using the large plastic nut and move it away with the sink drain. If you cannot get it unscrewed, you can cut the pipe with a hacksaw.
Once disconnected, I like to cover the waste pipe opening with a plastic bag and some tape. This ensures no odors are coming in to the bathroom.

After cutting both pipes, I then cut through the caulked seal around the edge of the basin, using a razor blade. At this point, you could start to wiggle the sink a bit and loosen it from the seal.
For the next part, I asked my husband to come and help. The sink is heavy, and since I had loosened it a bit, I did not want it to fall. It was still quite secure so this was unlikely, but you can never be too careful.
I had him hold on to the basin while I unscrewed the brackets down below that held it in place. Once these were out, we wiggled and rocked the basin, using the taps as a bit of a handle, until we were able to lift it out of the counter.

What a feeling! I’ve never removed a bathroom fixture before. At least not in real life. We did lots of this in my plumbing course. But as there was no running water, it did not feel terribly risky! So, so pleased to have the basin out. But I know it is the easiest of the three fixtures I need to remove.
I did take the time to remove the counter top as well while I was at it, and I dismantled the vanity below, as much as possible. It is also covering the cistern for the toilet so until that comes out, I could not remove every part of the vanity.
Removing the Toilet
After tackling the basin, I moved on to the toilet. We have a back-to-wall toilet, with the cistern hidden in the built-in vanity. The first step was lifting off the other half of the heavy orange marble counter top, to reveal the cistern and all the piping to and from the toilet.

I closed the isolation valve, so no water would come in to the toilet. I then flushed the toilet, to rid the cistern and the toilet bowl of as much water as possible. Without an active water connection, the toilet could not refill, so there was just a small bit of residual water remaining.
Exactly like the basin, I needed to disconnect the water and waste pipes, which both ran to the cistern. I unscrewed them easily, so no cutting required this time.
The bigger challenge was actually getting the cistern out of the cavity in the vanity. The flushing mechanism came through the wooden front, and I just could not figure out how to disconnect it. I could see no screws, and it was rusted over in parts. I finally just broke it into two pieces, so I could pull it through the wooden opening. Next, I unscrewed the two screws in the back wall of the cistern and just lifted the entire thing out of the cavity.

If you want to save any parts of the toilet, dismantle them and set them aside. I was sending the entire thing to the rubbish, so I did not bother dismantling anything that I did not have to.

With the cistern removed, it was time to remove the actual toilet bowl. I will admit, I was nervous. Again, I know the principles, but the reality was concerning. What if there was a deluge of waste coming out of the pipe? What about the smell? And what if I somehow had a leak and water begin running from the open pipe? I had lots of towels, plastic bags, and a bucket at the ready just in case.
In preparation for removing the toilet itself, I soaked up any remaining water in the bowl, getting it as dry as possible. I then unscrewed the two screws on either side that were securing the toilet to the floor. These can sometimes be rusted and need to be cut or pried away, but fortunately, they came right up for me. I also cut the caulk seal all around the floor and the vanity front, where the toilet was attached.
Just as I got ready to lift the toilet bowl off the pipe, my husband flushed the other toilet, which backs up against this one and comes off the same central waste pipe. Water gushed into my dry toilet bowl and stayed there. Panicking, I stopped everything. I could not remove the bowl if water comes into it every time we flush the other toilet, which is our only active one during the renovation.
This is where it is good to have a trusted plumber on speed dial. I texted my plumber and asked about this. He immediately reassured me that this is normal and I just need to shove a few old rags down the pipe, just in case.
It took me two more days to work up the courage to remove the toilet, even with the rags in place. I covered the floor in towels and cautioned against flushing the other toilet until I had the toilet out and the waste pipe secured.
With bated breath, I pulled the bowl out and away from the waste pipe. It came away and there were only a few drops of water trickling out and onto the towels. I quickly shoved some rags in the opening, followed by a plastic carrier bag to help stop the smells from coming in. I then taped another bag over the opening, just to be sure. Finally, I placed a shallow pan underneath the pipe in case anything did come out when we flushed the other toilet.

Fingers crossed, we flushed the other toilet and waited for the water, which I expected to come gushing out. Nothing. The pipe and the area around it stayed dry, and I checked after every flush for several days. All with the same dry result. The towels were working to block any amount of water from coming in.
Woohooo! I’ve removed another bathroom fixture, and I’ve faced a few challenges in the process, but the toilet is out and there are no leaks!
Removing the Bath Tub
The toilet was challenging, but the bath tub is the hardest. In part because of its size, and in part because I could not locate the isolation valves to cut the water. I would have to cut the mains before I could remove the bath tub.
I wanted to be as ready as possible before cutting the water mains, so I continued to remove the tile around the shower head and taps, to be able to see what I was working with. Once I had safely removed as much tile as I could without damaging any of the taps or pipes, I needed to access the pipes themselves.
The bath tub has both a shower head on a riser with a temperature knob and a pressure knob, as well as two taps for filling the tub. A wooden panel covers the front of the tub and unscrews from the frame.

I took the panel off the tub, and I could see the pipes, but they were too far back and I could not reach them. I therefore had to cut into the wall where the riser was installed, to access those pipes.
Using my tried-and-true technique for cutting into plasterboard, I cut a small hole in a place where I had removed the tile. Flashing my torch inside, I could see the pipes were set back and I could comfortably cut out more of the wall. I made a bigger hole, and kept increasing it until I had better access to the inner workings of the bath tub pipes.


At this stage, I turned off the water at the mains, There were no isolation valves that I could see on any of the bath tub pipes, so I knew I would need to cut and cap the pipes, to prevent water flow. This is essentially closing off the pipe so water does not come out of the pipe and you can then turn the mains back on.
I purchased Speedfit Plastic Push-Fit Stop Ends from Screwfix, in 15mm diameter, the size of my water pipes. The pipes are copper, so one option is to solder copper end caps to the pipes. But the plastic push-fit caps are easier to use, reliable, and can be removed and reused. This was a temporary hold until first fix with the plumber, so this was a perfect solution.
With the water mains off and the taps opened to remove any built-up pressure in the system, I cut the two pipes leading to the shower. A bit of water trickled out but not much. I quickly slotted the Speedfit caps on, pushing them all the way on the pipe until I heard a little click.

Next, I needed to cut the pipes to the taps below. I cut them at the point they were parallel to the ground, as they were easiest to reach. (Note that I could have tried to remove the taps from the pipes, but they were hard to reach so I just chose to cut them.) Because they were parallel, a good amount of residual water rushed out of the pipes after I cut them, which was a bit stressful. Note to self: put towels under the pipes next time. But, I quickly got the Speedfit caps in place and the water stopped.
Four pipes capped and secure for the bath tub. Phew! But the real test was turning the water mains back on and ensuring there was no leakage. Success! The pipes remain dry and the caps are holding beautifully.
With the pipes cut, I could remove the shower valves from the wall. To do this, you simply unscrew it from the board where it is mounted. I also removed the shower head and riser, which I just ripped from the wall, as I could not find any screws to release it.

And, I unscrewed the waste pipe, which was easy enough to reach. Again, if you cannot get it unscrewed, a hacksaw will work well.
With the pipes cut, it was time to lift the tub out of its place. I first demolished the frame around the tub, so we did not need to lift it up and over. I also ensured the caulk around the wall edges was cut. Then, my husband and I wiggled, pushed and pulled into we could slide the tub out of its place and get it up on end. It was a bit tricky, but it eventually came lose and we were able to slide it out of the space. We removed the metal legs for ease of transport as well.

One note: On all my pipes, there is an earthing, or grounding wire. There was one on the bath tub too, although it was not attached to anything. I did not remove any of the wires attached to the pipes and will leave for the electrician and plumber. But as the bath tub wire was not attached to anything, I removed it with the tub,
That’s a Wrap!
For removing bathroom fixtures at least. Still plenty more to do in this bathroom renovation.

But what a feeling! Three fixtures removed, loads of learnings gained. Truly, what an experience, to be able to understand, dismantle and detach these fixtures that we take for granted every day. What a superpower to possess!
Also as part of the demolition and after removing bathroom fixtures, I took the time to dismantle the rest of the built-in vanity. I also removed the wall at the head of the shower, including the metal studs and plasterboard. Now, we have a full picture of the pipes and the room and can make the final plans for first fix.

Next week, some reflections on demolition, and preparing for the first fix plumbing and electrical works.
Until then, Happy DIY-ing!








Leave a Reply