
While I felt a tremendous sense of accomplishment after removing all the tiles and disconnecting the fixtures in my guest bath renovation, I’ve now encountered some unexpected challenges in the bathroom demolition. Before, it felt like a moment to celebrate, since I had never done anything this significant in my DIY journey to-date. I think I even used the words super hero.
Sadly, I got a bit over-excited by my progress. Because today, I am here to share the sad reality that I’ve hit a few unexpected challenges in the bathroom demolition. My super hero cape has been set aside. It seems I saved the hardest bits of the demo for the end, and I am feeling a bit defeated.
I did not account for needing to lift up flooring and remove plasterboard from the walls. Fortunately, I built in extra time for just these types of unexpected challenges in the bathroom demolition. And let’s all remember, challenges are just the nature of DIY.

After I finally removed the hideous orange floor tiles, I realised I would need to remove the plywood backing that sits atop the sub-flooring. This plywood is rotting in places, has significant staining and even some damage from water ingress. It also has an abundance of mortar on it from the tiles, which I do not want to try and scrape away.

As well, because I am planning to add underfloor heating, I want to replace the plywood with something that will better conduct the heat upwards, like JackoBoards or a thermal shield. I need to account for the thickness of the new floor tiles too, to ensure a smooth transition at the door to the bathroom into the hallway. So I’ll need to adjust the thickness of the floor under the tiles as well.
I also need to deal with the back wall over where the tub had been. The mortar is thick and fast, and despite a lot of effort, I cannot remove it without doing a lot of damage to the plasterboard. Which reduces its effectiveness.

So, before I can move on to some of the more exciting bits of this renovation, there are still some unexpected challenges in the bathroom demolition to manage. So, let’s get moving.
Are You Considering a Bathroom Upgrade?
Get a step-by-step guide and tons of tips and tricks from my own experience renovating my bathroom. From demolition, to water-proofing, tiling, and installing fixtures, this is your ultimate guide through the process.

Removing the Plywood Flooring
Let me confess here that on several occasions during the flooring removal, I had my doubts. I was not sure I could do it, and I really struggled with the right tools to help me.
The boards were screwed or nailed down, although there was a chance they were glued down. I needed to be careful, because I could not see what was below, and you must assume there are gas, water and waste pipes down there. And you do not know how close to the surface they might be. As well, the boards are large, so lifting one out in a single piece with multiple points of attachment felt too difficult.
I also was waiting for the Man and a Van service to pick up the tub and toilet, as well as wood, framing, and about four boxes of plaster and tiling. I did not have a lot of space for maneuvering as I faced these unexpected challenges in the bathroom demolition!

I began working at the rotten place, digging at it with a chisel and hammer and slowly revealing what was below. The sub-floor. Once I could see this, I could determine the thickness of the plywood overlay (19mm) and plan accordingly.

I Tried Various Tools: Multi-Tool, Circular Saw, Hack Saw
My first attempt to cut the plywood layer was with my multi-tool. I used the plunge cutter blade and added a piece of tape to mark the depth of the board, so I did not go any deeper than the plywood I was removing. I did not want to cut into the sub-flooring below.
The plunge cutter blade worked okay for small areas, but it was clearly not enough for the entire floor, even thought it is a small bathroom.
I next tried my circular saw. This felt like a rather big tool for the job, but I was not sure what else might work. I set the blade depth to align with the depth of the plywood and carefully cut a small piece. It worked well and I was able to remove a small square of the plywood flooring.
Emboldened, I worked on a larger piece, continually checking that the depth was correct and that the sub-flooring was consistent underneath the plywood.

The circular saw worked well for awhile, until I reached the areas of the flooring with a large amount of mortar. The blade struggled a bit and the saw stalled, which caused me some concerns. Kick-back is a big issue with circular saws, and because I was working on the floor, my position was not the greatest. I was squatting down or hunched over the saw, moving in small steps along with the movement of the saw. It just felt like a recipe for disaster, so I stopped.
I moved to another area of the floor, where there was no mortar, but the footprint of the saw combined with the bathtub standing on end, as well as the pipes along the wall, prevented me from making any full cuts. I called it a day and decided to come back the next day with some fresh approaches.
The next day, I came armed with more research about the multi-tool. I have not yet got the hang of the multi-tool. People say it is the greatest thing ever, but I’ve not yet discovered what makes it so amazing.
But, I did discover that there is a cutting blade along with the plunge blade. I should have known this and probably did at one point, but I really have not used the multi-tool much. I fortunately had a cutting blade for wood and metal, so I installed it and gave it a try.
This worked better than the plunge blade but not as well as the circular saw. However, it cut through the mortar without any issue, so I kept going with it. It took awhile to cut a long strip of the board, and the smell of burning wood was intense. I kept the blade moving and took many passes to cut through the depth, so I am not sure what else I need to do here to prevent the burnt wood. If that is what it is?
I was finally able to remove two large strips from the middle of the room based on the cuts I had made. I used my chisel and hammer to pry the wood up at the cut seams. It took patience and some good old elbow grease, pushing, prying and pulling, to get these pieces up. The screws holding the boards in place popped up easily enough with some effort. (I could not unscrew them from the top, as you could not see them under staining, mortar and water damage.)

The progress was a relief! But hardly the end of the unexpected challenges in the bathroom demolition.
The rest of the flooring was along the edges of the room, and some of it was under pipes or under the baseboard. (As noted previously, I cannot yet remove the baseboard due to the radiator., which my plumber will drain and remove because the valves are broken and I cannot do it myself.)

I carefully pried up the free edges and then worked at pulling the wood up and away while being careful of any obstructions. It would have been good to cut the pieces down more, but given how hard it was, I decided to just keep working at prying these larger pieces.
Once I got an edge up, I shoved a piece of wood under and hammered it underneath the board, raising the board little by little. This helped pry the plywood up when I could not reach with my chisel and hammer. It worked fairly well. I also used two hammers and walked the edge of a board with the claw of each hammer. I pulled the board up, slipping the next hammer under and continuing along. This worked well for places where the wood was especially difficult to lift.
Honestly, a lot of the final success was simply sheer stubbornness and not wanting the flooring to beat me. I just kept pulling, pushing and prying, and even breaking off pieces of the plywood where I could. And finally, the pieces came up.
In hindsight, a really good crowbar would have helped. As well, a blade for the circular saw that could handle cutting through mortar.

Importantly, as with all DIY projects, the more I did, the more confident I got about what I would find underneath and the less worried I was about hitting a pipe.
So, lesson of the day: Keep at it. You will get it. It took me about three nights after work to get the entire floor up. For such a small space, that should tell you how much I struggled. This might be my least favourite thing so far in my DIY journey. As such, I also forgot to take many pictures!
But, the floor is finally up! I did it! So there!
Removing Plasterboard
Sadly, after finishing the floor, I still was not done. Another unexpected challenge in the bathroom demolition was to deal with the back wall where the tub had been and which is covered in mortar from the tile removal.

I spent a lot of time trying to remove the mortar from the plasterboard. I used hot water and steam to try and soften it, but as it is a cement-based mortar, this did not work for me. It could work for you, so give it a try. The Interwebs are awash with stories of success with these methods, but it was not to be for me.
When the steam did not work, I got a sharp chisel to pry off the mortar. But after several hours, I had only covered a small space and I had done significant damage to the paper covering of the plasterboard. I was able to remove the mortar easily when the plasterboard was finished. But most of the boards were raw or unfinished, and the mortar pulled the top layer of paper away when it came off. Or should I say, if it came off.

My plumber had suggested simply covering the wall with another layer of plasterboard or cement board. But I really did not like reducing the small room even by a few millimetres. Space is at a premium, I don’t want to be taking any away, no matter how small. And I would still need to smooth the wall down a bit to ensure an even surface.
The Solution: Replacing the Board
I spent several days trying to figure out the best course of action for yet another of the unexpected challenges in the bathroom demolition. I finally decided to remove the plasterboard and replace it.
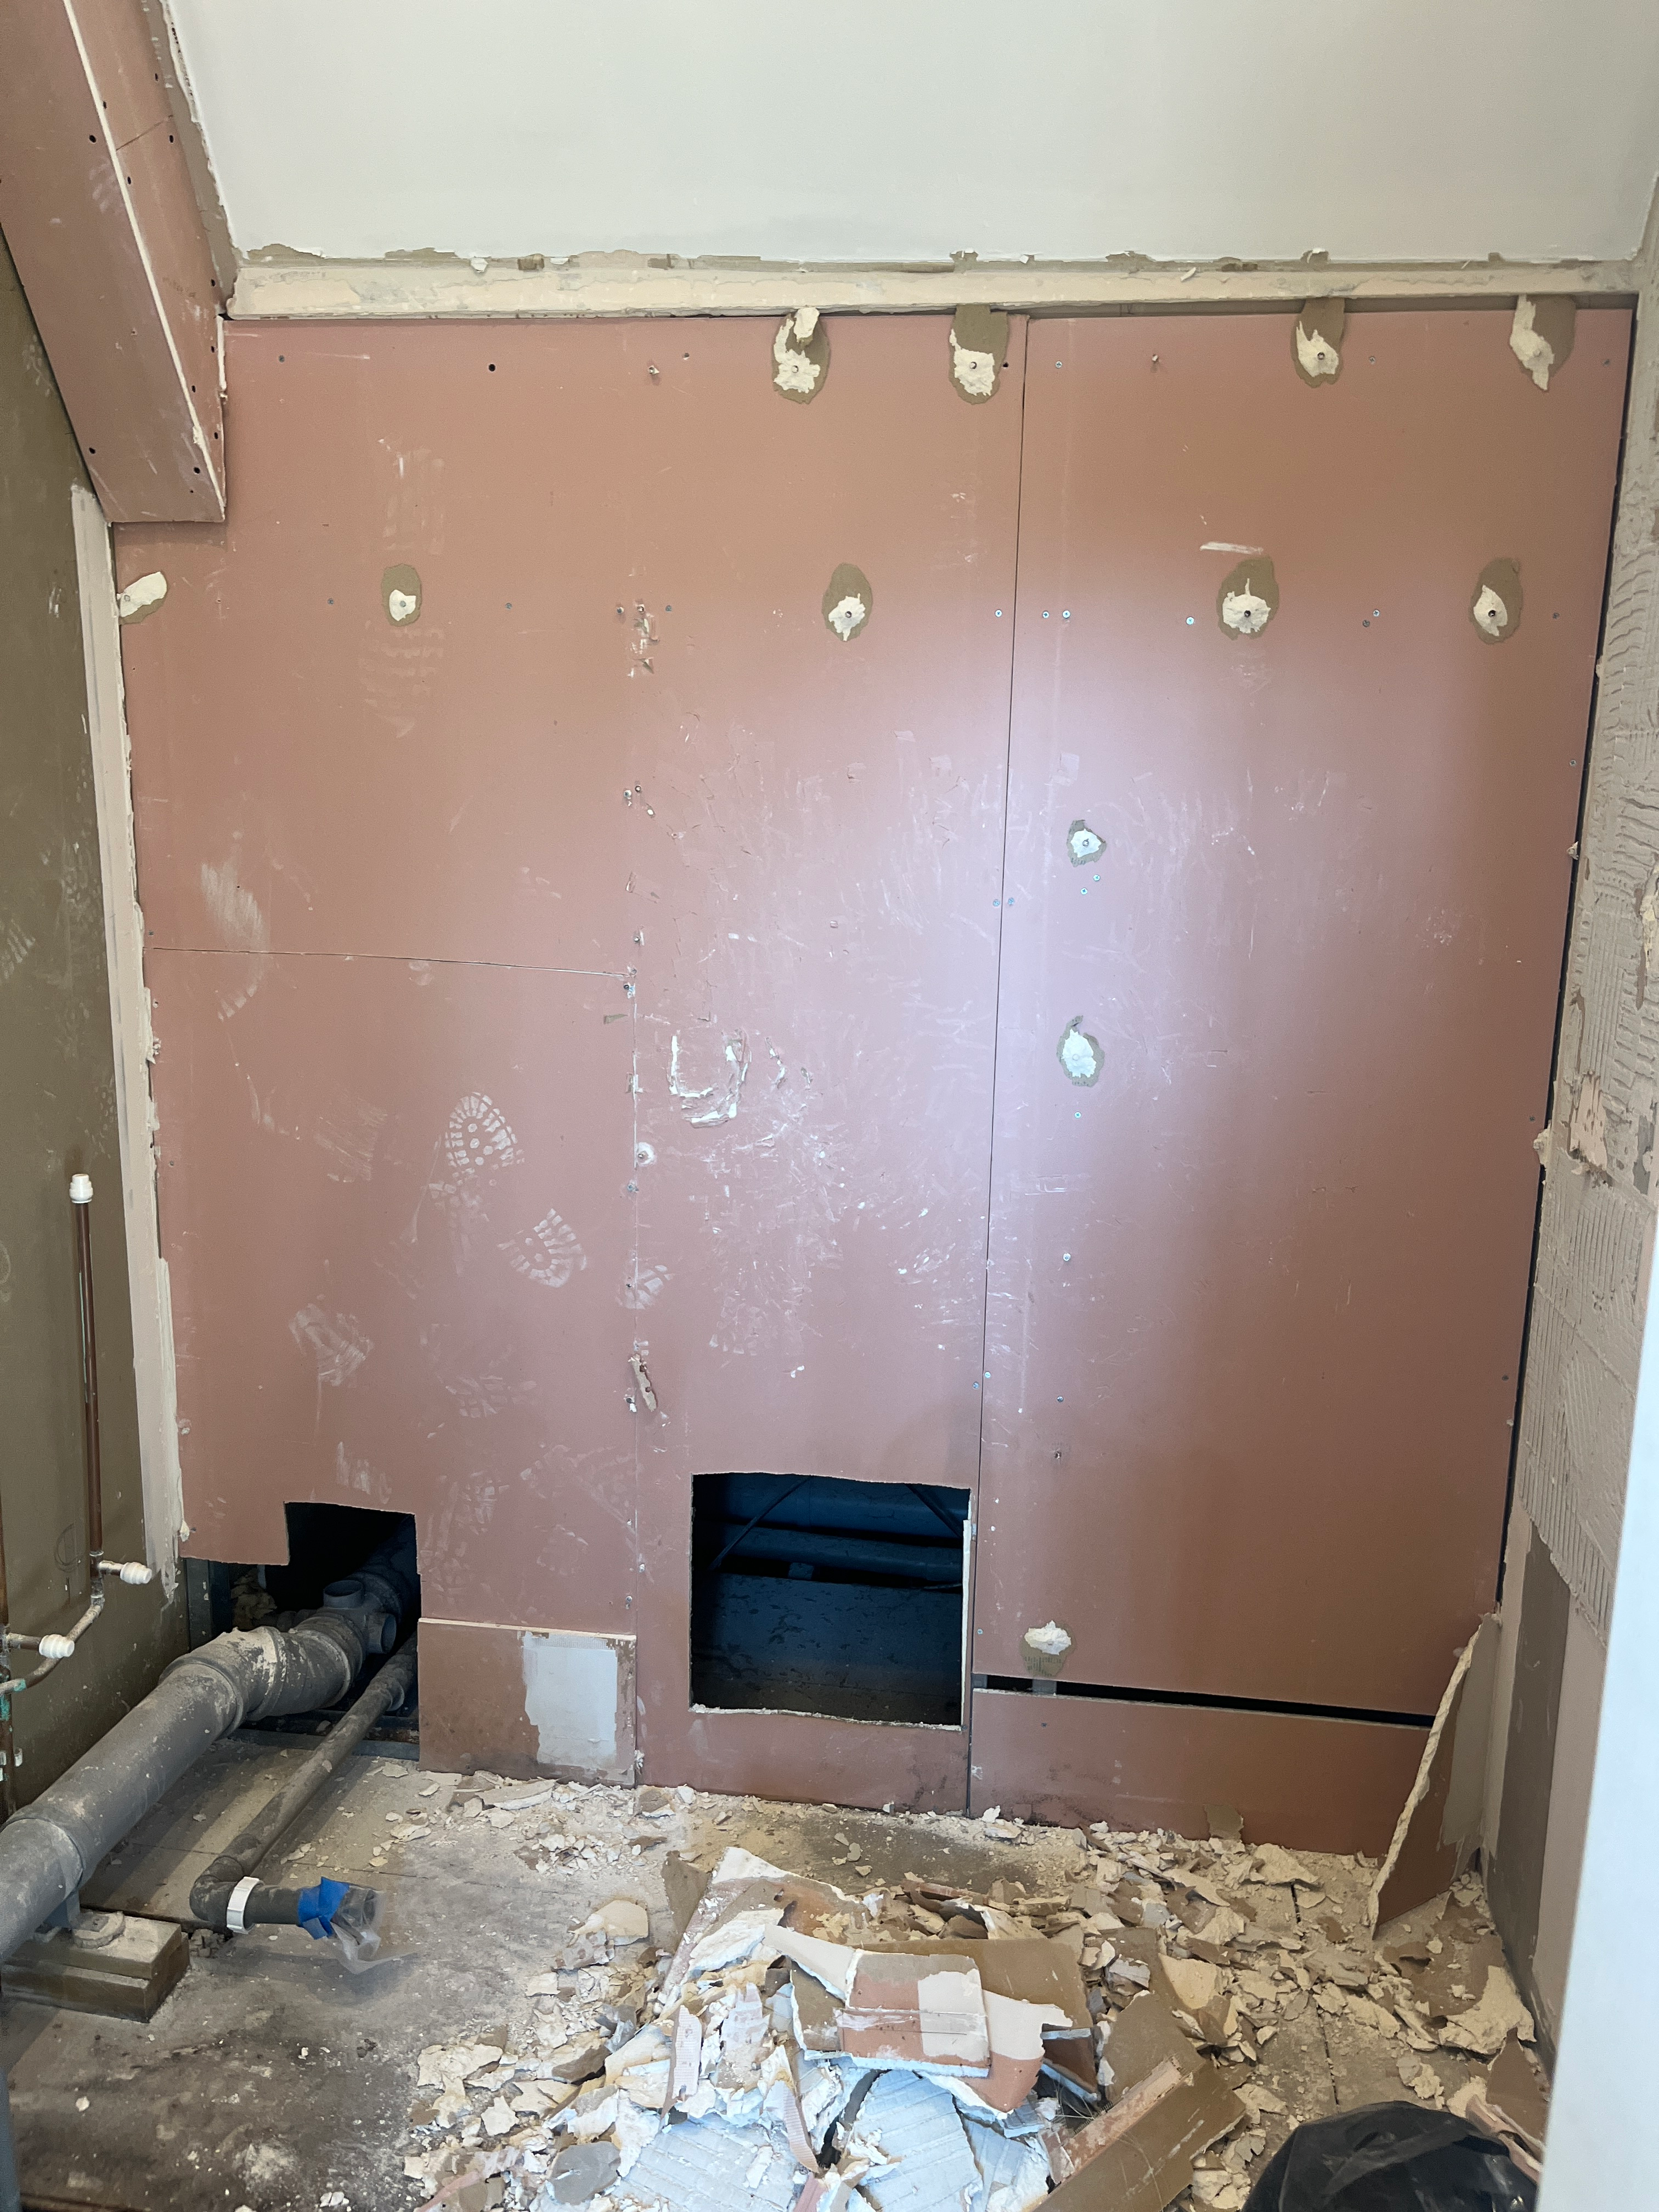
The wall backs up to the eaves, and it has fire-resistant plasterboard on it currently. You can tell this because the paper covering is pink. In the UK, pink plasterboard is fire-resistant while green is moisture-resistant, for areas prone to water.
As well, the wall has two layers of plasterboard. I am not sure why, other than to potentially increase the fire resistance. Except, there is a huge hole in the plasterboard, which we discovered when we removed the bathtub. And the seams have not been sealed either. I am not sure how resistant the plasterboard can be with open seams and a large hole cut in it …

I decided to try removing the front board, with all the mortar, without damaging the back board. How much better to not have to re-install two layers of plasterboard, if possible.
I did not have a lot of confidence that this would work, and I was fully prepared at any moment to just take the entire wall down and start over. But, with a good technique, I was able to remove the front board and salvage the back board.
As with most things, the most difficult part was getting started. Because of all the mortar, you could not see where the boards were screwed into studs. I tried to start at the open hole that had been cut in both layers of the plasterboard. But I could tell that there was not enough structural integrity at the cut-out to pry the front layer away without damaging the back layer.
Instead, I used my trusty jab saw to cut a small hole in the front layer. I had to be careful not to go too deep. Once I had cut a square of some depth, I chiseled away the plaster, taking off small chunks carefully. Finally, I could see the brown paper backing of the front board and knew I had arrived. Peeling this away, the pink facing of the back board smiled out at me. Success, on a very small scale!
Next up, I started chiseling away at the surrounding plaster. I put my chisel into the plaster centre, not against the pink back board, and I nibbled away at the plaster in small chunks before finally reaching the back board. This helped ensure I was not damaging the back board, because the chisel had to go in at an angle and could easily penetrate the back board if not careful. Ask me how I know this …

I worked at it for awhile and I had only removed a small amount, but the back board was intact, and the boards were not glued together, which had been my worry. As well, the more plaster I removed from the front board, the more I was able to get my chisel in a flat position to drive it underneath the front board without damaging the back board. The more I could start doing this, the quicker and easier the plasterboard started coming away in large chunks. Eventually, I was able to use the claw of my hammer to pry large pieces away, without damaging the board below.
About halfway through, one panel came away almost completely intact. I am not sure if my technique had been perfected or if they did not use enough screws on the board, but either way, I’ll take it!

After about two hours of work, I had removed the entire wall, and with it, all the mortar. A smooth, gleaming pink board stood there, replacing the heavy layers of mortar that had been on the front board.

I am debating if I will add a fresh layer of fire-resistant plasterboard over this layer, just to replace what was there before, or if I will replace the top layer with cement board. Both can work for tiling, but I am leaning toward the cement board, which just feels more durable for such a wet space.
But that is for another day, after first fix plumbing is completed.

For now, let’s enjoy the clean sub-floor and pink plasterboard, ready for the next step in this bathroom renovation. And we can finally celebrate, because the demolition phase is finally done! Hooray! Maybe my superhero cape can come back out!
Happy DIY-ing!








Leave a Reply