
When I began dreaming up the bathroom renovation, I assumed that installing underfloor heating would be well beyond my skills. But I was wrong. By following a few good tutorials and taking it step-by-step, I’ve been able to add this luxurious addition to my bathroom floor and improve the spa-like experience I am going for.
Last week, I shared the necessary steps for ensuring a secure and water-proofed floor for the bathroom renovation. A part of that process included installing waterproofing boards that can also act as insulation if you plan on installing underfloor heating. Make sure you read that post in case you plan on installing underfloor heating in your own renovation.

Today, let’s dive into the toasty project of ensuring warm feet in your bathroom: installing underfloor heating.
Are You Considering a Bathroom Upgrade?
Get a step-by-step guide and tons of tips and tricks from my own experience renovating my bathroom. From demolition, to water-proofing, tiling, and installing fixtures, this is your ultimate guide through the process.

A Little Background
As I read up on underfloor heating options, I learned that you have two options for the install. First, underfloor water pipes that use hot water to heat the floor and the room. Second, electric heating cables. For today’s install, I am discussing electric options, as water pipe installation is beyond the average DIYer.
However, installing electric systems that use cables hooked into a thermostat is very doable. And it is a very good option that provides an efficient and effective solution for warmth.
There are many options out there. The easiest ones provide a system of cables laid out on mesh mats that you simply lay out over the flooring, according to the directions.
Importantly, this DIY is a little more advanced than some of the other aspects of the bathroom renovation. You will need the support of an electrician for some parts of the install. And you need to carefully follow all the instructions. But, installing underfloor heating is easier than you might think. So do not be put off from giving it a try.
Let’s jump in, shall we?
Choosing an Underfloor Heating System
In my case, I chose the Thermosphere underfloor heating system for my bathroom, which I ordered from Drench. I had watched a few videos of the system being installed, and it looked clear and straight-forward. While I did not do a lot of comparisons, there are several similar systems out there that are probably installed quite similarly.
Overall, I am quite happy with the Thermosphere system so far. But I must caveat this with the fact that I have not yet used the system and seen how it works in real life. This is because you cannot try the system out before installing it, which is one of the more stressful aspects of installing underfloor heating if you are a DIYer. Let me explain.
When installing underfloor heating, you make certain checks using a multi-metre to ensure the system is working and the current is flowing through. But until you lay the tile over the system and a waiting period has passed, you cannot turn on the system or start to use it. So there is a level of trust that everything will work out in the end, but you never know.
So, I am sharing today’s post without having yet checked that the system actually works! My positive experience is based on the ease of installation and the support provided for the system. Once the renovation is complete and the waiting period has passed, I’ll be sure to report back on if my efforts at installing underfloor heating were truly a success and my thoughts on the actual product in use.
The Thermosphere Underfloor Heating System
There are a few components to the Thermosphere system.

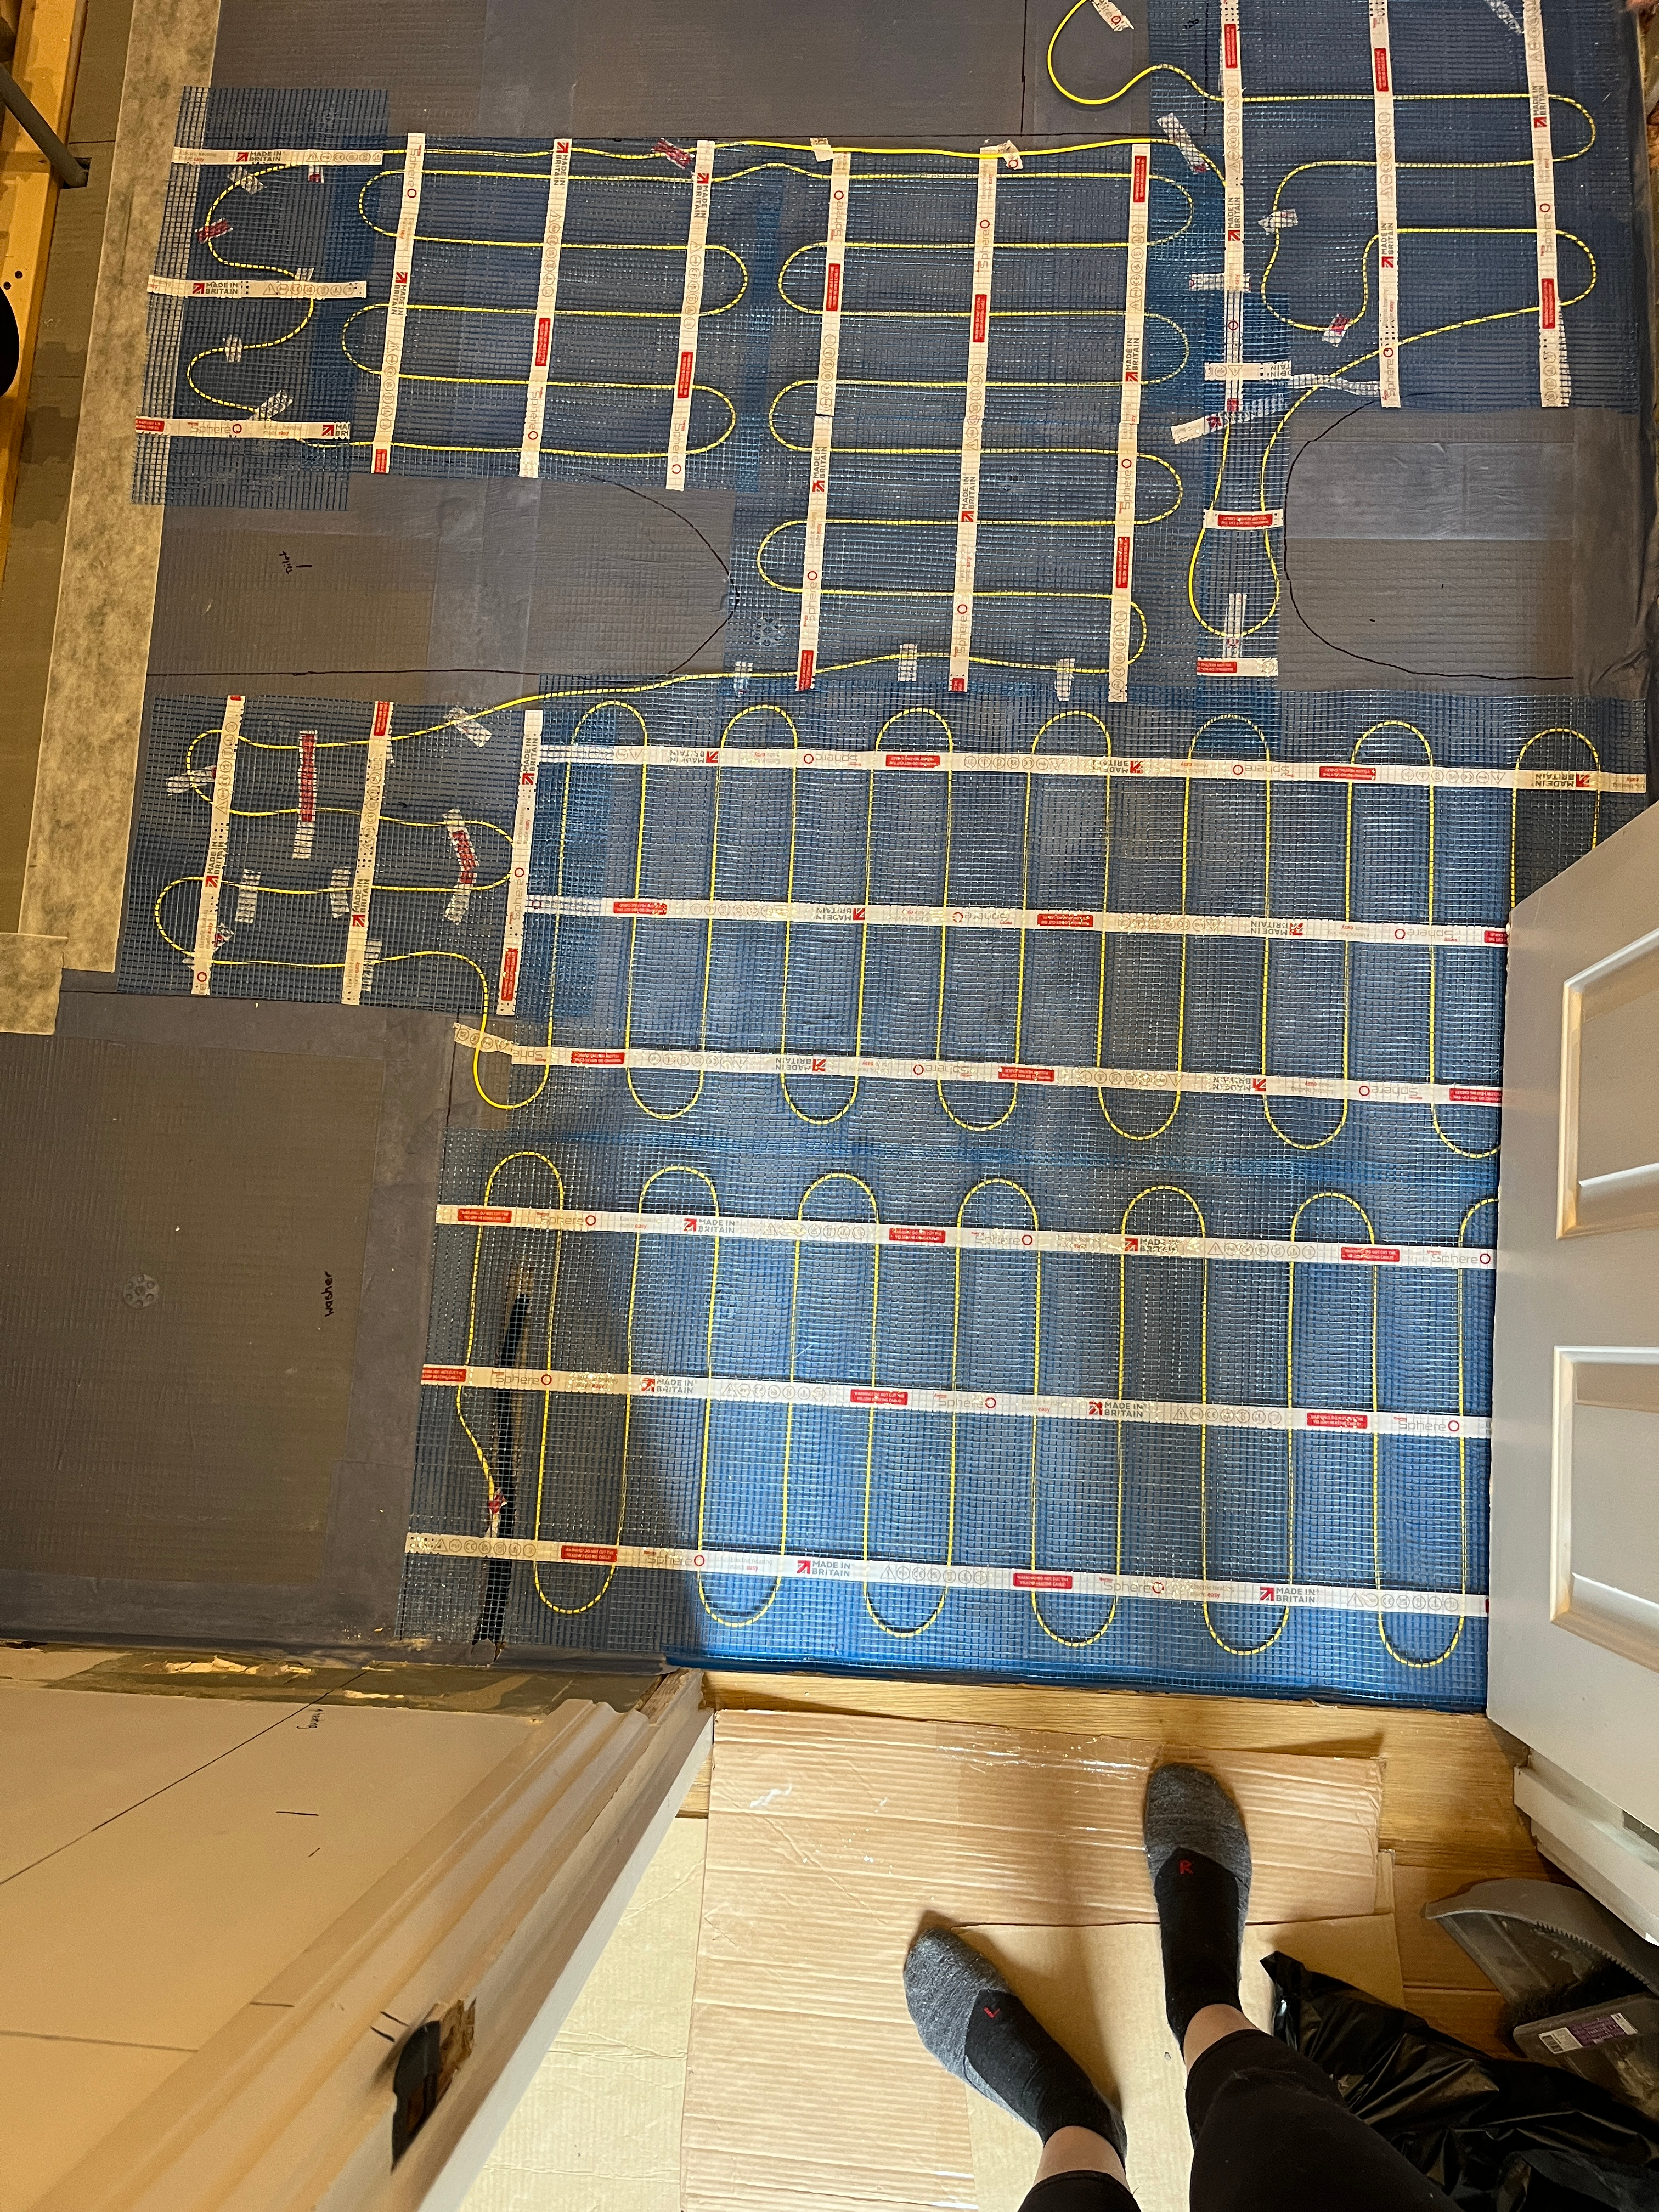
The central component of the system is the heating cable installed on a mesh backing for ease of use. (You can also just purchase the cables and lay them yourself without the mesh, if you prefer.) The mesh backing is sticky so it lightly adheres to the floor. You lay the cables in a perfect pattern on the mesh for installing on a straight run with no obstructions. (We will get to how you work around obstructions like fixtures a bit later.)
The mesh system comes in different sizes depending on the size of the room.
Along with the cables, you also need a thermostat, which is sold separately. An electrician needs to attach the thermostat to the system.
How to Install Underfloor Heating
For this post, I will share how to install the Thermosphere system, but most systems are quite similar. Just read their instructions carefully for any potential differences.
Step 1: Measure the Room and Order the Correct Sizing
Do not under-estimate the importance of getting this step right. Unlike other projects where you may be able to adapt a system to fit, you cannot cut underfloor heating cables without damaging their ability to work and voiding the warranty. You need to carefully measure and order the right sizing for your needs.
I know first-hand the inconvenience of ordering the wrong size, because I did not account for the sizing of the fixtures in the room. I had ordered 1.5 metres too much and had to exchange for a smaller system. #rookiemistake
To take accurate measurements, either place your fixtures in the room, or tape the outline of the fixtures on the floor. This does not need to be perfect, but it should be as precise as you can be. The reason for this step is because you do not want heavy fixtures or furniture sitting permanently on the cables, which can damage the system.
Take measurements of the remaining floor space where you plan to install the floor heating. A simple way to do this is to calculate the square metres (length x width of the room), then subtract the area taken up by each fixture. You only need to account for the base of the fixture that sits on the floor. In my case, I needed to subtract from my calculations the shower pan, toilet, pedestal for the basin and the washing machine. This took me from four metres down to 2.5 metres. Hence the exchange needed of the mesh mat.
Step 2: Electrician First Fix of Thermostat and Wall Cabling
You may be able to do this step yourself. But as I had the electrician coming to install a socket for the washing machine, wiring for wall sconces, and changing out the fan, I had him do this work as well.
For installing underfloor heating, you need to run a conduit from the thermostat to the floor in the room. This involves cutting a hole in the wall for the thermostat (which in the UK is placed outside of the room, beside the door to the bathroom). You then cut a hole in the wall near the floor inside the room below the thermostat, and you run a conduit, or a plastic tube, between the two.
Running a tube down the wall blindly is not easy. My electrician had some great threading tools that helped him do this. If you are taking this step yourself and are struggling, another option is to cut out a channel in the drywall all along the wall and then patch it later.
Step 3: Cut a Channel in the Flooring to Bury the Conduit
Once you have installed the conduit, you want to ensure you can bury it under the final flooring. This conduit is used to run the floor sensor cable under the tiles, while allowing for you to easily remove it in case it stops working and needs replacing.
To properly bury the conduit, cut out a channel in the waterproof flooring, as well as the sub-flooring if needed. I used a chisel and hammer to cut out a channel in the JackoBoards, which was really quick and easy.

However, when I laid the conduit in place, it was still sitting above the flooring slightly. To fully bury it, I needed to cut into the sub-flooring which I did not want to do. I do not know what is under the floor in terms of pipes, but I do know a gas pipe runs somewhere under the room, as the boiler is next door.
As I tried to figure out a solution, I realised that the electrician had used a larger diameter conduit than the one supplied by Thermosphere. I am not sure why, but the thinner conduit that had been provided with the thermostat would work perfectly. While I tried changing the conduit myself, I was unable without cutting into the length of the wall.
I am not sure why the electrician did not use the conduit provided, but I called and had them come back out to exchange this, to keep me from having to cut into the sub-floor and into the wall. Learn from me and if using an electrician, ensure he/she uses the conduit provided, unless you do not mind burying a larger cable.
Step 4: Make a Plan for the Cable Layout
Before getting your cables out of the box, think about how you will lay them out. Choose a starting point, and maximise the long, uninterrupted runs of the room. Ensure the starting point aligns with the conduit. You want the conduit with sensor cable to sit between two loops of the heating cable, so it can get an accurate reading. I needed to move the conduit over a bit from where the electrician had it coming out of the wall. This required a small cut in the drywall to move it over slightly.
There is also the long tail of the cables, that needs to run up the wall alongside the conduit to connect to the thermostat. This is why the starting point needs to be where you’ve installed the thermostat and conduit.

When installing underfloor heating, you also need to ensure you use all of the heating cable. In case you have just a bit of cable left at the end, you can always run it around the perimeter of the room. But you should not have too much cable left over. So again, plan carefully and order the right amount.
I actually found it quite difficult to do a plan without the actual cable, so I did not spend a lot of time on this. Rather, I did a dry run with the actual cable, before finalizing the placement.
But first …
Step 5: Perform the First of Three Electrical Tests
As soon as you take the mesh and cable out of its box, you need to perform some tests. This is a requirement to ensure the warranty is valid and the system works.
Because you cannot actually turn the system on until it is fully installed and covered in tile, you need to make sure the system is working properly. To do this, Thermosphere has you do three electrical tests during three different points of the install. You need a multi-metre to perform the test, or you can have the electrician do it (but this might require three separate visits).
When you first take the mesh system out of the box, this is when you perform the first tests. Here, you are testing the resistance measurement of the electric cable, the insulation resistance, and the floor sensor.
I had never used a multi-metre before. My husband’s words of encouragement were ringing in my ears: “I’ve never gotten a multi-metre to take a successful reading of anything before.” Fortunately, my dad had given me a multi-metre he had in his shop, so I pulled it out to try. After some incorrect readings and lots of confusion, I realised the battery was bad. So I replaced it, and with some support from the Interwebs, I was able to take the readings.

A few tips for using a multi-metre:
- It reads many different measurements, so you need to know which settings to use. A search of the Interwebs for your specific need is best.
- For the underfloor heating, you are reading Ohms, which has the Omega symbol. Turn the dial to Ohms.
- There are multiple options here, so start with the lowest reading, usually 200 ohms, and move the dial up after each test until you get a reading. A 1 on the screen means you are not at the right setting.
- To take a reading, you apply the nodules to the wires, pressing firmly to ensure a good connection. Ideally, alligator clips would ensure a good connection, but I did not have these, so the readings were a little harder.
- You also need to make sure the nodules plugged are into the right ports. For these readings, the red cable needs to be plugged into the ohms port while the black cable needed to be plugged into the COM port. Check the guide for your multi-metre, as it might be different. It also differs depending on the measures you are taking.
The Thermosphere directions for taking the readings were not too clear. While they say the system can be installed by DIYers, their instructions are really written for an electrician. Fortunately, I found (after a lot of searching!) a great video from the company with a step-by-step guide, including the test steps. Check this out for more guidance on the tests and how to record the results.
Compare your results with the label on the box, which tells you the readings you should get, with a tolerance on either side. Record everything in the instruction book on the page noted. Again, this is mandatory for validating the life-time warranty. Assuming all the readings match up, you can proceed.

Step 6: Lay Out the Cable
This is the most fun aspect of installing underfloor heating: actually putting out the mesh and making it work in the room. I have quite a small room with a lot of obstacles, so I needed to be creative. If I had installed a heating system previously and had some experience, I might have done better with just the cables to lay myself, without the mesh.
My first run was a straight shot across the room. I had already aligned the starting point with the conduit, so this was easy.

To turn the cabling at the wall, you simply cut the mesh between two loops and turn it to face the opposite direction. Here, I had my second and final straight run, and after turning the mat, I encountered the basin and toilet on the next row.

Here, I simply removed the wiring from the mesh backing. It is taped down, so I carefully removed the pieces of tape and set them aside. I then ran the cabling in the areas needed in the shape that works. I tried to stick to the same loops as on the mesh backing, just in different sizes.
The rest of the room was a mix of short runs using the mesh backing, but a lot of unpicking the cables and laying them myself. In the last corner, I could have just laid out the final bit of mesh. But that would leave a few areas without cables, so I removed the mesh and laid the loops out slightly larger so I could cover the area. This area will see the least amount of traffic, so it should be fine.

Remember: DO NOT CUT THE CABLES. The tape and the cable both have this reminder, but it is worth saying again. You can cut the mesh. You can unstick the cable from the mesh backing. But you cannot cut the cable.
In the places where I had removed the cable from the mesh backing, I then pressed the mesh backing back over the cables that I had laid freestyle. I also re-used the little pieces of tape to keep the freestyle cables in place.
Once everything was in place and I was happy, I went back over the layout and made sure none of the cables were sitting on top of the washers and screws used to install the JackoBoard. There were a few instances, and I just adjusted them slightly.
I also made sure the conduit was positioned in its channel and the long tail was in position to be run up the wall alongside the conduit. At this time, you run the heating sensor wire, which comes with the thermostat, down the conduit from above. When it comes out the other end of the conduit in the room, you put the cap on the conduit, enclosing the sensor. Make sure it is in position in the channel with the mesh covering it and keeping it in place.
At the very end of the heating cable, there is a small ending cable, which also should be laying flat. If needed, you can dig a small channel in the flooring for it, but I did not find this necessary.
As a final step, I went back over the mesh and pressed it as firmly as possible to the floor. There was a plastic covering over the beginning of the mesh, which I peeled off. Make sure everything is stuck down as much as possible.
Step 7: Perform the Second Test
Now that you have laid the cable, it is time to check it again. Perform the same tests as above and record the results. Hopefully everything reads out as needed, showing the cable is still functioning and ready.
Ready For Tiling … Or Not
Now that you are done installing underfloor heating, your room is ready for the final floor covering.
In my case, though, I still needed to deal with the uneven floor. I had done as much as I could with the JackoBoards, but there were still some high spots on the right side of the room and a dip going down the left.
I decided to add some self-leveling compound, to further even out the floor a bit prior to tiling.
The underfloor heating is made to accept either self-leveling compound or tiling adhesive directly onto it. I liked the idea of a protective layer of self-leveling, as I could see the cables easily being damaged by a trowel scraping over them repeatedly as I laid the tiles.
If you need to level the floor, now is the time, after installing underfloor heating.
Block Off the Area to Be Leveled
Before pouring any self-leveling compound, you need to create barriers, so it stays in the area you want leveled. I needed to make sure all edges of the JackoBoards were sealed, so it did not run off the sides and into the cracks. Because I had already done this as part of the tanking, there were only a few areas under the new wall I was building that were open. To address these, I placed spare pieces of wood or tape as a barrier.
At the threshold to the room, I also added tape and some cardboard, to protect the hallway floor.
Mix and Pour the Self-Leveling Compound
Similar to tile adhesive, self-leveling compound comes in a bag, in powder form. You add it to water and mix it for five minutes, until it is smooth and free from lumps. Use a drill paddle mixer if you can.
Self-leveling compound is a thinner liquid than adhesive; it should be pour-able and only slightly thick, a bit like a smoothie.
I made a batch from one bag, but my bucket was not big enough, so I could not add the last 1/8th of the bag. I mixed well and then poured it out on the floor, starting at the back of the room.

I poured carefully, putting some in each back corner. It started to spread immediately, so pay attention that you are faster than it. You also need to pour slowly enough that you can help ease the liquid into the corners and generally help it along, so it covers the entire floor.
The compound mostly does the work itself, but you do need to coax it along a bit. It also goes quickly since it is a thin liquid. While I have a small room and only wanted a thin coat, I could see that one bag was not enough. I could only cover about 60% of the room.

I let the first batch cure over night, and on day 2, I mixed up another batch from half a bag and finished pouring it.

On day 3, the self-leveling compound had completely cured and I checked it out. It does not look pretty, as in many places, it seeped under the adhesive mesh. Bits of mesh are poking up through the compound, but they are flexible and will just be compressed when I tile. One cable is not quite covered, but this will be dealt with when I tile. I did not want too thick of a layer, so that also impacts the coverage.

The important thing is, is the floor level? I checked with a level, and it is remarkably level. It is not perfect, there is still about a .5mm difference in one spot right to left. But given the previous dips, it is a lot better.
To double-check, I used some little balls, like marbles, to test the floor. You set these around the room and see if they roll about. This tells you the slope of the room and any dips or highs. The little balls rolled slightly and then stopped. A good sign the floor is even.
The final test was my plumber / consultant. When he came by, he agreed it looked great and that it did not matter about the mesh peeking up. He also laid the shower pan in place and said it required very little effort to level it, which is always a good sign!
Job Done, Ready for Tiling
The final step in the flooring is the tiling. I hope to get that done this week, although I also need to reboard the walls before I can tile the shower. I would love to tackle the floor and wall tiling all in one go, so we will see.
In the meantime, I am enjoying the progress made on this floor. It has been a lot of steps, but the result is a solid, level, tanked floor that will hopefully deliver some warmth to our feet when the bathroom renovation is finally complete! Here is to installing underfloor heating and self-leveling compound. Two more new-to-me skills!
See you next week, and in the meantime, Happy DIY-ing!








Leave a Reply