
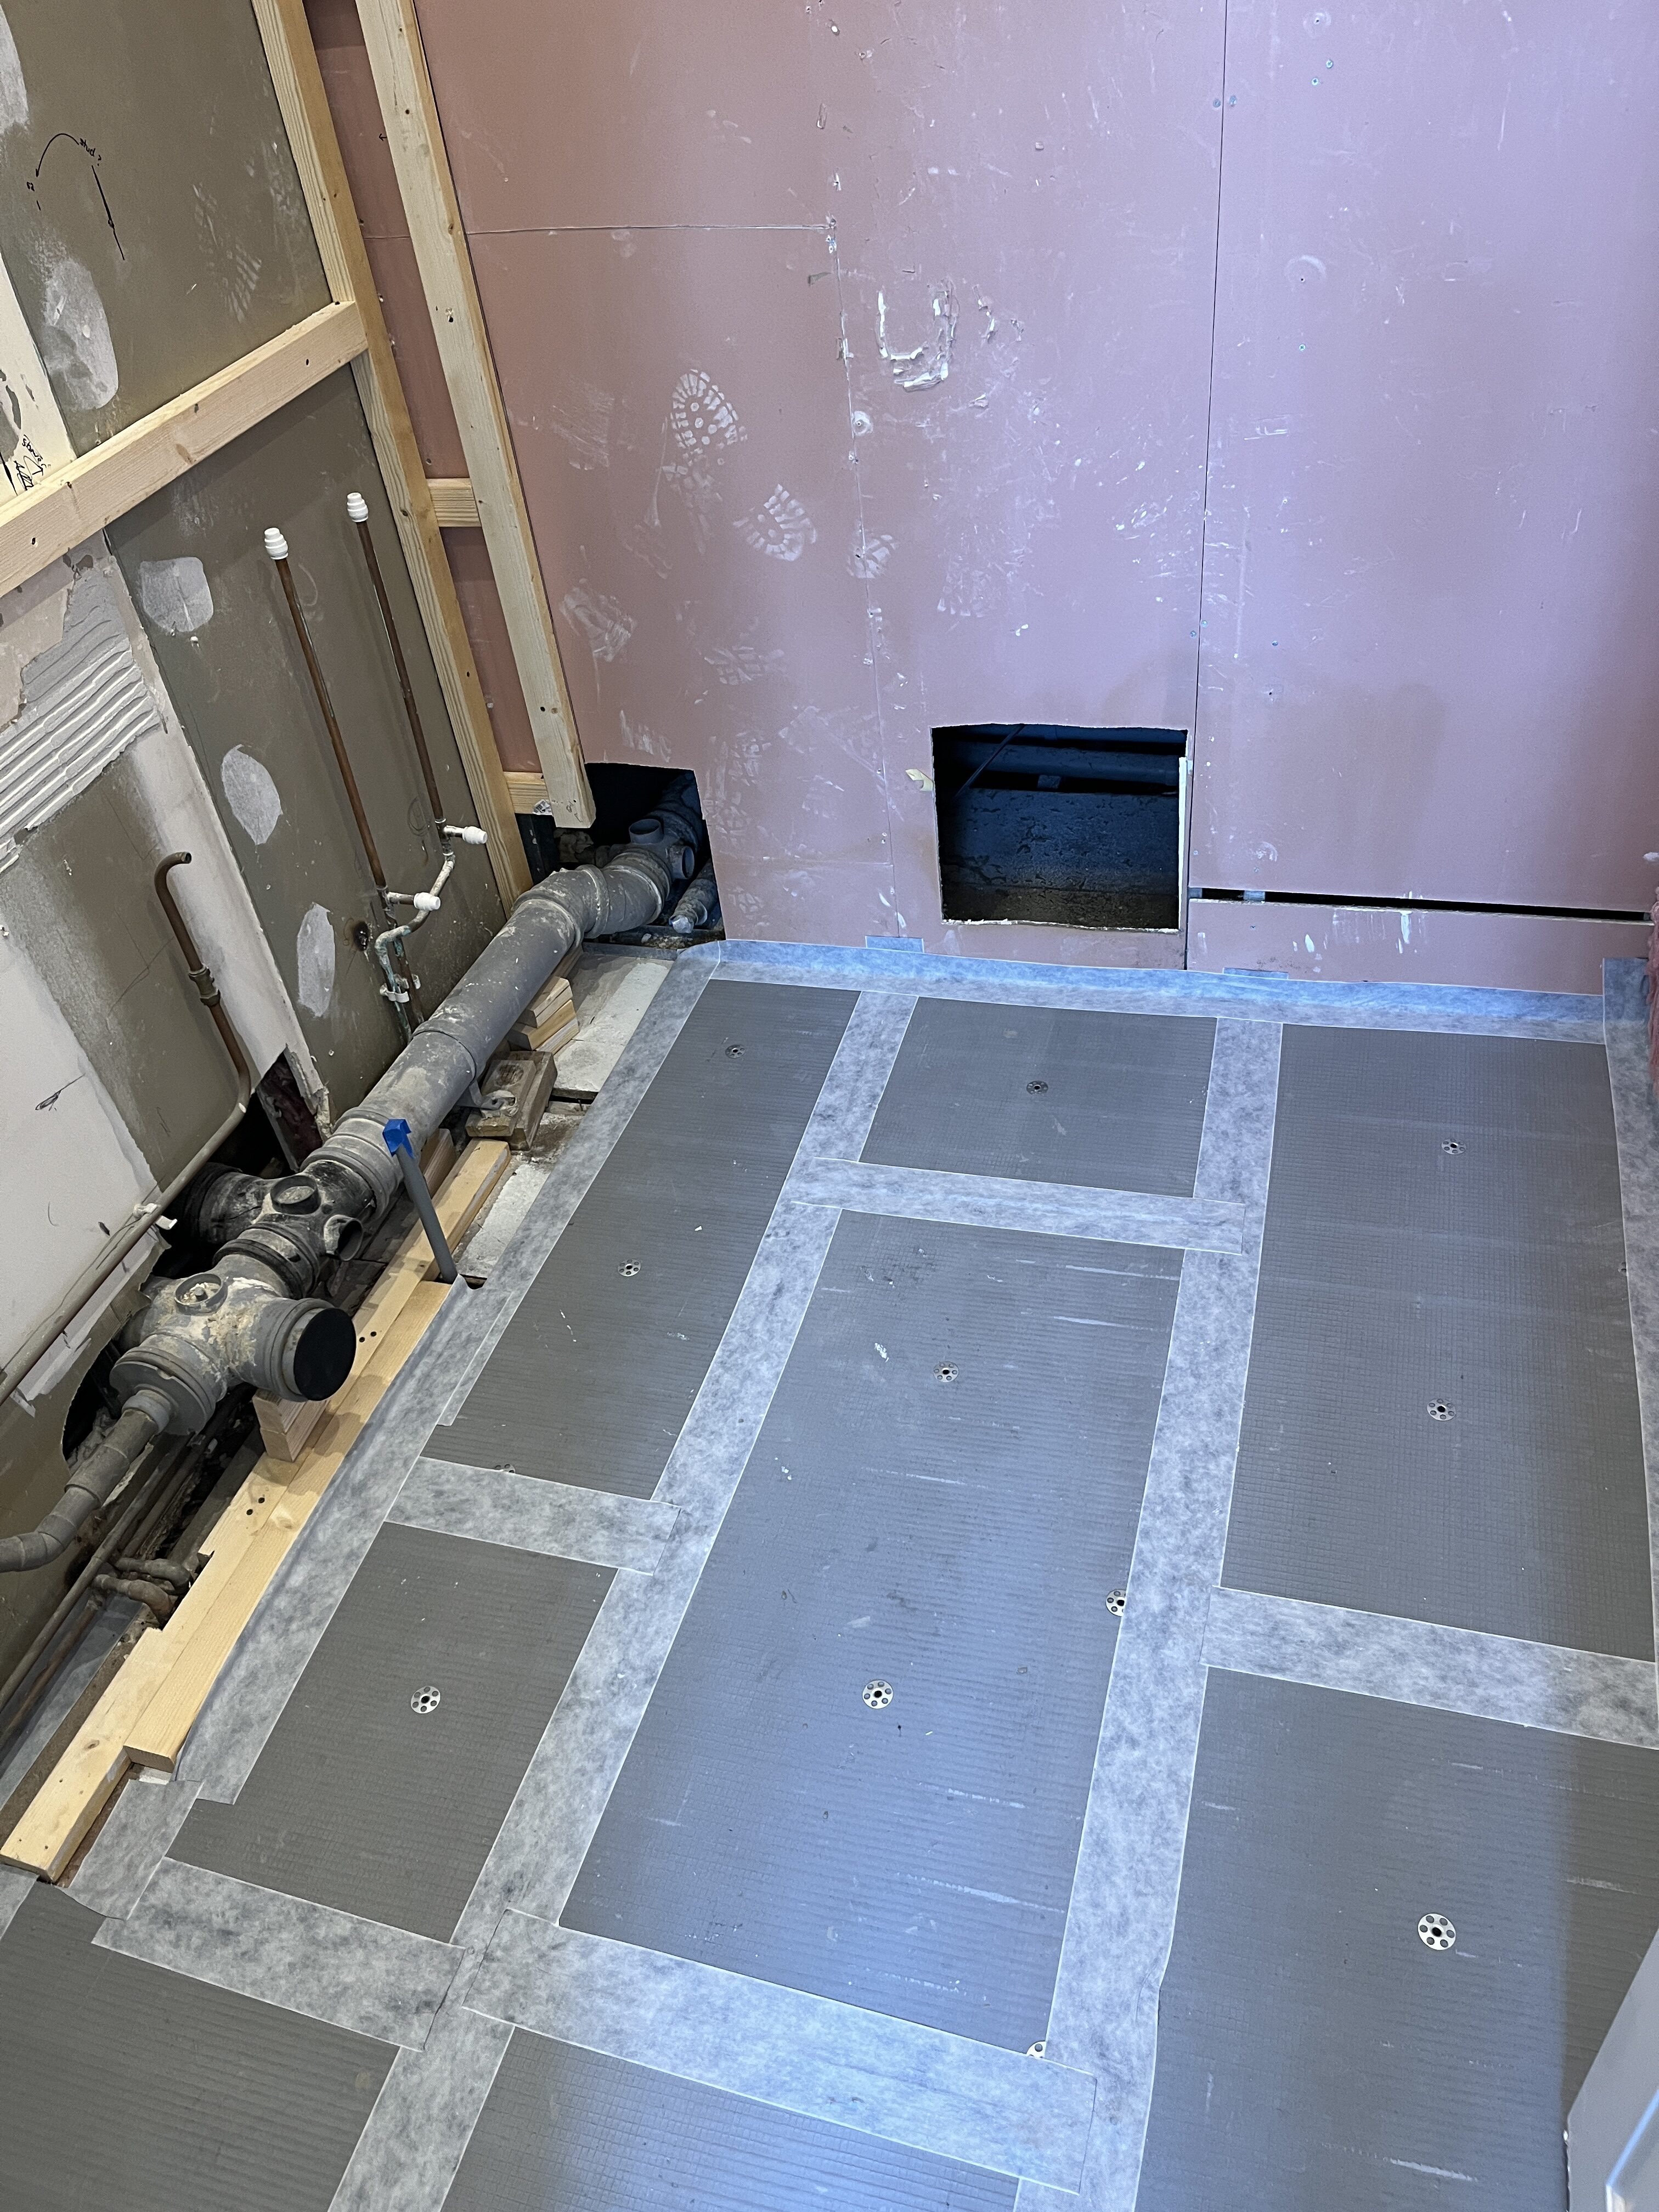
The floor is one of the most essential aspects of a bathroom renovation, as everything literally rests upon it. It is critical to ensure a strong, sturdy floor, ready to accept all that will come its way. Today, let’s look at water-proofing the floor in our DIY bathroom renovation journey. I’m sharing all the tips to make sure this high-traffic and very wet room is completely waterproofed.
When I began my bathroom renovation, I had no idea what I would find under the ugly orange floor tiling. But I assumed it probably would need some work. Several of the tiles were cracked, which could suggest movement in the sub-flooring. As well, there was the potential for water ingress, as I started removing tiles and finding areas of the plasterboard that were not properly sealed or tanked.
And I was right. Once I was able to get all of the orange tiles up from the plywood underlay, I could see several uneven areas, some rot, and a lot of water staining. There have been a lot of innovations since the work was originally done in this bathroom, so there is great opportunity to improve the waterproofing with this renovation.

Between the state of the floor and the amount of tile mortar left behind, I needed to remove the plywood underlay and reveal the sub-flooring. (That was quite a job and probably one of my least favourite DIY projects to-date.)
Fortunately, the sub-flooring was secure and stable for the most part, although someone had cut a huge hole just under the toilet, which reduced the strength in that area. As well, there were water stains, but fortunately, no mold. Overall, the floor was stable and secure, although not too level. A few days in the open helped ensure a dry sub-floor ready for its make-over.

Now, in all my research about water-proofing the bathroom floor, there are a lot of different approaches you can take. In some ways, it depends on what you plan to do to the floor, like tiling, vinyl or laminate. And the state of the sub-floor will dictate your actions too, of course.
If you have not removed your flooring yet, check out the posts on removing the floor tiles and lifting up the underlay. You need to get down to the sub-flooring, if you plan to change out the current flooring.
All the Steps For Waterproofing
Let me share with you my approach to water-proofing the bathroom floor, which includes quite a number of steps. Better safe than sorry, since everything else in the bathroom renovation is dependent on a waterproofed floor as a sure foundation.
Are You Considering a Bathroom Upgrade?
Get a step-by-step guide and tons of tips and tricks from my own experience renovating my bathroom. From demolition, to water-proofing, tiling, and installing fixtures, this is your ultimate guide through the process.

Step 1: Secure the Flooring
First things first, you want to make sure the sub-flooring is stable and secure. If you have any missing or rotted boards, replace them, and ensure the floor is dry and clean. I left the sub-floor to dry out for a week just to be sure there was no damp. (I had some travel for work, so this worked out well!).
If you have any lose boards, re-fasten them to the joists below, with nails or screws. Of course, be careful when nailing into the sub-floor, that you know what is below. There may be water or gas pipes or electrical cables, which you obviously do not want to hit.
In my case, I needed to fix the hole in the flooring that is right where the toilet will sit. This area held the last toilet just fine, but it seemed better to stabilise it just in case.
I had already laid a stud across the floor, running parallel to the joists and the hole. This was for the original base of the new stud wall, which ended up being too shallow for my needs and was re-built. But the stud stayed in place and served as a brace for repairing the flooring.

Using two smaller pieces from the CL16 studs used for the new wall, I clamped one end to the board and the other end under the flooring on the other side of the hole. Using two 65mm screws on each end of each board, I secured the studs in place, perpendicular to the long stud and creating two braces across the open hole.

I could have covered this over with a piece of plywood, but as I knew I would cover it in a later step, I did not do this. But you certainly can if you face a similar situation.
Step 2: Ensure the Sub-Floor is Clean and Clear
As a precaution, I decided to paint the sub-flooring with Zinsser BIN, which is a primer, sealer and stain killer that helps prevent mold. Zinsser alone is not enough for water-proofing the bathroom floor, but it is a good start. This also helped make the sub-flooring look a bit nicer. Not that it matters at all because I will cover it with tiles. But it just felt a bit better to clean and refresh the sub-flooring in advance of all the work it would be doing for my new bathroom. And adding the primer helped ensure the water stains are covered and will not mold later.

At this stage, I also checked to see how level the floor is. It is slightly higher on the right side, but only by 1-2mm. Not significant, but certainly not perfectly level. This is not uncommon, and all my reading says that a few millimetres off is not too terrible, as long as the floor is stable and flat with no large holes, dips or rises.
I also measured the depth of the floor with my chosen floor tiles against the threshold leading into the hallway. If at all possible, I want to ensure a level transition between the hall and the bathroom, so I wanted to make sure my various layers on the floor would allow this.
As you can see, there is sufficient room for adhesive, once I’ve stacked the waterproofing boards and the tiles.

Finally, I took this moment to paint on a layer of SBR, which is a priming and bonding agent that helps tile adhesive to stick to the floor below. UPDATE: I learned the hard way in my master bath renovation how important primer is. I should have used it between layers of self-leveling compound to prevent de-laminating. So, when in doubt, prime.
3. Add a Layer of Waterproofing Boards
The next step in creating a sound and secure bathroom floor is adding a layer of waterproofing boards. Also known as tile backer boards. The bathroom can be a very wet place, and because I had already seen water ingress in the previous set-up, I want to ensure a water-tight room to the extent possible.
Another reason for this step is to ensure proper insulation, especially if you plan to add underfloor heating. Which I do. For maximum benefit of an underfloor heating system, you need to place the heating mats or cables on top of a layer of insulation that can direct the heat upwards, toward the room. Laying directly on plywood sub-flooring will suck much of the heat downwards, which will be a waste of heat and expense.
For water-proofing the bathroom floor, I decided to use JackoBoards, which are a cement board on the outside with a foam core. This makes them fairly lightweight and easy to use, while also offering excellent strength, insulation and waterproofing. (And I love that they are purple!)
I ordered 10mm boards from ProTiler Tools and was super impressed with the service, delivery times, selection and pricing. Since this was my first time using the JackoBoard system, I ordered the self-adhesive sealing tape, bonding agent and galvanized washers recommended to go with the boards. I probably could have found cheaper options, but I want to ensure the install is as perfect as possible.
To lay the JackoBoards, or any type of boards for water-proofing the bathroom floor, do a dry layout of the boards, to get the placement right. You want to avoid too many seams, where more than two boards meet up, so vary the layout in something like a brickwork pattern.

My room is small and rectangular, and it is the exact length of two JackoBoards. For my first row on the right side of the room, I laid the JackoBoards without cutting them. But for the second row, I cut one board in half across its width, and put the cut ends on either end of one long board. For the third row, I placed one long board, after trimming down the width to fit. I cut the next board to meet the end of the stud wall, and I cut the final board to fit the area where the washer will sit. I needed to add a smaller piece against the wall too.

Cutting the JackoBoards is super easy. You can use a utility knife to cut the board, pressing into the cement layer and through the foam. Use the spirit level as a guide for a straight cut. To finish the cut, stand the board on end, fold it along the cut, and cut away the back side of cement board.

Once you have decided the placement of the boards and have dry fitted them, it is time to fix them to the sub-floor. You use both adhesive and screws and washers for this step.
4. Affix the Waterproofing Boards to the Floor
Mix up a batch of flexible tile adhesive following the instructions on the package, making sure to mix it well, ideally with a paddle mixer fitted to your drill. Once you have a peanut butter-like consistency, use a trowel to spread it on the floor in small batches the size of a board, with a bit of extra along the margins. Spread in the same direction, using the notched edge, so you get ridges in the adhesive. Aim for a consistent amount across the floor.
Repeat for each board, and make sure you wiggle the board in place, to ensure it is well set in the adhesive. Continually check for level between boards, to ensure you do not have a lip from one board to another.
The process went very quickly for me, but of course, my room is small. After less than an hour, I had laid all of the JackoBoard. The adhesive needs to set for at least 4 hours, but I let it set overnight before walking on it.
Screwing the Boards in Place
Screw the boards to the sub-floor once the adhesive is set. Here, I had ordered the recommended 40mm screws. But upon discussion with my plumber (who is also my sounding board for the entire renovation), I purchased 25mm screws, which would ensure I screwed through the JackoBoard and into the sub-flooring without going through the sub-flooring. Since I do not want to puncture a gas or water pipe that almost certainly runs below the sub-flooring.
I placed one washer and screw at each corner, just in from the edge, as well as one or two in the middle of the board, depending on the size. Press the washer into the board and make sure it does not stand proud above the surface. I did not do a great job here, but I hope the adhesive for the tiles will help cover this.

5. Waterproof the Seams
The waterproof boards will go a long way toward preventing water ingress, but it is not enough. You also need to seal all the seams, between the boards and at the edge of the room.
To do this, I used both the bonding agent and the self-adhesive seam binding that are part of the JackoBoard system. First, the bonding agent comes in a tube similar to caulk. Using a caulking gun, you spread it along the seams to create a seal. I actually think after a closer read of the instructions that you use it on the edges of the boards before laying them down, like a glue. I did not do this, but I still created a good seal at every seam by treating it like caulk or silicone and fully covering the seam.
Update: In my master bath, I found a better approach to waterproofing using the seam adhesive. I tried adding to the edge, but with the mortar as well, it was a mess. So I applied it to the seams after I laid the boards, as I did here. But I took the extra step of running my finger along the adhesive, pressing it into the seam and flattening it out a bit. It was still messy, but I am certain the seams are secure.
Also, with the addition of the self-adhesive seam binding, I covered the seams and all edges a second time with the tape, so this feels like very good protection. Belt and braces, as they say.
Roll out the seam tape over the edges, and peel the backing off in two parts. This allows you to use it on corners and edges between walls and floors as well. You can adhere the wall or the floor first, peeling one half of the tape, then do the other half, for a smooth fit.

I covered every seam and edge in the room, creating a tight seal that should prevent any leaks.

6. Tank the Room
Even with the Jackoboards, seam adhesive, and seam tape, you still are not done. The final step for today is to tank the flooring. Use a waterproofing membrane that you paint on over the floor further to ensure a truly waterproofed space.

Ideally, you would tank over any part of the room that will be exposed to water, including shower walls, the entire floor, and any other areas, all at one time. However, my walls are not yet ready, as several have yet to be boarded. But, I need to get the floor ready before first fix with the plumber, so I am doing it now. Not to worry, I’ll tank the rest of the room once I re-board the walls. I painted the tape at the seam between wall and floor. When I tank the walls, I’ll ensure I go back over the seams between the floor and walls.
There are a lot of different tanking systems. Some have multiple steps, some have an actual membrane you put over the walls. I chose a single-step, paint-on membrane. It is thick, a bit like a gel, and you paint it on in one direction. After it dries, you paint it in a 90-degree direction from the first coat, to ensure you cover the surface well.
The directions say to use a brush, but I used a roller, to save a bit of time.
The end result is a blue, rubber-like membrane over the floor. And a sealed and waterproofed floor ready for tiling.

A Watershed Moment
Well, that’s a water-proofed room. In my case, I’ve finally made some progress toward my bathroom vision. Between last week’s stud wall and this week’s flooring, you can start to see tiny glimmers of progress.
But there is still so much to do. And we are not finished with the floor! Stay tuned next week, when I share another new skills: adding underfloor heating. The final step before we are ready to tile.
I also hope to be ready for first fix with the plumber next week, which will then help me progress with re-boarding the walls, tiling the floor and shower, and starting more of the decorative aspects of the bathroom renovation.
Are you now confident in waterproofing a room? Are you keen to start your own DIY project, whether it is a full bathroom renovation or something smaller to start? Well, wherever you are in your journey, I’ve got you covered. Read more about my own approach to DIY, as an Intrepid DIY-er. Or better yet, download my guide to getting started, and start to build your own DIY superpowers.
And stay tuned here, things with my bathroom renovation are really starting to flow!
Happy DIY-ing!








Leave a Reply