
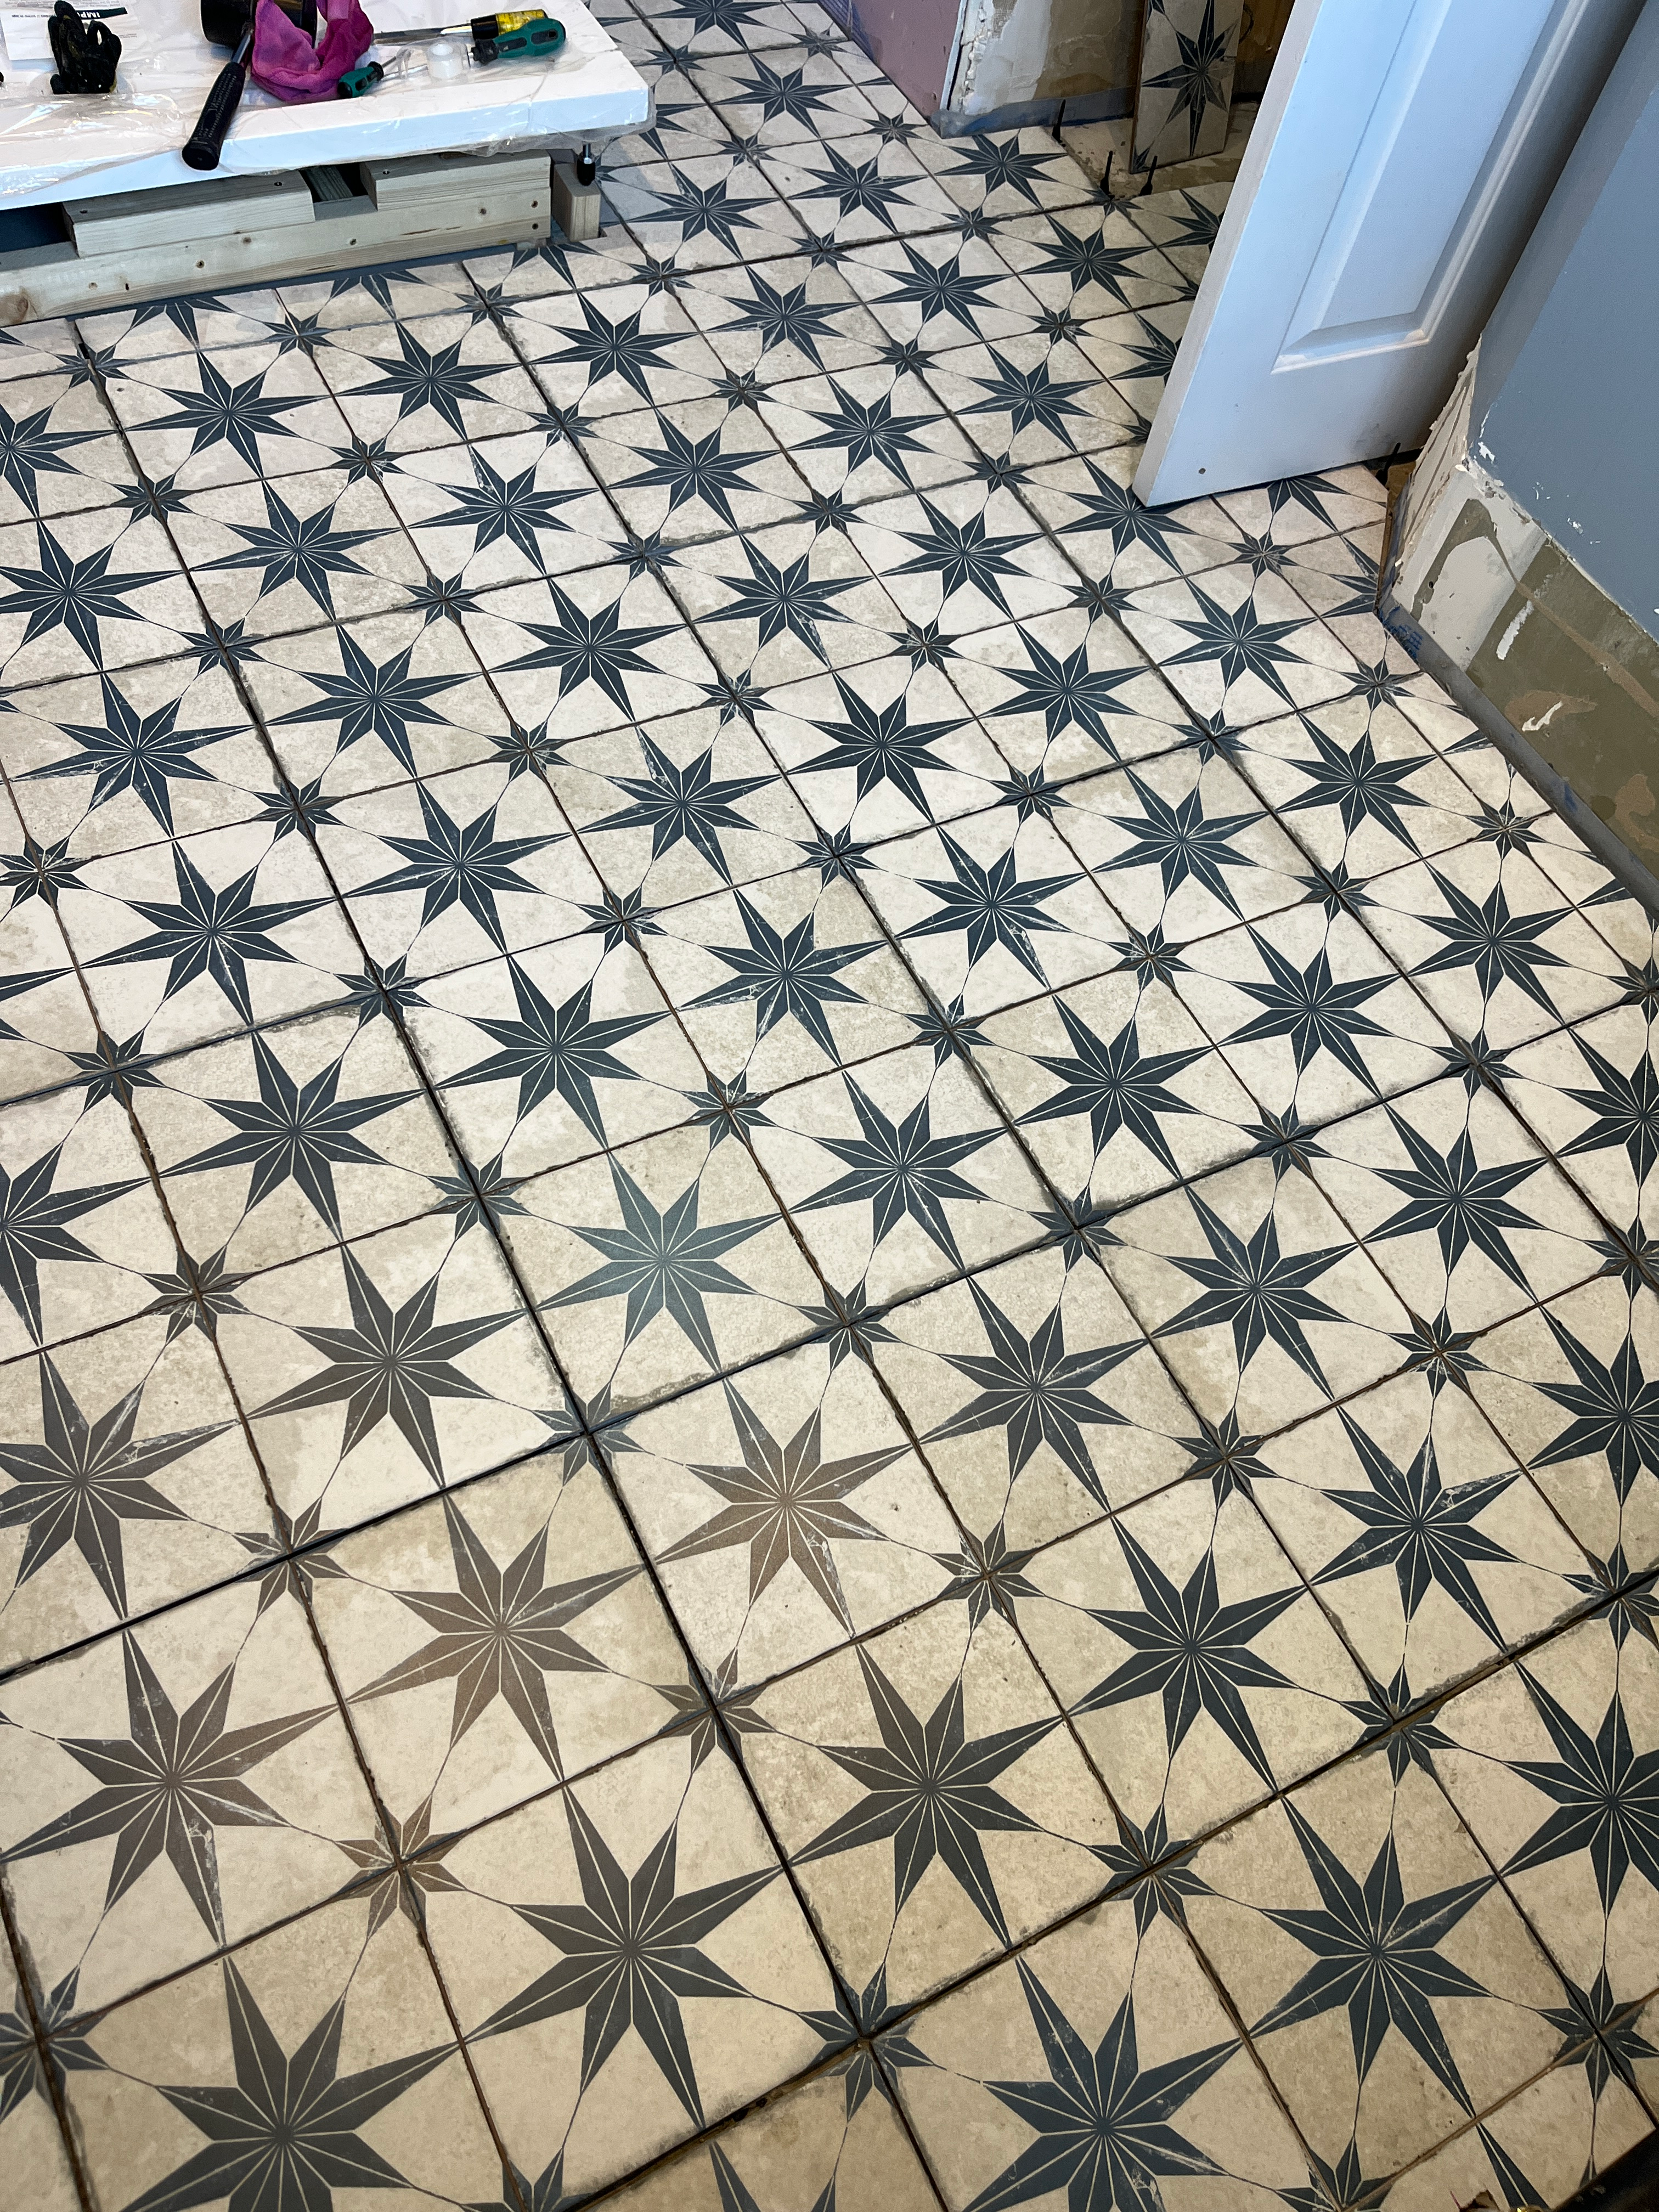
The master bath saga continues. After recovering from several failures, I was excited to get to tiling the bathroom floor. I genuinely enjoy tiling, and I had such a great experience with my guest bath tiles that I could not wait to tile some more. And the tiles I chose are utterly gorgeous. My experience, however, was an utter failure. Today, I am sharing my top tiling tips, gained the hard way. Through failure.
Looking back, tiling the guest bath — my first-ever tiling experience — was generally a breeze. I had a few issues, but the biggest challenge honestly was figuring out how to lay the complex pattern of different-sized tiles. The actual tiling went quickly and with few issues, other than one or two tiles that gave me a bit of a hassle. For a more in-depth tutorial on how to tile a floor, with some additional top tiling tips, check out the post from the guest bath.

For the master bath, I expected an easier go of it. The tiles are all uniformly square, and the design makes it easy to keep them straight and aligned. There is a faux grout line running both horizontally and vertically, which helps with alignment from tile to tile. I did a dry layout to make sure I had the best placement, and everything fit with no small cuts or odd placements.

Of course, I knew going in that I would have some challenges with the self-leveling compound. There were a few dips and uneven bits, as well as some of the mesh from the underfloor heating poking through, which had hardened with the self-leveling. But otherwise, I expected an enjoyable Sunday afternoon.
Round 1: Laying the Tiles the First Time
I did enjoy laying the tiles, and it went fairly quickly, even though the room is a bit larger than the guest bath. On Sunday, I laid the tiles, covering most of the room except some of the perimeter. I planned to come back throughout the week to finish those bits, which required a variety of cuts. On Tuesday, after 48 hours to allow the tiles to cure, I removed the self-leveling spacers and was cleaning up some of the dust and mortar left behind on the tiles, when I noticed that a tile near the door was a little loose. Not good.
I used my chisel to gently pry it up, and it came up with very little resistance. There was not a lot of mortar on the back side of the tile, which suggested it had not really adhered as it needed too. I scraped up the mortar on the floor, being careful not to scrape the cement or the underfloor heating below. It came up pretty easily, which was good for needing to re-do it, but not good in terms of creating a strong bond.
But as I was scraping, I noticed the next tile over was also a bit loose. So I took it up, with the same result. A bit nervous, I started checking all the tiles, only to find that most of them wiggled a little when pressed. One by one, I began removing and scraping the left-over mortar. And almost all the tiles had very little mortar on the back. They had not really embedded into the bed of mortar, so they had not set securely.


By the end, I had about five tiles that were secure and in place, out of about 30. Not a good result. I ended up taking up those tiles too, since I would need a thicker bed of mortar all around and wanted to ensure the tiles would be level with one another.
It was discouraging, to say the least. Every single big project in this bathroom has had an element of failure so far. Not sustainable, with so much left to do. But I needed to figure out why the tiling failed and how to ensure it did not happen again.
My Assessment: Top Tiling Tips
After a lot of review and re-laying the tiles the following week, here are my top tiling tips to ensure something like this does not happen to you.
The Right Mortar Mix
The mortar is the foundation that secures the tiles in place. It is critical to get the mix right. (I am assuming here that you are using a powdered form and mixing it with water; do not use the pre-mixed versions if you can avoid it, as they are not as strong.)
In my first round, I was a little generous with the water when I mixed the mortar. I added a bit more than was called for, to ensure a smooth and workable mix. Because I had mixed 10kg, or half a bag, I needed 2.25 litres of water. I added another .25 -.30 litres, which created a very workable mortar, with no slump. But in hindsight, it might have been a bit too thin.
For my second go, I stuck strictly to the recommended water / mortar ratio. I did add two extra splashes of water with my hands, because it was a touch dry, and this worked perfectly. A little water goes a long way with tile mortar. While the mortar seemed fine the first time, my second round batches were much thicker and more substantial.

It was a bit harder to spread, and I used a full 20kg bag on Round 2, whereas I only used a half of a bag on Round 1. So already, I was laying a stronger foundation in Round 2.
A Thick, Solid Bed of Mortar
And that brings me to the second of my top tiling tips: Use a good amount of mortar for the tile to sit in. I felt like the mortar bed was sufficient on the first round, but perhaps it was not. On the second round, I really laid it on thick. I ensured good deep grooves with the trowel, and ample coverage across the entire floor.

The thickness of the mortar mix, combined with a thicker, more solid bed, helped offset some of the dips in the floor. And it ensured a good solid bed for each tile to almost sink into.
Importantly, if you are using a self-leveling system on the tiles, you also need a good thick bed to help as the tiles are lifted and pressed with the self-levelers. If there is not a good thick bed, when tightening the leveling domes, the tiles might be lifted slightly and not be embedded in the mortar, which is of course not good.
A good sign is when excess mortar squeezes up through the grout lines. This means there is a good amount of mortar and some even needs to escape. Of course, you’ll want to clean up the excess mortar before it dries, as you want clean and clear grout lines for grouting.
Back Buttering Is Crucial
I will ashamedly admit that I did not back butter the tiles on the first round. Back buttering is a technique where, in addition to the bed of mortar, you also add a thin layer of mortar to the backside of each tile before laying it in place. A bit like buttering a slice of toast. This extra layer of mortar ensures that the tile and the mortar bed truly adhere, and it is especially recommended on large format tiles.
I know this. I did this in the guest bath. There, the tiles were quite large and a bit thicker. In the master bath, the tiles are 45 x 45 cm. Not small tiles. I should have back buttered them. But in round 1, I did not. I am not sure why. I guess I thought they were pretty thin and uniform, so it was not needed.
Mistake!!! Always back butter your large tiles. It cannot hurt with smaller tiles either but is not as necessary as with these larger tiles. There is a significant surface space, so lots of room for the tiles not to adhere. Give yourself the added protection by back buttering.
I back buttered every single tile in the second round. Even the small cuts. Belt and braces this time.

Wiggle the Tile Into Place
And finally, once you’ve taken all the above steps with the mortar — mixing it without too much water, laying a thick bed on the floor, and back buttering every single tile — there is one final step in my top tiling tips. When you place the tile into the mortar, wiggle it into place. Lay it in the mortar, and then wiggle it into the mortar bed, to help make sure the mortar makes contact. This creates a little bit of a suction between the mortar bed and the mortar on the backside of the tile and ensures good contact. Then push it into position.
If you have a good bed of mortar, this will be a little hard to do, as you create that strong bond between tile and mortar bed. That is a good sign. For a few tiles, I needed to use my mallet to gently tap the tile into place, because it was so strongly stuck in.

Never Forget
With all of these top tiling tips, you also must never forget to:
- Check for Level: Check for level on every single tile. Check across multiple tiles, and going in every direction. If anything is off, build up the mortar bed underneath to help bring the tile into level.
- Check for Coverage: Periodically, lift up one of the tiles you have laid and make sure there is full coverage on the backside of the tile. You should struggle to lift the tile out of the mortar bed (use a chisel or the claw on your hammer, but carefully, carefully). And the back should have lots of mortar covering it. If any gaps, re-apply and be even more generous on your mortar bed and back buttering.
- Check for a Seamless Surface Across Tiles: Use a self-leveling system to space the tiles and level them against one another, for a flat and seamless floor. This is actually another reason you need a good thick bed of mortar, because the leveling systems work the tiles off each other to level. They may pull a tile up slightly to get it level to its neighbour, and if there is not enough mortar, the tile will be sitting on air, which is not secure. I think this happened in quite a few cases on my first round.

Round 2
I completed Round 2 of the master bath floor, following all my own top tiling tips. I’ve ensured a good thick mortar and a thick mortar bed. I’ve back buttered every single tile. And I’ve wiggled the tiles into position, feeling the suction of the tile to the mortar.
I completed about 2/3rds of the floor the following Saturday, using one full bag of mortar, which is more than I planned for and a lot more than I used in Round 1. Then, I used another half a bag on Sunday laying the cuts around the perimeter. Although I needed to re-do a few cuts along the way, I got all the tiles except the two by the door in place. To get these two tiles to fit, I need to trim some of the architrave at the door, so I will do that and then add these while tiling the shower.

I let the tiles cure untouched for four full days, just to be sure. I kept checking them and they seemed secure, but you cannot know until you remove the self-levelers. Finally, I removed them on Thursday after work. I will admit, I was nervous. If the tiles did not adhere, I had a feeling I would just give up!
The Final Result
I am so pleased to share that Round 2 has been a success. The tiles are securely set in the mortar, no wiggles and no tiles removed. The end result looks amazing and was so worth it all. I absolutely love these tiles. And to think, they will look even better when I get the tiles grouted. Exciting!

A Few Words About Failure
Anyone who has been following my DIY journey will know that I am more than willing to share my failures. I am not here to create some perfectly curated DIY life with only beautiful pictures and project successes. Because the fact is, failure is where the real growth comes from. I learn more and it sticks when I fail. And I want the same for you. If you can learn from my failures, then I am happy to help.
So as painful as it is — and it is very painful — I am grateful for my failures because they make me better. You can be sure I will never neglect to back butter my large tiles again.
Through this third failure in the master bath, in as many projects, I will not pretend that it has not been hard. While I know I am learning, this girl can only take so many failures. I also need some wins.

But I keep going. And when it gets too hard, I remind myself of the progress I’ve made and all I’ve learned. I reflect on the words of encouragement I’ve received. And I’ve received some amazing encouragement over the last few weeks with my bathroom failures. Words that remind me that I am a DIY-er, without significant experience, doing the real work. On my own. At nights and weekends. Unafraid to try, and unafraid of failure (even if I am a bit tired of it!).
Words like:
What you are doing is amazing, and it is impressive given that you are doing it on your own and with no formal training.
You really know your stuff. Even in failure, you find a way through and just keep going.
Most people would have just tried to grout over the loose tiles and hope for the best. You did the real work, removing every last tile and doing it again. That is the sign of someone who is serious about DIY and whose work shows it.
These are real quotes from real people in my life. People who encourage me when I have failed, who give me tips and advice about my projects, and people who cheer me on as I live this DIY life. I hope you have people like this in your life for those times when you need a word of encouragement.

In case you do not have the needed encouragement, let me be that voice for you. Make no mistake, you are going to fail. Failure is inevitable. (Not the most encouraging start to a pep talk, I know, but stick with me.) When you do fail, you will recover. You will learn from it, and you will find your way through. And in the end, the result will be better for your failure. More important, you will be better for your failure, because you will have learned real lessons that will stick with you forever. So go be imperfect — because it is making you better and better with every DIY project. For more encouragement, check out my recent post on being an intrepid DIY-er, which is core to the work I am doing in this DIY life.
And when it comes to tiling, I hope my top tiling tips and my full and glorious sharing of my mistakes will help you to successfully lay that beautiful tile you bought, securely and in just one go.
Happy DIY-ing!








Leave a Reply