
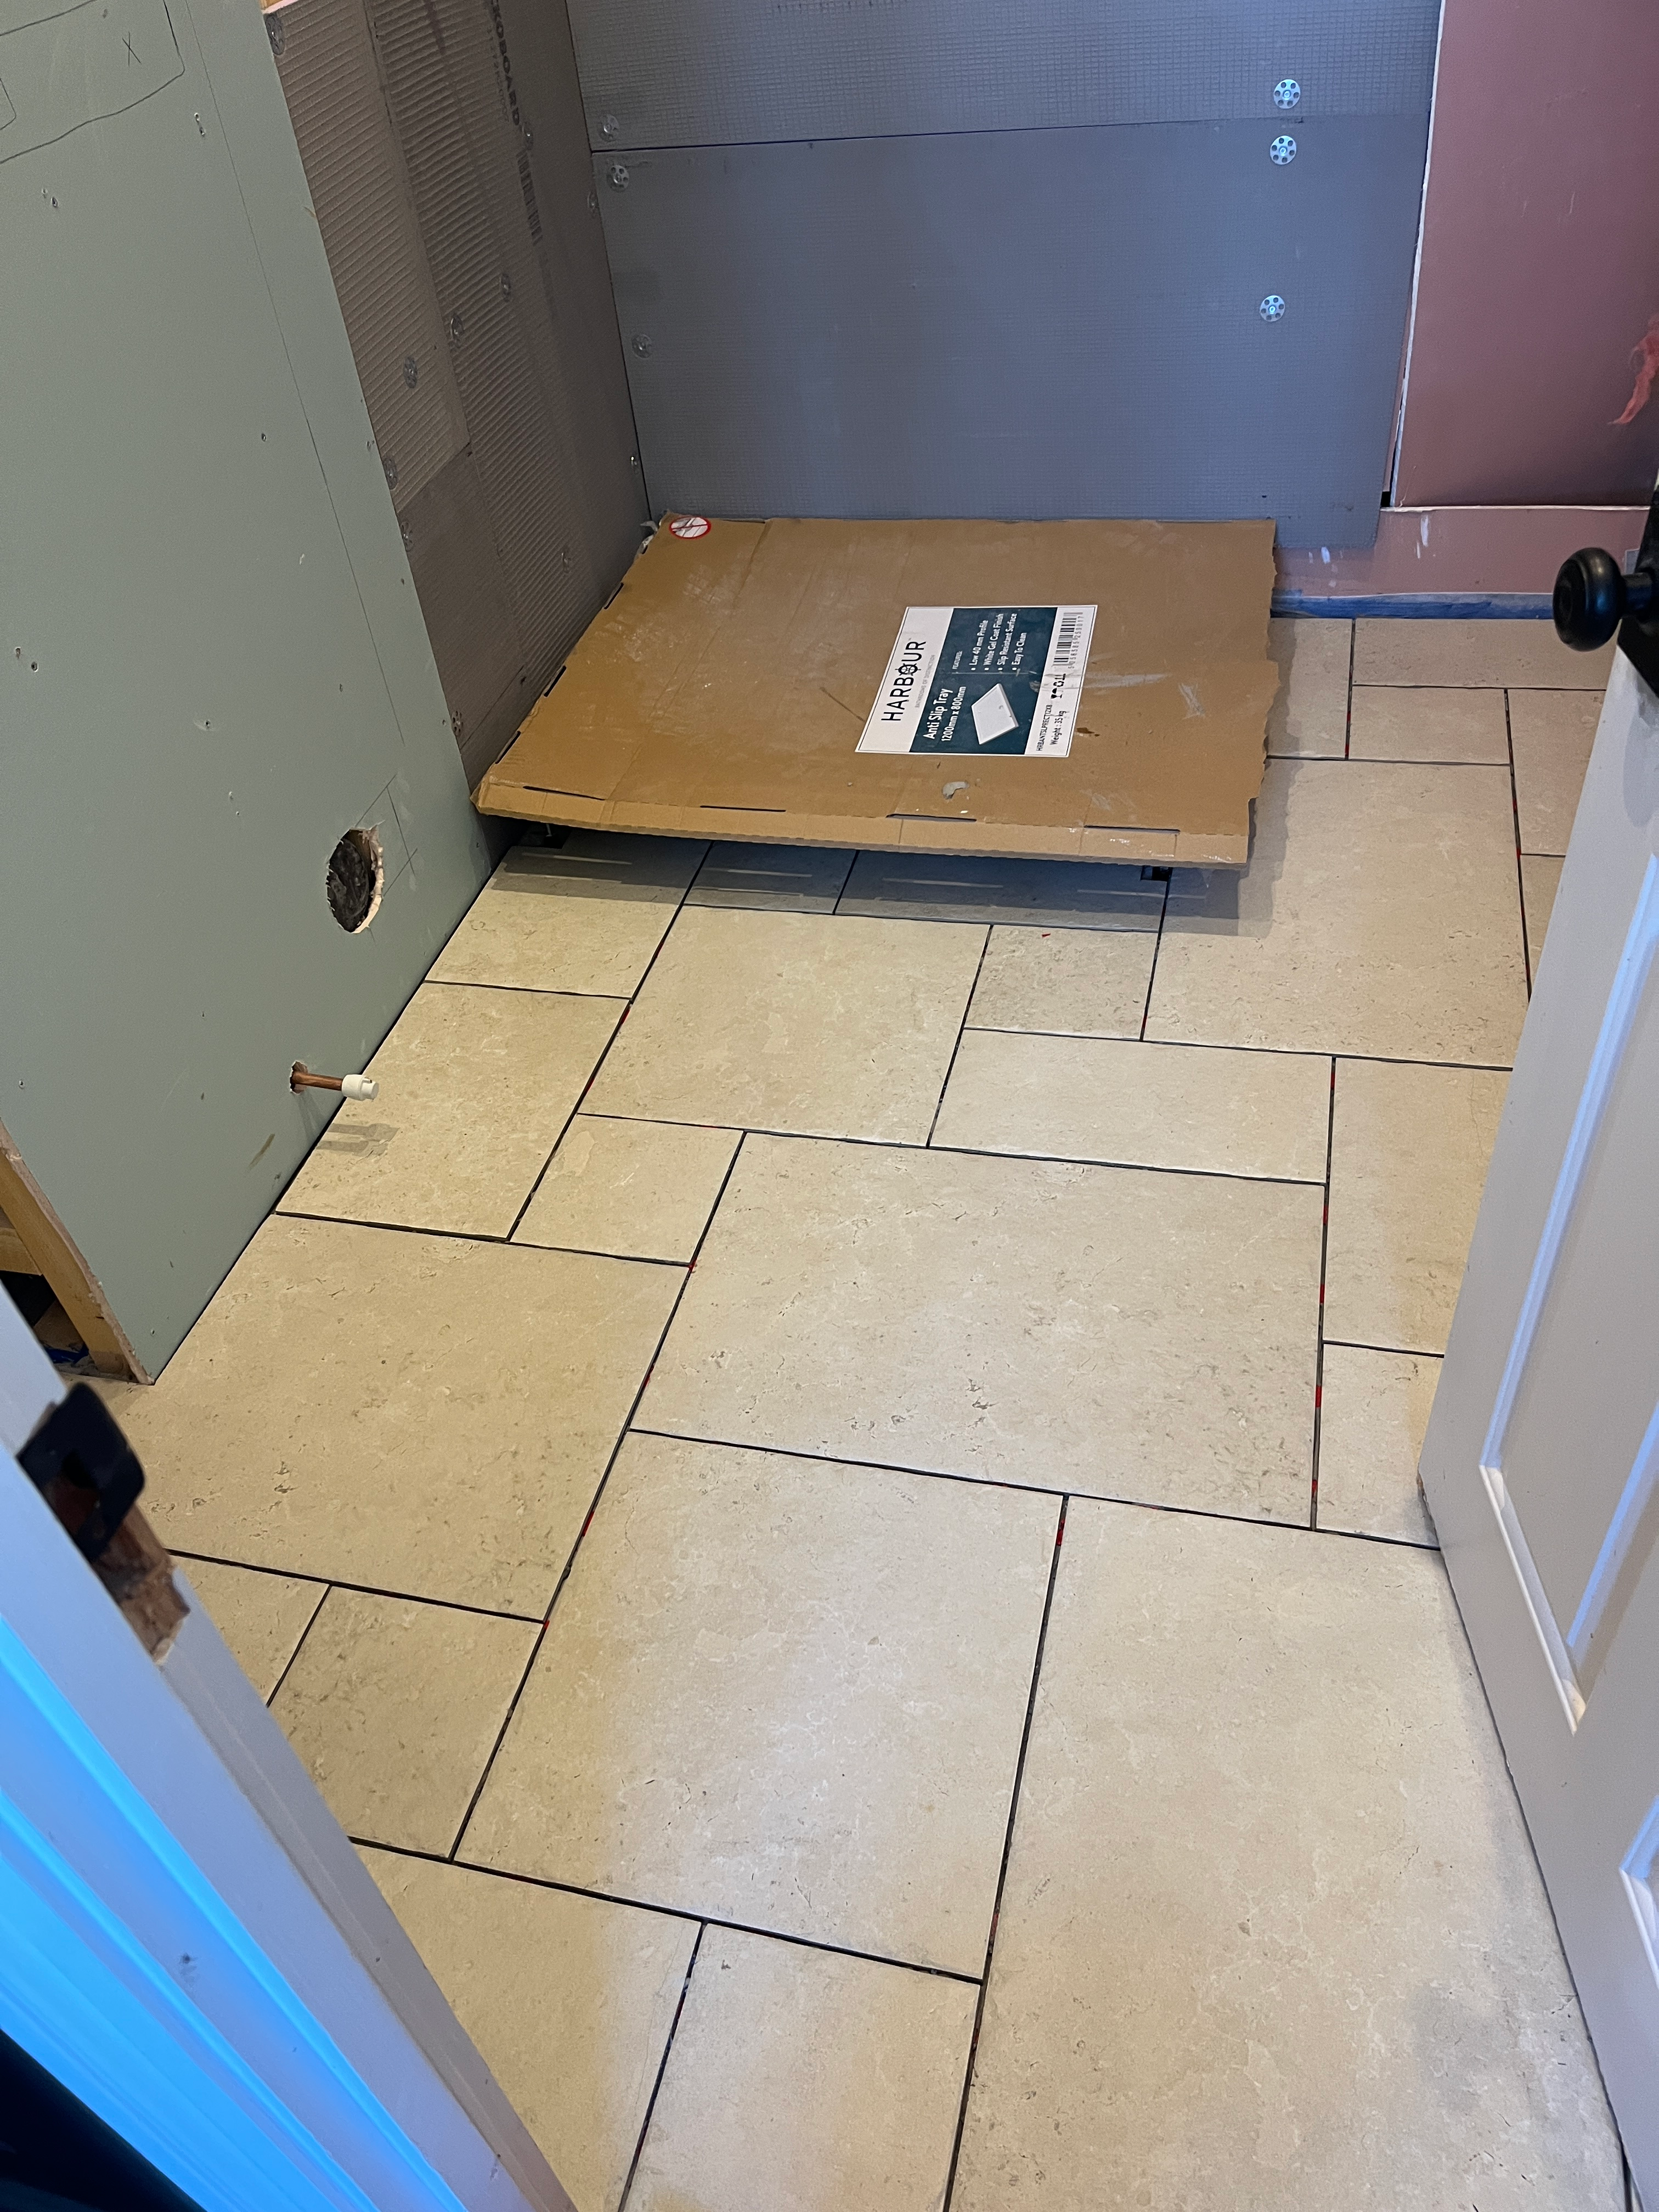
I’ve spent a lot of time working on the floor as I renovate my bathroom. From stabilising the sub-flooring and adding waterproofing, to adding underfloor heating. Because it is critical to ensure a strong foundation for the room. Today, I’ve entered the final stages: tiling the bathroom floor.
I shared some early images of the tile I chose, as it is one of the first things I purchased. A cool limestone-effect porcelain tile, from the Stone Tile Company. It so reminds me of a luxurious spa, with the clean lines and cool texture. Tiling the bathroom floor with these tiles + the underfloor heating = cool and warm vibes, and an overall spa-like bathroom.

In typical me-fashion, I picked out the tiles I wanted with no consideration of how challenging it might be for my first tiling project. I bought what I wanted and then dealt with the consequences. I really just seem to know no boundaries, even with a project like tiling the bathroom floor!
It turns out that I chose a super challenging tile. Large-format tiles are notoriously harder to lay well, and these tiles are large. Well, a mix of large and medium, but with the largest tile measuring 66 x 44 cm! I only learned after purchase that it can be quite difficult when tiling the bathroom floor to ensure tiles are level and without a lip. This is where one tile sits above an adjoining tile and there is no smooth transition between the two. Not to mention cutting such a large format can be tricky.
As well, while the mosaic pattern of my tiles looks great, it was extra hard to figure out. I followed the guide printed on the box, which seems easy enough. But actually, it was a bit like playing Tetris, finding where each tile goes and getting it in place. Because there was no specific pattern that repeated, I spent more time on the dry layout than I did on actually tiling the bathroom floor.

But all is well that ends well, because I love the new tile floor. SO MUCH BETTER than the hideous orange tiles that were there before.
Are you up for tiling a bathroom floor? If so, read on, as I share the process and everything I’ve learned from my experience.
Are You Considering a Bathroom Upgrade?
Get a step-by-step guide and tons of tips and tricks from my own experience renovating my bathroom. From demolition, to water-proofing, tiling, and installing fixtures, this is your ultimate guide through the process.

Steps for Tiling the Bathroom Floor
Choosing and Ordering the Tiles
The starting point for any tiling project is obviously choosing the tile and ordering it. As with the underfloor heating, you need to calculate the amount of tile needed. You should order 20% more for flooring, while wall tiles require a 10% overage. Most on-line tile companies have an option to add the recommended overage automatically.
While I calculated the correct amounts, I somehow ended up with three boxes of tile left over. Considering I ordered 8 boxes, that is quite a bit more than the 20% overage. Fortunately, I did not break any tiles during the install. All my cuts were spot on, so I did not need much in the way of overages. In my case, the company does not take tiles back. So I’ll need to figure out something with my left-over tiles. I am not sure what to learn from this experience, since it is better to have too much than not enough when it comes to tiling. But where to store them in my small flat?!
Dry Lay the Tiles
This might be the most important step in the process. Especially if you have a pattern like mine with lots of different tile formats. You want to ensure there are no odd or wonky cuts that leave small slivers of tile in a very visible place.
To start the dry layout in advance of tiling the bathroom floor, choose a very visible place where you want full tiles and no odd cuts. For my first layout, I started at the edge of the shower pan, which is close to the centre of the room. It is a very visible place, and I thought it would look good to have uncut tiles here.

Once you’ve chosen the starting point, lay tiles throughout the room, to see how they fit. If you have a standard pattern with tiles of the same size and a fairly square room, you can lay a few rows and columns to get a sense of the tile cuts that might be needed. If you have an unusual shape to your bathroom, or if you have different sizes of tiles in your layout, I strongly recommend laying out the full room.
Also, pull tiles from different boxes and mix them up, to mix up any colour variations throughout the room. It would be terrible after the floor is completed to see a line where colour variations from one box to another are visible.
Dry Layout Redux
After I had laid out the tiles starting at the shower pan, I decided to try something different. There were some smaller cuts around the perimeter of the room, and I thought I might be able to improve this. Typically, you do not want any cuts that are smaller than a third of the tile.
With my redux, I started at the door. I was able to get a slightly better layout, with fewer small cuts. And it still worked well for the shower pan. With the pan in place by this time (my plumber came for first fix between the two dry layouts), I was able to slide tiles under the pan without cutting them and still get a very good layout.
If you do have some small cuts, which might be unavoidable, try and make sure they are in a less visible part of the room, like a hidden corner behind the door or under the toilet or vanity.
Also, make sure your tiles are straight and even. I started with a chalk line along my first tile, but the red chalk got on everything. In the end, I just took measurements periodically to ensure everything was straight. I actually think the large tile format helped keep things straight much easier than smaller tiles would have.
Because the layout of my tiles is quite intricate, this extra step took awhile. But I am glad I did it. I really like the large tile right at the entrance, and the overall layout is really pleasing to the eye.

I labeled my tiles, in an attempt to be able to easily lay them out when ready to affix them with adhesive. This did not work that well, I still ended up getting confused by which tile goes where. I took lots of photos though, which helped. And I went slowly and took my time, which also helped.
Prepare the Adhesive
Like me, you may have already prepared adhesive to lay the cement boards as part of the under-flooring. If so, simply repeat the process. If not, you want to follow the instructions on the bag of tile adhesive. Add the right amount of the powdered adhesive to water in a bucket. Mix well with a paddle on your drill. You want a peanut butter-like consistency, with the adhesive fairly thick, but still spreadable.
I purchased Larssen’s flexible tile adhesive from ProTiler Tools, in grey. The colour does not really show with my tiles, so it was not too important in my case. But it might be for you depending on the type of tiles you choose.
Note that when tiling the bathroom floor, it is better if possible to choose a powdered adhesive that you mix yourself. The pre-mixed adhesives are not as strong, so do not try and take this time-saving step. As well, unless you are a pro, I would not recommend the rapid set adhesive. Take your time here and do not let the adhesive push you to rush through the project.

Lay the Tiles in the Adhesive Bed
Just as with laying the cement boards below the tile, you want to spread a good bed of adhesive onto the floor, using a trowel. For floor tiles in such a large format, a 10mm trowel is best, as you need thick coverage and good solid grooves in the adhesive.
My process was to spread a layer of adhesive using the flat part of the trowel, then go back over it with the notched edge, running the notches all in the same direction.
Because my tiles are a large format, I also needed to back butter each tile for extra coverage. This simply means adding a smooth and thin layer of adhesive to the back of each tile. Like buttering a piece of toast.
With adhesive on both the floor and the tile, lay the tile in place, and wiggle it to set within the adhesive bed.

It is recommended to periodically lift a tile after you lay it to ensure there is good coverage of the tile adhesive. If you see gaps, you’ll want to be more generous with your adhesive.
As well, with each tile you lay, check for level in both directions. If the tile is not level, you can add more adhesive to bulk up the bed. Or you can remove some adhesive, although be careful not to take away too much.

Ensuring Good Spacing and Level Tiles
When tiling the bathroom floor, as soon as the first tile is in place, you want to add spacers all around. Here, you can use the small cross-shaped spacers, which work well. Add several to each side of the tile. In my case, though, because of the large format of my floor tiles, I used a different type of spacer, which includes a leveling system and is meant to ensure a flat and level surface with no lip, or no tiles that sit proud above the surrounding tiles.
After some research, I purchased the Rubi Cyclone Leveling System, from ProTiler Tools, in the 3mm sizing.
This system works brilliantly. You add plastic spacers all around the tiles, slipping the base underneath the laid tile and flush against the side of the tile. Add spacers around the sides and at the corners. The bigger the tile, the more you should add.
With each new tile, slide it up against the spacers on the previous tiles to ensure even spacing between each tile. As you lay each tile, take the time to add the spacers all around so you do not forget. Do this while the tile adhesive is still wet; they are impossible to add after the tile has set. This means that if you lay the tile in a few different sessions, make sure when you finish a session, you have added the spacers on all the open edges or you will not be able to later.
Once you’ve added the spacers and the tile is in place with the right amount of adhesive, it is time to ensure the tile is perfectly level with its neighbours. Here, you spin the little plastic dome onto the stalk of the plastic spacer and tighten it down. Do this all around the tile, and check for level across the tiles, in all directions. Tighten the domes as needed.

Learn from me: Pay attention to the placement of the spacers. You need room around the spacer for the plastic dome to be screwed on. A few times, I placed spacers close together at each tile corner, and the dome would not fit on both spacers. Be strategic in the placement so you can add the dome to the spacer.
As a final check, take a dome from the box, without the spacer, and slide it over the adjoining tiles. It should slide smoothly and not get caught up at the seam. Then you know the tiles are level without a lip. If it gets caught up, keep adjusting the domes, or worst case, lift the tile and adjust the adhesive bed as needed.
Rinse and Repeat
Keep laying the tiles all around the room. I worked out from my first tile, which was at the door, across to the back wall, and then around the perimeter until I ended up back at the door.

I focused on laying the whole tiles, leaving space for the cut tiles at the walls and other barriers for another day. Again, do not forget to add the spacers all around the open areas, as you cannot do this after the adhesive is dry.
Go slowly and be careful. Every tile should be checked for proper spacing, ensuring it is level and has spacers and the Cyclone domes added all around.
Cutting Tiles
It is almost a guarantee that when tiling a bathroom floor, or any project, you will need to cut some tiles. Some people cut them first and lay everything at once. I chose to lay the full tiles, then take exact measures and cut the needed tiles the next day. You choose what works best for you.

There are a few options for cutting tiles: a manual cutter that you use to score and break the tile, a wet cutter with a diamond blade, or a grinder with a diamond blade.
I originally planned to hire a manual cutter, but I was worried that my floor tiles are too thick. You also can only cut straight lines with a manual cutter. I researched hiring a wet saw too, which would allow me to cut a few corners to go around the legs of the shower pan.
Then I came across a great recommendation from The Stone Tile Company, where I bought my floor tiles. They recommended the Vitrex wet saw from B&Q. This is a simple wet saw at a very good price. Their recommendation is that you do not need anything fancy to cut tiles, and that this one works really well.
Given that it was cheaper than hiring a tile saw, and it would ensure I had plenty of time and did not feel rushed, I ordered it. And let me say, what a little gem of a tool! It worked a treat, and now I have it for the shower tiles, as well as any other tiling project I want to take on. I love when you can find a tool that brings more value than its price tag, and this wet saw certainly fits the bill.

For my bathroom floor, I needed to cut about 12 tiles. There were cuts around the perimeter of the room, as well as around the feet under the shower pan. All of the cut edges would be hidden under the pan or by the base boards, so absolute perfection was not required.
I made all the cuts in one go, dry laid them for fit, and then laid them all in one go. It went quick, with all the tiles cut and dry laid in about two hours. It is a bit messy, as the saw requires water which keeps the diamond blade from overheating, so if possible, make your cuts outside. There is a lot of water spray, mixed with tile dust, so be prepared.
In terms of measuring for the cuts, it is quite easy. See my guide for measuring when I laid vinyl tiles in the kitchen. In short, for simple straight cuts, you lay the tile in place and mark the edge where it meets the next tile, allowing the necessary space between the tiles. You also want a little space between the wall and the tile, a few millimetres at most. This will be covered by trim so it does not have to be perfect.
Make a straight line at the mark using a square edge and a pencil, then cut along the line with the wet saw. Sand or file any rough edges. And place the cut edge against the wall when laying the tile.


For corner cuts, the approach is the same. You lay the tile in place and against the barrier. Mark the boundaries, then turn the tile to mark the second side. Draw lines using a straight edge and cut the space where they connect.

A Few Tips for Using the Wet Saw
The wet saw can be a bit daunting if you have not used it before. I had learned how to use it in my tiling course, and here are a few tips that can help:
- Make sure you wear goggles and gloves. Cutting tiles with a wet saw is messy business, and with tile dust flying off the blade, you want to protect your eyes.
- I found that the cutter was quite light, so when I pushed my tile across the surface, the tile cutter slid along as well. I could not find a way to clamp it to the work space. Fortunately, I learned some good tips with my router for holding wood steady and had ordered a rubber no-slip mat. This worked a treat for keeping the tile cutter in place.
- My tile was also too large to use the straight edge guide. I drew a straight line on the tile with a pencil, which could be wiped off if needed. Then, I carefully followed the line freehand, which worked fine. Just go slowly, and stop as needed to check and reset. Again, the edges were going to be covered under the trim, but they looked good and could have been visible without issue.
I am sure I will have more tips to share once I get to tiling the shower. There, I plan on using metro tiles in a brickwork pattern, so completely different from the large format mosaic tiles on the floor. The metro tiles also have a bevel which brings another challenge to the experience. #neveradullmoment
Removing the Spacers and Preparing to Grout
Once all the tiles have been laid with adhesive and you are happy with the look and the level, walk away. Let the tiles cure overnight. My adhesive says tiles are ready for grouting after 18 hours, so I let my tiles cure for two days. I did check on them after 24 hours, testing that they were secure and there was no movement.
But I only removed the spacers and leveling system after two days. My one complaint with the spacers is the lack of directions. There are a few pictures, Ikea-style, but not nearly as helpful. And a QR code leads you to a site with even less info.
Thinking I understood how to remove the spacers from the picture of a foot kicking them away, I removed all the cyclone domes, then took the rubber mallet to the plastic stalk. The first one broke in parts, with shards still sitting proud above the tile. Same for the second and third. A bit worried, I stopped and did some research.
Turns out, you leave the domes on and remove them that way. I tried it, and they popped right out. Makes sense, as the dome helps pull the shaft away from the embedded base in the tile adhesive. Make sure you hit the dome in the direction of the grout line, not against it, or you might chip a tile. The process, once I figured it out, was downright fun. Almost like croquet, hitting domes across the room with a mallet.
To remove the three broken bits of spacers, I worked at them with pliers, being careful of the surrounding tiles. I was able to break off enough of the shaft below the tile so it will sit under the grout.

Always a Challenge
No project would be complete without a challenge. In my case, I ran into one problem tile. It came from several factors, but it proved challenging to overcome. The last tile I laid was a cut tile against the wall and underneath the door. With spacers in place all around, I was unable to move the door out of the way. So I needed to complete all the other tiles and remove the spacers before I could deal with this last one.
I had not realised that some tile adhesive from the previous tiles had dried in the area. Combined with a slight high area from the mesh underfloor heating, the space was not level. I tried scraping away the dried mortar but needed to be careful not to damage the underfloor heating. But no matter what, I could not get the tile to lay level without a lot of adhesive, which made it sit proud above its neightbouring tiles.
I laid it once with minimal adhesive, but it was not enough and the tile was quite lose even after curing overnight. In the end, I was finally able to get the tile in place with just the back corner sitting a little proud. It is against the wall, behind the door, and most of the high part of the tile will be covered by the trim. There is a slight lip at one edge, but it is not too noticeable. It is not perfect, but I could not figure out any other way without cutting out part of the flooring and underfloor heating. Which of course I did not want to do.
Final Step: Grouting
I had hoped to share the completed floor with you, but due to the problem tile, I was not able to get the grouting completed. I hope to do it this week, and I’ll share this final part of the technique in the coming week.
In the meantime, here’s a shot of the completed floor, sans grout. I’ve been walking on it, as I worked on other aspects of the room, and the tiles are secure, level and even. I am so pleased by my first experience tiling the bathroom floor, even if I still need to complete the grouting.

Stay tuned, I’ll be back with the final step soon!
Happy DIY-ing!








Leave a Reply