
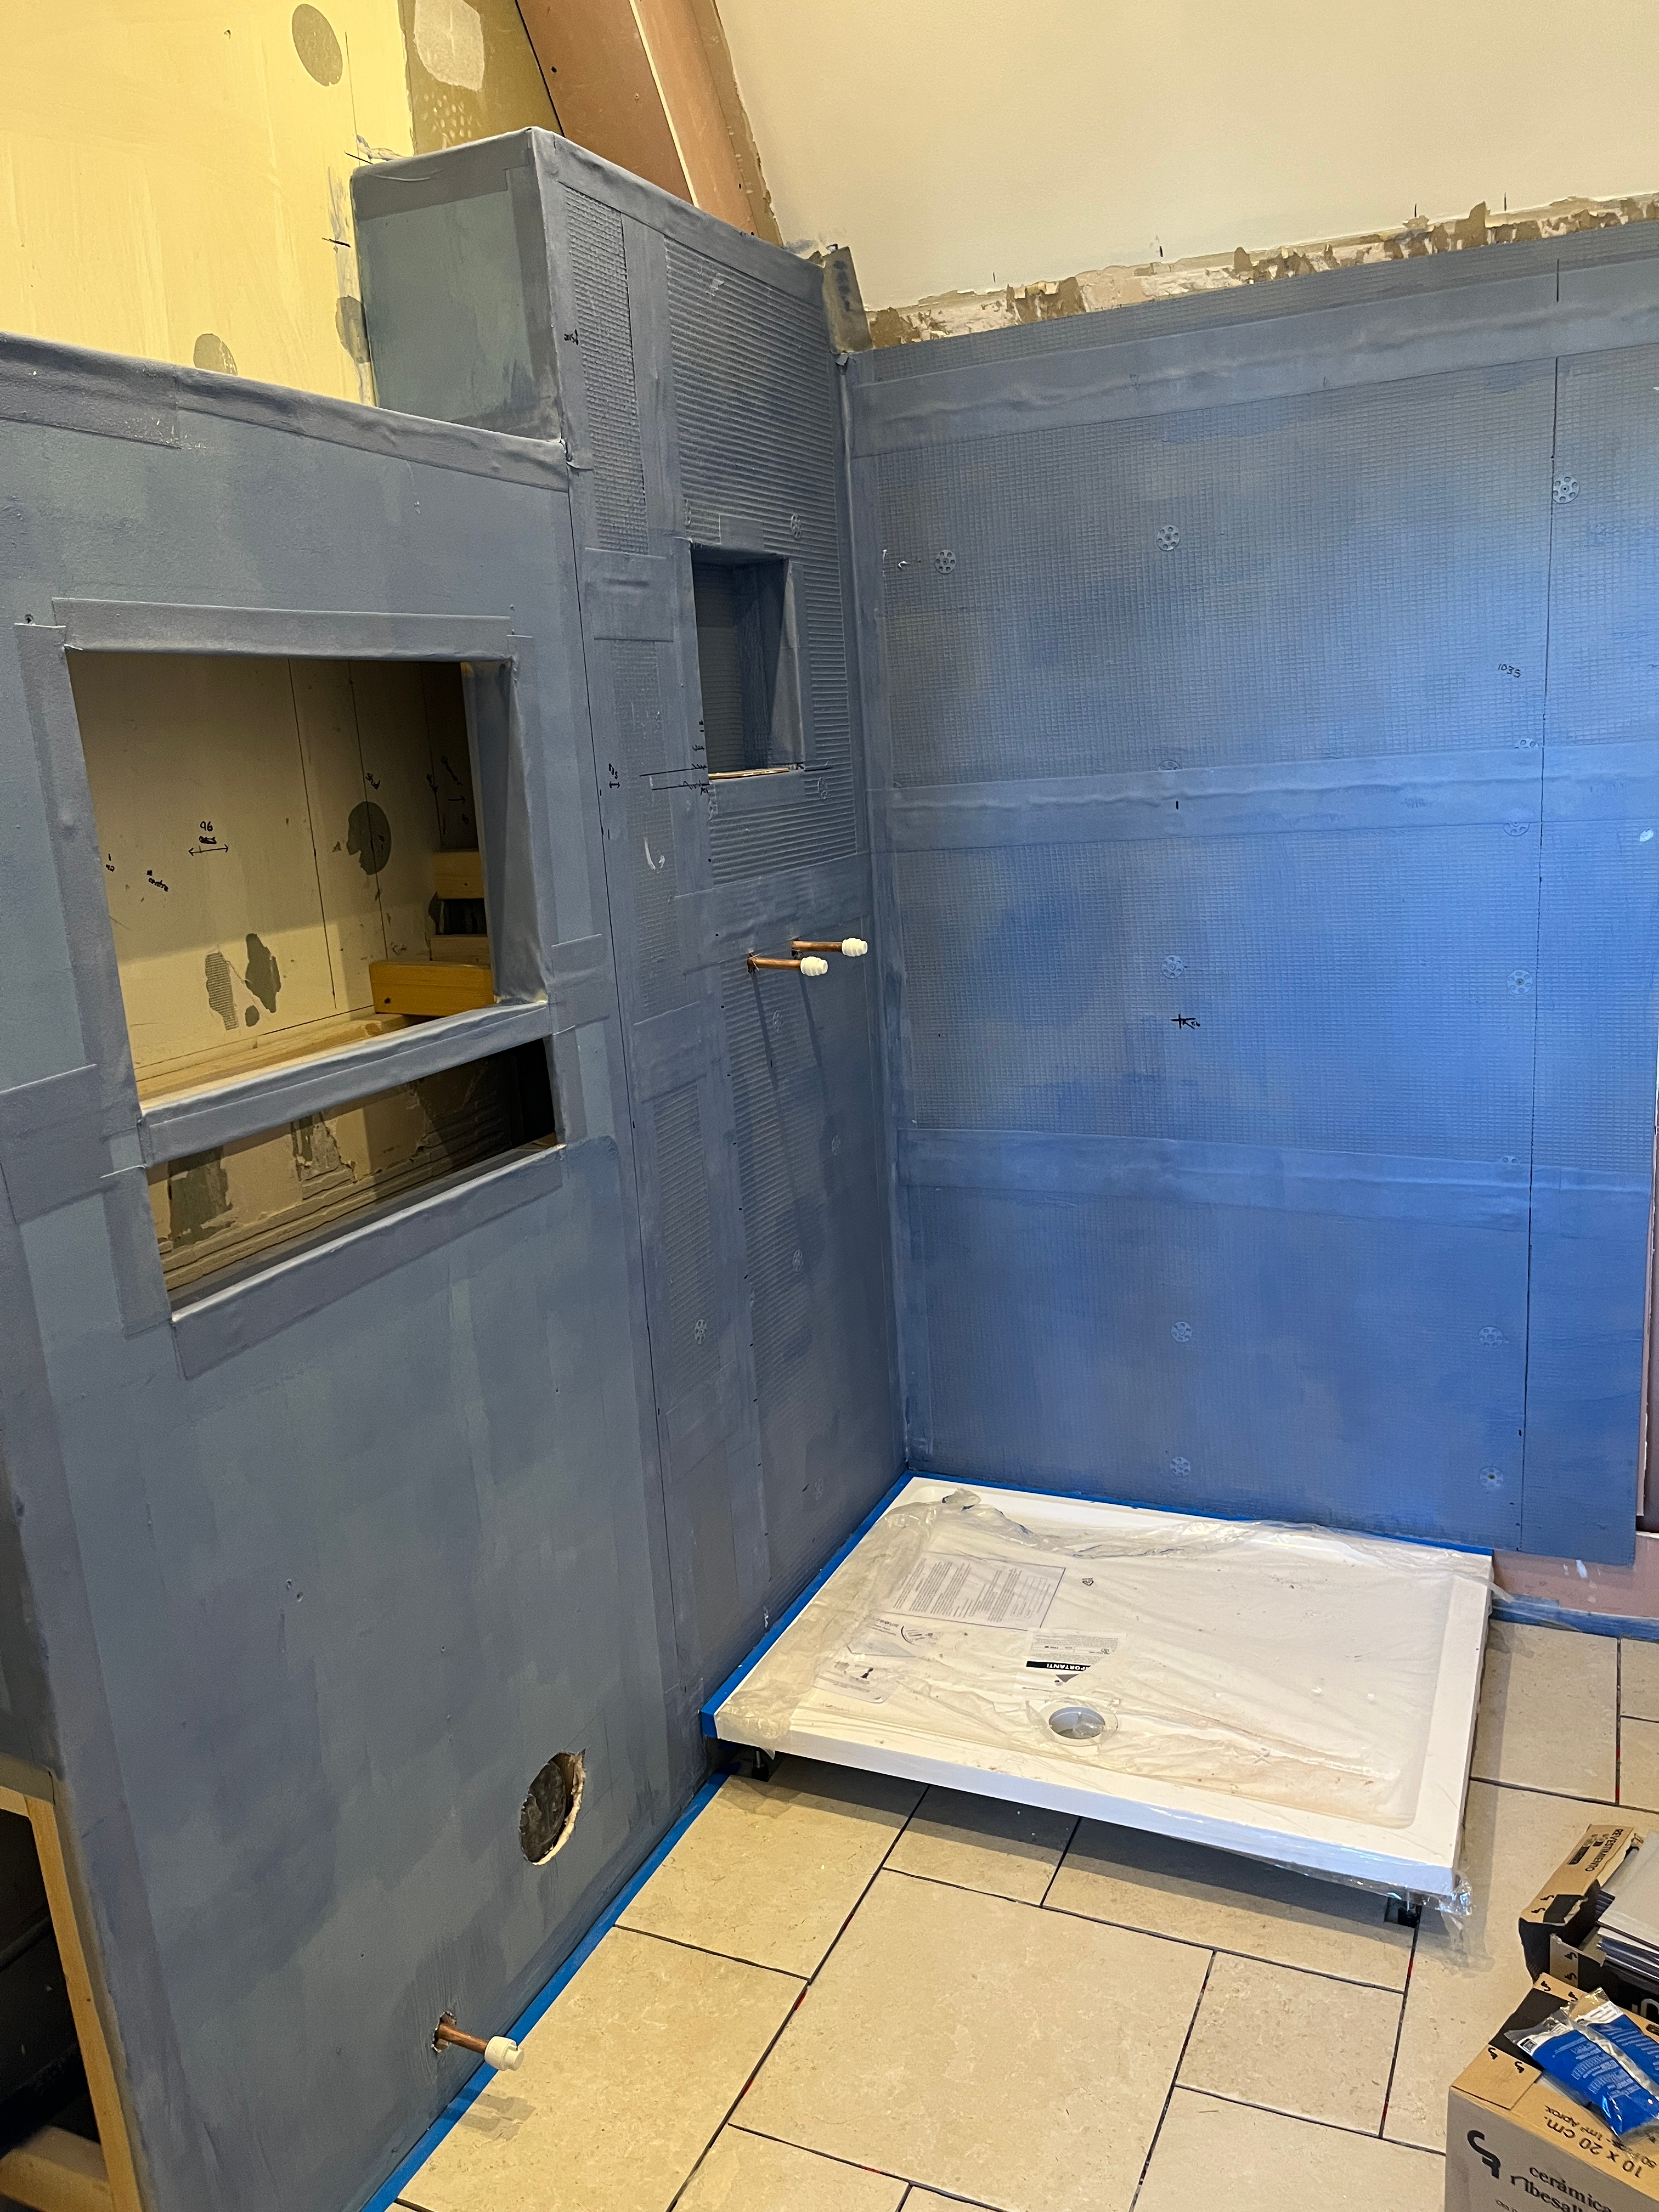
Today is not the most exciting of posts, but it is a necessary one. Today is all about re-boarding the walls.
In any bathroom renovation, there are the exciting and picture-worthy aspects, like tiling the floor, or ripping out the basin. And then there are the more mundane, but critical tasks, like re-boarding the walls. From tearing out plasterboard, to re-boarding walls for tiling or other finishes, to patching and filling holes. All are absolutely necessary, but some are just less fun.
Today, I am wrapping up a lot of the more mundane tasks, which centre around re-boarding the walls. But don’t tune out, there is plenty to learn and lots of vital tips to ensure you are ready for the more glamorous bits, like installing shower tiles, wall panels and new fixtures.
I’ve spent the last week on these most boring of tasks. But as you would expect, it was anything but dull. Always something to learn. And some important tips to share with you if you are undertaking your own bathroom renovation. Because like the floor, re-boarding the walls is a critical foundation for what comes next.
Are You Considering a Bathroom Upgrade?
Get a step-by-step guide and tons of tips and tricks from my own experience renovating my bathroom. From demolition, to water-proofing, tiling, and installing fixtures, this is your ultimate guide through the process.

Boarding the Shower
First up, let’s talk about the shower area. Before I can tile, we need to ensure it is ready for tiles and all the water without leaks.
Just as with water-proofing the floor, I used cement boards all around the shower where I will be tiling. You may remember that on the back wall, I needed to remove one of the two layers of plasterboard. This was due to stuck-on tile mortar and damage to the boards.


Technically, I could have added a second sheet of plasterboard. Or I could have just tiled onto the remaining board, after proper preparation. But in my opinion, you cannot really overdo it on the waterproofing. So I chose to use the JackoBoard system in the shower. After all, I was pleased with it on the floor, so why not here too.

I added the layer of JackoBoard cement boards, with a foam/fibreglass centre, over the stud wall in the shower area, as well as on the back wall. It is the perfect substrate for hanging tile and water-proofing the area.
Bulking Up the Stud Wall
As I started installing the JackoBoards in the shower area, I realised that I needed to bulk up the stud wall a bit more in some places. This was due to the layout of the JackoBoards, to ensure every board edge could be attached to a stud for maximum stability. Re-boarding the walls meat that there were a few places the boards joined each other with no stud behind. This resulted in some weak spots in the overall surface where two boards met without proper back-up in the stud wall.
When tiling, it is critical to ensure there is no deflection on the walls, as this will result in cracked tiles or eventually water ingress. Deflection is where the wall moves or shifts, even if only slightly. Now is the time to solve for this and ensure the wall is steady and sure.

It was simple enough to cut a few more pieces of the C16 studs to length and install them where needed. Although I had run out of long lengths and needed to order a few more, which set me back a few days.
Once I had the studs in place, I added all the cement boards, following the same approach as with the floor:
- Apply the boards with no more than two seams meeting up.
- Use the JackoBoard screws and washers, placing them at every corner and along the edges and centres of the board.
- Ensure the washers are flush with the board and do not sit proud.
The install went well on the side wall, once I built up more studs as needed.

Adding a Shower Cubby
You may notice the addition of a shower niche in the shower area. Several people strongly encouraged that I add this as a place for shampoo, soap, etc. I had originally planned to build one from plywood covered in cement board. But when I saw that JackoBoard sells a pre-made niche, I decided to purchase it. This ensures a perfectly square cubby that is already waterproofed and ready to go.

Install was easy. I slotted it in and screwed it to the side, top and bottom studs, ensuring a secure fit. I then installed a JackoBoard to the stud wall covering the front of the cubby. Then, I simply cut out the opening from the facing board, using a utility knife.
I also needed to cut around the water pipes, ensuring they remained level and at 150cm, to accept the shower taps once installed in second fix.

Fighting the Metal Stud Wall
When it came to re-boarding the walls at the back of the room, I was dealing with the metal studs used throughout our home. These metal studs are a constant challenge that I need to face.
I first tried some screws made for metal studs. They are meant to be self-tapping, so I could screw straight into the stud. For whatever reason, I could not get these screws to work at all. When I tried to hammer them in, the studs shook and vibrated, but the screw would not go in. I tried drilling them in, which also did not work, since I could not get a good starting point.
Perhaps I need to purchase a drill bit that will penetrate the metal studs? But I do not have a lot of confidence here so I do not want to spend the money. I finally gave up on drilling into the studs, although at some point, I have got to figure this out.
Fortunately, I can access the space behind the wall, which is dead space under the eaves. So I decided to bulk up the metal studs behind the wall with some additional C16 timber studs. I added a wood stud along each of the metal studs, clamping it in place and then using existing holes in the metal stud to attach the two studs together with screws. I also added one stud across the horizontal stud in the same way.

With timber studs in place alongside the metal studs, I screwed the JackoBoards into these through the plasterboard, creating a secure cement board wall with no deflection and able to take the weight of the shower tiles once installed.
Re-boarding the walls for the shower area is done, on to the other walls.
Boarding with Plasterboard
I also needed to board the area outside of the shower, on the new stud wall over the toilet. Here, I applied water-resistant plasterboard. In the UK, these boards have a green paper over them so you know they can be used in the bathroom. I am going to add bead-and-butt paneling to this area, so the plasterboard does not need to be finished or plastered, but it should still be waterproofed since it is right next to the shower.
As well, it is important to note that the bead-and-butt paneling boards I plan to use on the walls cannot be simply applied to the stud wall. They need the support of plasterboard or some other substrate. More on this when we get to paneling, hopefully in a few weeks.
To plasterboard the stud wall, I first measured the space and cut the plasterboard to fit. To cut plasterboard, use a utility knife and score the front paper on the board and into the plaster centre. It may take a few passes to go deep enough. Use a spirit level to help get straight cuts.
Once you’ve scored the line, press some weight on the board to fold it at the cut line. It should fold over, and you can score the paper on the back side, giving you a cleanly cut board.
My cuts are not the cleanest, although my technique improved the more boards I cut. I did need to use the jab saw to even the edges out a bit once installed. And a bit of plaster repair and the seaming tape will help in a few places.
Cutting Around Obstacles
On the wall, I needed to cut holes for the water and waste pipes for the toilet. I held the cut board up to the wall and marked the spots to cut, much like I mark tile cuts. I used a spade bit in my drill to cut the water pipe, and for the waste pipe, I used the jab saw.
You may remember that I built a few niches into this portion of the wall, to make maximum use of the space. While I could have boarded around these spots, I chose to put a full board up and then cut out the areas. This results in fewer seams and is a cleaner and more precise approach. The same as with the shower niche made from JackoBoard. Just remember to roughly mark the location of the niches so once boarded, you can accurately cut them out with the jab saw.

To affix the plasterboard, I used outdoor screws, which are water-resistant, in 50mm lengths. Using an impact driver, I drilled the screws in all along the board, making sure to go into the stud wall behind. The screw should just pierce the paper of the board, but not go too deep. You want it embedded in the board, not sitting proud.

A side note: I placed the plasterboard with the turquoise side facing out. I am not sure if this is right, as on the existing plasterboard walls, the darker green side is facing out. But the boards state that the dark green should be facing in, so I did this. I am not sure if it matters, but any insights are welcomed in the comments.
Re-Boarding the Walls: The Right Side Wall
With both the shower and the stud wall boarded, I also needed to re-board one part of the existing wall on the right side of the room, where the mortar at the back of the shower had damaged the board beyond repair.
Here, I added some timber studs on the edge of the existing plasterboard and screwed them in through the existing wall. This gave me the bracing needed to affix the new plasterboard. On the left side, I had a metal stud to use as bracing, so I bulked this up with another wood stud, just like the back wall.

I needed to cut the board at an angle to fit under the ceiling, and I was not as precise as I could have been. But, I was also running out of boards and had to work with what I had. The end result is not perfect with a few gaps, but I’ll fill these in and tape over them. This area should not see much water, so it does not have to be water-tight. The wall will be covered by the paneling, except at the top where I will wallpaper, so I’ll need to ensure a smooth, defect-free surface here. More to come when I get to wallpapering, which is much later down the line.

Water-Proofing the Area
Once I had finished re-boarding the walls, with either cement boards or plasterboard, it was time to water-proof everything. I followed the same approach as for the floor, with a few additions.
First up, I used the tanking membrane on all the seams in the shower. This was a new step that I read about after installing the floor, and I thought it made sense as an extra precaution. I painted the rubber-like membrane on all the seams in the shower, as well as over all the screws and washers BEFORE adding the seaming tape.

Next up, I applied the board sealant to the seams. I will be honest, I am not sure about this step. It is messy and as I lay the seam tape, I feel like I lose a lot of the glue. But, I did it, and I tried to be careful not to wipe it off as I added the tape. Again, the directions call for using it to glue boards together, but this seems even messier with large, unwieldy boards.
I used the JackoBoard seam tape next. I really like this stuff. It is very satisfying to roll it out over the seams and feel its strong attachment to the boards. I used every bit of two rolls between the floor and the shower and walls, so this was well worth the cost.

Finally, I painted on the tanking membrane over everything in two coats. The first coat went on vertically, and after 24 hours, I painted on the second coat horizontally, as the directions instruct. The tanking creates a rubbery seal over the walls, which brings even more water-proofing.

Note that I did not tank the existing walls beyond the shower and the new stud wall. There are a few reasons for this:
- For one thing, I am not sure that the tanking membrane would be good under the wallpaper at the top third of the room. It creates a bit of a texture, and I think this could show through the paper.
- Second, I still needed to patch a lot of holes in the walls, which I had not yet done. No sense tanking a wall with holes, since water could still get through.
- And finally, the rest of the walls have been plastered, and they will not face a lot of water. With the paneling added over them, the chances of water ingress is quite low.
Instead of the tanking membrane, I decided to add Zinsser Gardz to the rest of the walls. This primer also creates a water-proof barrier, and it helps smooth out rough walls. It is the perfect addition to the walls, to prepare them for wallpaper, while also covering over the patched holes and other blemishes in the plaster. The walls will see less water than the shower, so this should be a sufficient step.
Some Final Little Steps
As I prepare for finishing the walls, either with tile, paneling or wallpaper, I also needed to patch holes around the room. The electrician had cut a few holes during first fix, for wall sockets and lighting connections, and there were a few spots on the walls where the plaster had come off in large chunks when I removed the tile. I filled the holes in with drywall repair patches and filler, sanding them down and filling them a few times over a few days to get them flush with the wall.

And that is a room ready for finishing the walls. Again, this was not a very fun or glamourous set of tasks, but they are all critical for ensuring a water-proofed bathroom that can be properly finished.
Job now done, I can start on the fun tasks next: tiling the shower, grouting the floor and shower, and then adding the paneling to the walls, before wallpaper and paint. And of course, second fix, when we add the fixtures in. I cannot wait to see this room come together. And get the pile of supplies out of the hallway!
The end is in sight. Stay tuned as we move along next week with tiling the shower and the promised update on grouting the floor. Things are getting more and more fun!
Happy DIY-ing!








Leave a Reply