
Being a DIY-er means we can make big and small changes in our homes. All by ourselves. It is quite the super power. And today, I am making plans for my biggest change to-date in this journey. I am planning a DIY bathroom renovation. Down to the studs, with new everything. And, I am going to share all the details, so you can take on a similar project, should you wish to.
I have been looking forward to the day when I have the confidence and the skills to start my DIY bathroom renovation and put so many of my learnings to the test. And today is the day!
Both of our bathrooms are dated and need a major refresh. They also do not maximize the space, which is a big issue for me and my small London flat. The guest bath has an orange floor, orange counters, and a strip of orange tile halfway up the wall. Have I ever told you how much I hate orange? Especially as an interior design feature.

And now, it is finally time to get rid of the orange! I am ready to start the demolition and make my dreams come to life.
This is big! I have never done a DIY bathroom renovation before. In typical me fashion, I am taking on something with no real concept if I can do it … or if I should do it. But that is me, never knowing my limitations and just giving it a try. And sharing the good and the bad with you, so you can learn from my wins and my losses.
It really cannot be any worse, can it?

I have done my preparatory work in planning for my DIY bathroom renovation. I’ve watched loads of videos, read tons of articles, and made my trusted to-do list of all the steps I think I need to take. Last summer, I took a plumbing course and a tiling course, as I thought I would have started this project last year. But life got in the way!
So, I am as ready as I can be, and most important, I am excited about trying this big DIY bathroom renovation project and seeing how far I can get.
Are You Considering a Bathroom Upgrade?
Get a step-by-step guide and tons of tips and tricks from my own experience renovating my bathroom. From demolition, to water-proofing, tiling, and installing fixtures, this is your ultimate guide through the process.

Follow My Progress
I expect this project will consume my life and my little space on the Interwebs for awhile. I have not given myself a time frame, but in general terms, I hope to complete the major parts of the DIY bathroom renovation in about four months. This might seem like a long time, but remember, I work a full time job, have a number of other commitments, and I do this in my so-called spare time. And I am trying to be more realistic about how long these things take. (The old me would have estimated one month!)
I have no idea what I will find as I get started. Let’s already assume I will face metal studs. And, I am expecting to need to move some pipes around, replace some of the drywall, and build some structural elements, to achieve my vision. I have my plumber on call (thanks Rob!), and my dad is just a FaceTime away in case I get stuck.
So, I hope you are ready to learn everything you can about DIY bathroom renovations. Given how long the cupboard expansion took, I expect this to take longer! (And I still haven’t finished the doors of the cupboards; this is in the queue!) I will share all the links to the various posts in My Ultimate Step-by-Step Guide to Renovating a Bathroom, so you can follow along if you want a one-stop shop for your own DIY bathroom renovation. You can also subscribe and get updates right to your in-box.
First Things First
As with any good project, the first thing is a plan. And I have a plan for the guest bath renovation. It is high-level, as I need to adjust as I go, learning as I demo the current bath and discover what I am working with.
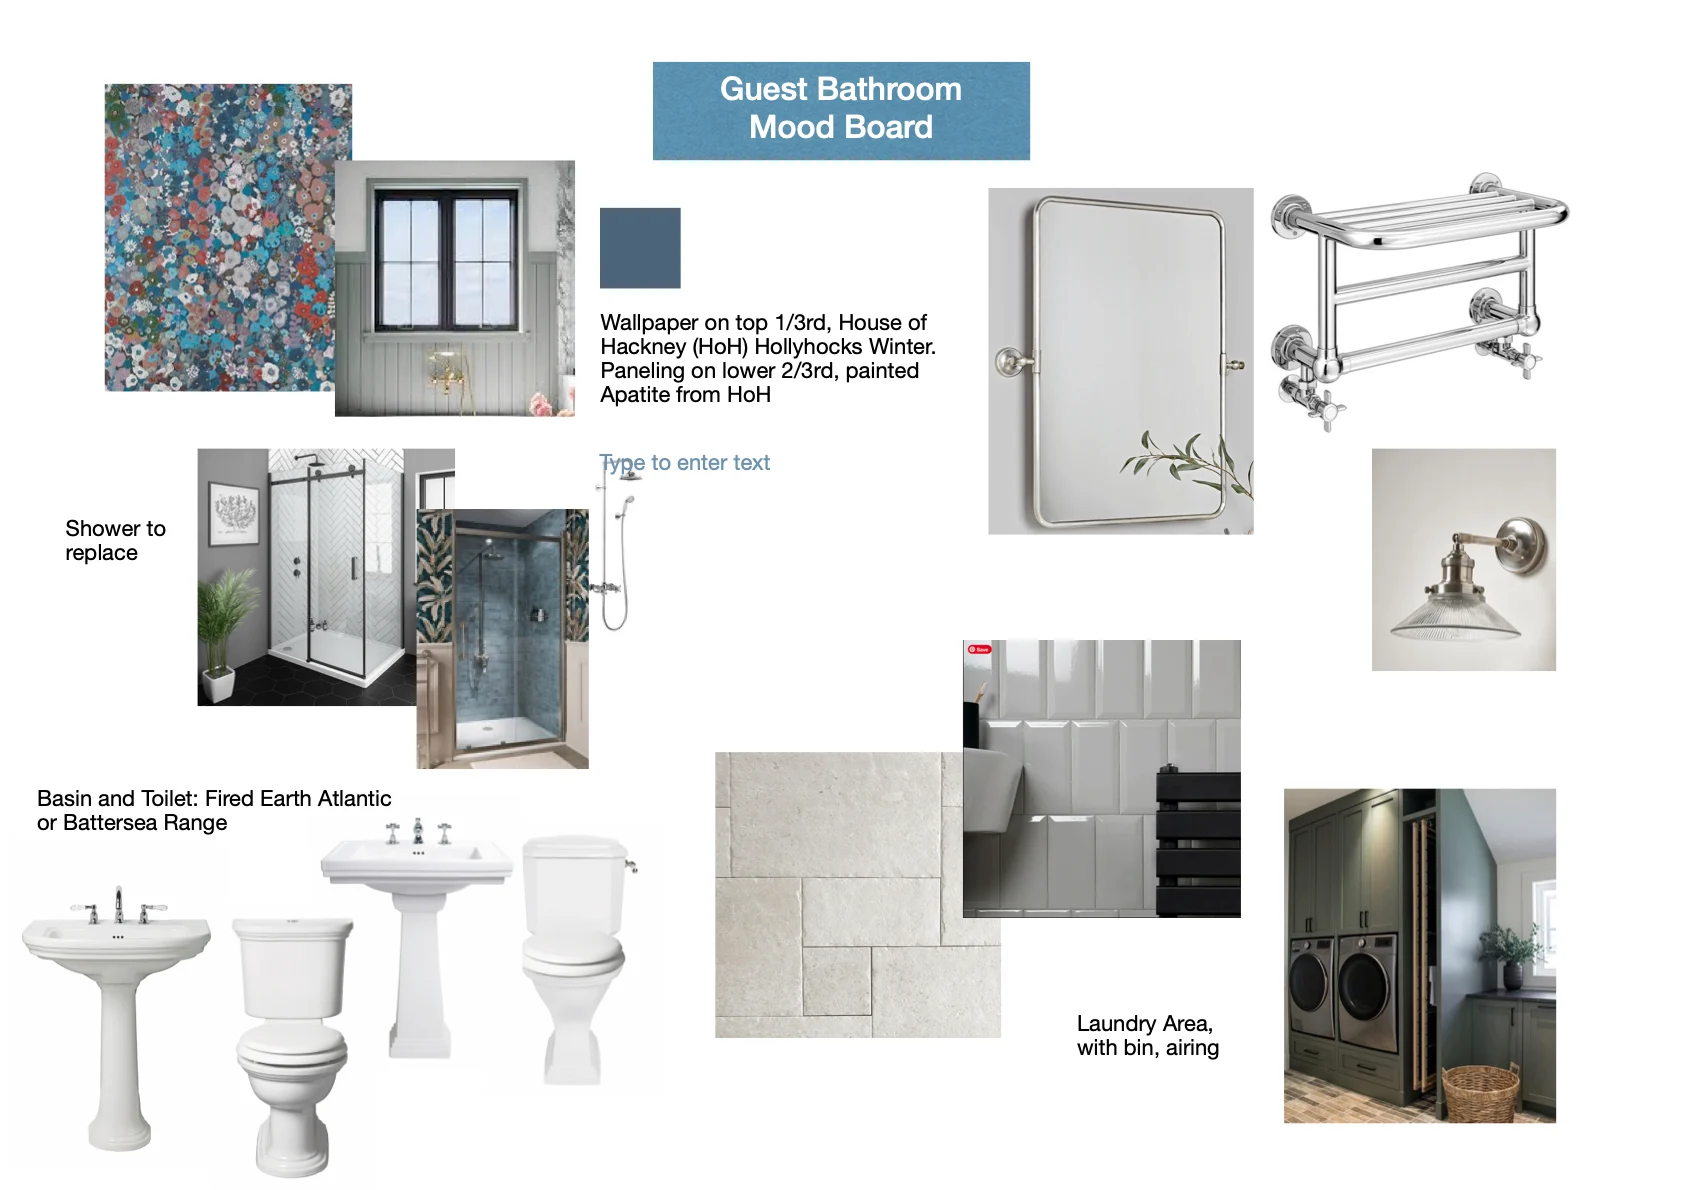
First up, my mood board. The overall look and feel that I am going for.

Again, I do not have everything solved, but this design work-up will guide my decisions throughout the process. Let’s explore the different elements, shall we?
Colour Palette
Wallpaper
Everything for this room begins and ends with the wallpaper. I visited a friend a few years ago in her new home, and her guest bath blew me away. It had this gorgeous wall paper that I would have never chosen for myself because it is Just. So. Much. But it works! From House of Hackney, she had papered the small room in Hollyhocks – Spring.

For our home, the Winter colourway is more suited. I love the teals, blues and even a bit of purple. And fortunately, my dear husband also likes it. This was my first purchase, almost six months ago! Wallpaper is expensive, but fortunately, I did not need much, since the room is quite small. I plan to hang the wallpaper over the top quarter or third of the room, on every wall, except where the shower is, which will be tiled. I’ve never wallpapered before, so I am excited to try this new skill. (Honestly, I expect this to be one of the easiest bits of the project. Famous last words!)
Butt and Bead Paneling
For the lower 3/4ths or 2/3rd of the walls, I plan to install paneling. I love the look of butt and bead paneling, and the English Paneling Company makes an MDF version with wider-than-usual grooves, which I quite like. They also offer a dado rail that has a rebate to cover the top of the paneling, if you are not covering the entire wall. I love paneling, and this will be a nice compliment to the wallpaper. It also is a bit of a splurge, so I am still deciding if the wide width is worth the extra cost. But I do really love it.

Paint
I am still not sure of the paint colour. There are several options from House of Hackney to go with the Hollyhocks wall paper, and I really like Apatite, a dark rich green with a shot of grey in it.

I want to create a warm and cozy fell in the bath. Importantly, the current bath has a huge wall mirror which is great for expanding the feel of the space, but this is coming down in the renovation. I love the use of mirrors to expand a space, but an entire wall is just too much!
Whatever I do, the room is going to feel smaller, and part of me just wants to lean into that with a dark paint colour. I am even considering colour drenching the ceiling, door and trim work. I hate the term and feel it has become too much of an Instagram fad, but it can look really good in the right spaces.
As well, I want to ensure the room flows with the rest of the house, without using a grey paint. I have a lot of grey, so a bolder colour might be a nice contrast.
Tile
The current bathroom has tile around the tub as well as just above the counter top over the sink and toilet. Did I mention it includes an orange strip of tile?

I plan to tile only the shower in the renovation. I love the look of Metro tiles, and I ordered a few samples, thinking we would go with a nice neutral white. However, I love these light grey beveled tiles from the company Metro Tiles, which will still offer a neutral palate but go well with the dark and moody vibe.

Layout
The room layout is up for discussion, once I can see the pipework and discuss with my plumber what my options are. Long-time readers will know that I want to move the washing machine/dryer combo from our small kitchen into the guest bath. I hate having the laundry in the kitchen, and honestly, I need that space for kitchen storage. The guest bath can accommodate the washer/dryer, so I am keen to move it in there.
I also want to remove the tub and replace it with a shower. We have a tub in our main bath, but it really is not necessary for the guest bath. This space can be better used for the washer/dryer and potentially some additional linen storage.
I am considering moving the sink over to the wall opposite the toilet, so I can put the washer in its place. This will all be decided once I demo the current space and we can see what we are working with.

Appliances
It might seem frivolous, but we are replacing everything in the bath. We’ve lived here for more than six years (renting for the first three years), and the bathrooms have felt dated and unloved since well before we moved in. The appliances were installed many years ago, and they are on the low end of quality. So it is time for an upgrade.
I love a closed coupled toilet, with the cistern exposed. This just feels more traditional and keeping with the style of our home. I also really love the look of a pedestal basin. Yes, I know, there is no storage with this style, but I love the clean, uncluttered look. Besides, I can find storage in other places. For these two pieces, I’ve picked out a few options, but I have yet to decide the final ones. More to come here.
For the shower, I plan to build a wall and install a sliding glass enclosure for the stall, with a shower pan. I am still choosing the exact version and sizing here. This will depend on the discussion with the plumber in terms of where the washer will go, which potentially impacts the size of the shower.
Flooring
I found a beautiful limestone effect tile from the Stone Tile Company that I fell in love with. The rustic and traditional style will look great in the bathroom. I ordered this a few months back and have stored the tiles in various places across the flat while I waited to start the renovation.

I also want to add underfloor heating. I’ve never done this, but I think it is do-able for a DIYer, so I plan to try.
Decoration
Finally, a few decorative pieces that I’ve already chosen. My friend who inspired the wallpaper also had a stunning mirror, and I shamelessly copied that too. I ordered the Rectangular Angled Wall Mirror in Antique Sliver from Cox and Cox a few months back, and I cannot wait to hang it.

There are also some wall scones from the same company that I really like, but these are out of stock, so I am still searching for the lights. I am also considering a towel rack or a heated towel bar, but we will see. It might not be needed if we have the heated floor.
Let’s Get Started
So that is my plan for the full guest bath renovation. What do you think?
I am excited but also nervous, but all I can do is give it a try. Worst case, I’ll need to call in the professionals to dig me out, but I do not think it will come to that. No matter what, it has to be better than the current bathroom. Follow along, and let’s see how this goes!
UPDATE: The bathroom renovation was a success. See the final reveal here and check out progress on my second bath renovation here.
Happy DIY-ing!








Leave a Reply