
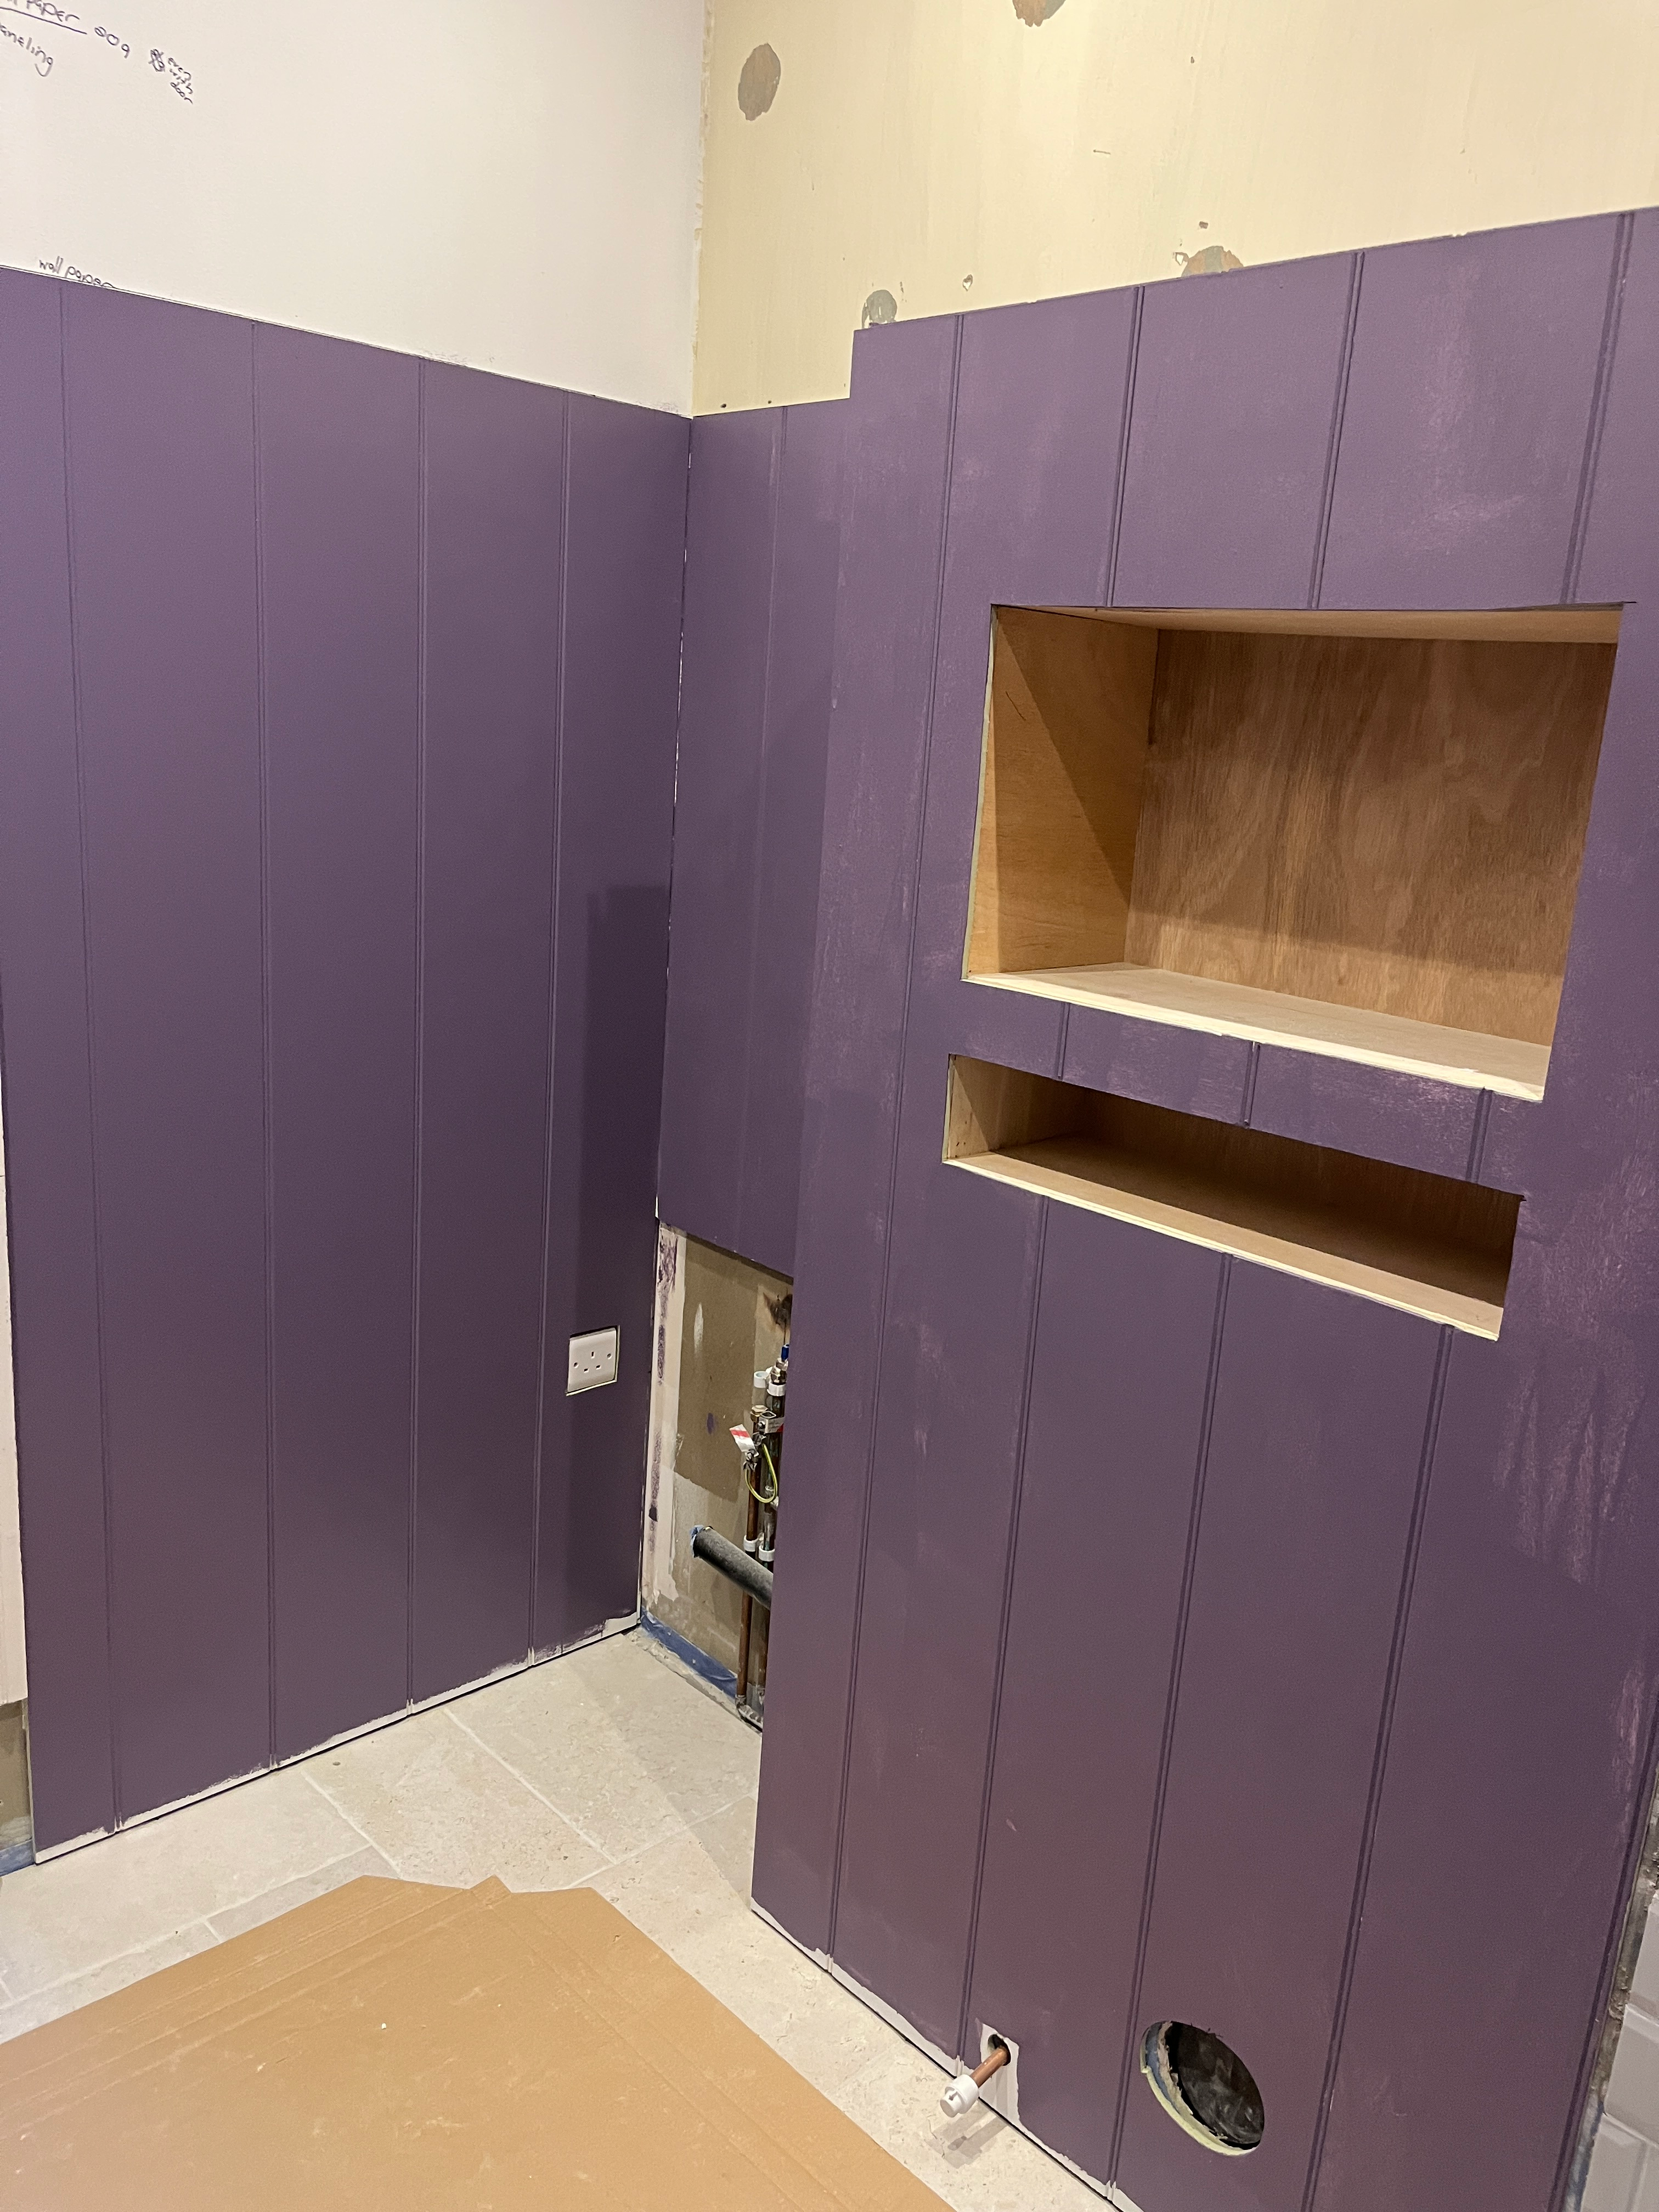
Today marks an important turning point in the bathroom renovation. I’ve completed the tiling. Finally! Now I can move on to the rest of the walls, which desperately need some attention. I want to share how to install wall paneling, which can be a great addition to any room. In my case, I plan to install wall paneling in a wide-grooved bead-and-butt style over two-thirds of the walls where I have not tiled. I’ll add a dado rail across the top, and then add wallpaper over the top third of the walls.
I am so tired of looking at the blobs of adhesive where I removed the large glued-on mirror. And the pink plasterboard on the back wall. And the holes where the radiator was removed. Paneling will cover most of these issues and provide a unique wall treatment that will go nicely with the limestone-effect flooring and the glossy grey metro tiles. And with my very special wallpaper! With the installation of wall paneling, the room will really start to feel like a proper bathroom, instead of a construction zone.

A Quick Aside: Final Tiling Woes
Before I get to how to install wall paneling, let me give you a quick update to close out the tiling. I had my plumber come out for second fix last week, and sadly, it was not to be. We ran into several issues, including missing parts for the toilet and a basin that got lost en route to us, as well as a design issue on my part. You may remember that when I built the stud wall, I did not go all the way to the ceiling. I wanted to keep the beam under the angled ceiling exposed, to match other similar features throughout the flat. I measured the height of the shower riser and built the wall to a height that would accommodate it.

Sadly, I missed that the shower riser included a second piece, and when we went to install it, the wall was not high enough. It is quite a tall riser. Not ideal, as I had already completed the tiling and added plasterboard and paneling along the top of the wall. I could have exchanged the riser, but I really love it and want to make it work. Fortunately, the situation was fixable, with some effort. I spent the last week building the stud wall in the shower up to the ceiling, then boarding it with JackoBoards, tanking it, and tiling it.


The extra work set me back a week, and again, it is not an ideal way to tile a shower. In the end, I did three separate tiling sessions along with re-boarding and tanking each time. The potential for an uneven wall, leaks, and just general mistakes was high with this approach. Considering everything I went through, I am pleased it turned out as well as it did. And I can finally celebrate that tiling is complete! At least I hope it is!
Now let’s get to the topic for today: how to install wall paneling.
How to Install Wall Paneling
Choosing the Panels
If you are planning to install wall paneling, you have a lot of options. There are so many choices out there, some of which completely cover the wall, and others which add features to the wall. I love wall paneling, as it can create interest and depth in a room, if used correctly.
My first experience installing wall paneling was in our bedroom as a feature wall, choosing fancy recessed paneling made from wide MDF boards and small decorative trim. I absolutely love the look. I plan to add small shoe molding trim in the lounge and hallway, maybe later this year. And I’ve recently discovered the addition of brick as a feature wall, although this may not really be considered paneling. But I love the idea of using tiles or even real brick for a wall paneling or covering. This might need to happen in the future!

For the bathroom, I chose to install wall panels in a bead-and-butt board, also known as tongue-and-groove boards. I knew I wanted wide-grooved panels, and once I got to searching for the right style, I was surprised to find so many options available.

MDF For the Win
Regardless of the style of paneling you choose, I highly recommend using MDF panels instead of wood. MDF is light-weight so it does not require significant support. Adhesive and nails are really all you need in most cases. MDF is also very uniform, without the issues that wooden boards have, such as warping, knots, and twisting. And finally, MDF is easy to install and it looks great. You cannot tell the difference once painted.
Note that if you want to stain your panels, you will need to use wood or create a stain effect with paint. As well, if you have a period home or really want to splash out, proper tongue and groove wooden boards can be used, but these require significant precision for install. Walls are rarely straight, so they will require a lot of tiny adjustments to get them right.
Wide or Thin, Horizontal or Vertical
For bead-and-butt board, beyond the material, you can also choose among many different styles. There are panels with wide grooves, spaced up to 200mm, or with thinner grooves, at 100mm. You can choose either vertical or horizontal grooves, and even different styles of grooves.
You can also choose to have your panels primed. I highly recommend this step. While there may be a small additional cost, you save significant time and money by not needing to take the additional step to prime the boards before paining. It is also important to note that if you are installing panels in the bathroom or in a wet area, you will want to select water-resistant MDF as well.
For the bathroom, I wanted something a little different than traditional bead-and-butt board, so I opted for the wide grooves. I purchased wide-grooved Georgian Beaded MDF panels from Paneling Direct. I looked at a number of different companies, but Paneling Direct offered the best options at the best price, with free delivery. There are lots of options out there, I was spoilt for choice in the UK, so you should be able to find something that will suit your needs.

Just pay close attention to all the options, so you choose the right panels. Consider overall size of the panels, depth of the MDF, style of grooves, and direction of the grooves. Remember priming and water-resistent features too if needed.
Choosing the Thickness of the Panel
One important learning for me: I chose a thickness of 9mm for the panels. I am not sure why I chose this depth, except I ordered the panels at the same time I was ordering plasterboard and JackoBoards, which I ordered in 12mm. In hindsight, I wish I would have ordered 6mm depth instead. The 9mm panels are fairly thick, and honestly, the 6mm panels would have been more than sufficient.
The panels come in a large format, at 2400x600mm, so they are quite heavy and difficult to move around. It took a few days to get all seven panels up to the top floor of our building, and finding a place to store them was a challenge. They also were difficult to move around and cut, but more on that in a moment.
If your walls are in decent shape, go for the thinner depth if you can. I certainly will next time!
Are You Considering a Bathroom Upgrade?
Get a step-by-step guide and tons of tips and tricks from my own experience renovating my bathroom. From demolition, to water-proofing, tiling, and installing fixtures, this is your ultimate guide through the process.

Cutting and Fixing Wall Panels
Choose the Height of Your Panels
If you are paneling an entire wall, this will be an easy step. In my case, I wanted to panel the lower portion, while adding wallpaper to the top part of the wall. To begin, we marked out the walls with several options to help visualise what the panels could look like. We considered two-thirds of the wall, three-fourths of the wall, or aligned with where the angled ceiling starts. We also considered aligning with the top of the door.

In the end, we went with two-thirds, which is a standard approach in interior design. It also allows the bold wallpaper I’ve chosen to be a feature without overpowering the room. Honestly, all the options could have worked, except aligning with the top of the door frame. This just looked entirely too symmetrical and did not work at all.
Batch Cut the Height of the Panels
I recommend cutting the height of all your panels at one time, to ensure consistency. This is especially important if you are doing a consistent line of paneling across your room. Batch cutting is also a good approach for managing the size of the panels.
I needed to cut my panels down to a height of 1800mm. Here, a few of my tried and true tools really came to my aid for this process:
- Saw Horses: My Stanley saw horses are a tool that I use all the time. These were perfect for holding the panels while I cut them. Just make sure you use a spare piece of plywood underneath to protect the plastic surface and for the saw to cut into. It also helps keep the boards stable after you cut them.
- Kreg Accu-Cut and Rip-Cut: These fantastic track saw guides are added to your circular saw and help you to cut large formats like paneling sheets in straight and even lines. The Rip-Cut is perfect for cutting height off the panels; you set the track saw position to the right measurements, and then you just cut each and every panel at that setting, using a straight edge of the board to guide the cut. Perfect consistency. And the Accu-Cut helps cut the various widths needed across the room.
- Bosch Circular Saw: I love my circular saw. It is a small piece of kit that can do big jobs. With the track saws added, it is almost as good as having a table saw, which I just do not have the space for.
You can read more about all of these tools in my 25 Days of Christmas DIY Advent Calendar.

I will note that getting the panels on to the saw horses and having the space to move around was a challenge. For cutting and sawing, I use a small walkway and exit just outside our building, and it is barely wide enough to fit one of the panels lying flat. I had to squeeze along the side with my saw, just barely fitting. And getting the panels up on the saw horses was a comedy of errors. The lightweight saw horses kept tipping over as I tried to get the panels on to them, and I hurt myself a few times as the unwieldy panels slid and tipped while putting them in place. I finally had to ask for help for moving them around. It is definitely a two-person job!
Even though it was a bit more work moving the panels several times, I cut the height of all the panels in one go, again for the consistency. Set the track saw once, make multiple cuts. I then came back on another day and cut the width according to the needs of each wall.
Measure and Cut Each Panel, Then Install
To install wall paneling once the height is cut, I recommend going panel by panel. Measure the first panel, cut it, then install it. Move on to the next panel, working your way around the room.
I began on the wall to the left of the door as you enter the bathroom. With the height already cut, I measured the width and cut one of the panels to size. I then needed to cut out a space for the socket that had been installed on this wall for the washing machine. More on this below, as you will absolutely need to cut around obstacles throughout any room.
Once the panel is cut and the cut-out created, apply adhesive to the back of the panel. I used Evostick adhesive with my caulking gun and applied long rows that circled around and covered the entire back of the panel. Press the panel in place and ensure it is flush against the wall.

I placed some small pieces of 9mm MDF on the floor to prop the panels on and create a small gap between the flooring and the panels. These were removed after the adhesive had dried. I just wanted to give everything a bit of space for expansion and movement due to condensation in the bathroom.
Make sure the panel is sitting level across the top and that it is level on the wall too. You can use some shims as needed to help bring it into level, depending on the state of the walls and floor.
Once you are happy with the placement of the panel, secure it with some nails. I used my trusty nail gun with 25mm/1.5inch nails, spaced around the panel and countersunk into the MDF. You do not need too many, just cover the perimeter and a few in the centre.
Once one panel is hung, move to the next panel, measuring, cutting and hanging it to be flush with the last one. You want to move around the room, paneling off the last panel you hung. Just as with tiling, do not go freestyle when you install wall paneling. Do not hang a panel without working off another one. This will just create more potential for error. Or at the very least, more cuts needed.

Cutting Corners
To install wall paneling at internal corners, you could cut a mitred corner, but I do not think it is necessary. Cut one board, then cut the next one on the adjoining wall to simply butt up against the board. A bead of caulk will cover any gaps.
To install wall paneling at external corners, you should ideally cut a 45-degree mitre on each corner, to meet up. However, given the size of the panels and the use of the track saw guide, I was not able to cut a mitre on my one external corner. Instead, I butted the edges against each other and did a line of caulk. I ensured the more visible edge was on top, and this worked fine. I may add a small piece of shoe molding later, but so far, I am happy with this.

Cutting Around Obstacles
It is inevitable that when you install wall paneling, you will need to cut around obstacles. Sockets, pipes, or fixtures, all will need to be considered in your paneling.
It can be a bit tricky because the panels are so large, but with some patience, you can do it. It is the same principle as marking and measuring tiles or peel-and-stick vinyl tiles, which I’ve covered in-depth here and here.


First, make sure you have cut the width and the panel fits into the space.
Then, hold the panel in the space with the vertical height correct but the panel pulled out so the horizontal edge sits alongside the obstacle. Mark the vertical dimensions of the obstacle on the edge of the board.
Next, hold the panel horizontally against the wall, with the top or bottom edge up against the obstacle. This might be harder depending on the size of the panel. You can measure the obstacle either from the top or bottom, whichever is easier. Just make sure it is in place horizontally, to get the right measurements. Mark the horizontal edges of the obstacle on the panel.
Put the panel back onto the saw horses, and use a straight edge to draw straight lines parallel to the edges, from the marks showing the obstacle’s location. The lines should intersect horizontally and vertically, and this is where the cut-out needs to be.

Use a drill and make a hole within the cut-out space. The hole needs to be large enough for your jig saw blade. Use the jig saw to then cut around the perimeter, being as precise as you can. You might want to cut out a small portion and then take the panel back to the wall to check your measurements. Adjust as needed and finish cutting out.
If you need to cut a round cut-out, use a hole saw bit or spade bit, depending on the size needed. Or, if the hole is too large, as in the case of the waste pipe for the toilet, you can find a circular object in the house and trace around it. A saucer or small plate might be perfect here. Then use the jig saw to cut the hole out.

If you make any mistakes or the edges are a bit jagged, you can sand them down or use a bit of wood filler. My waste pipe cut-out is not perfect, but I think the toilet will cover it. If not, a bit of wood filler, caulk and paint should solve this.

Add Trim to Finish the Look
You’ll want to finish off the paneling at the top and bottom, to help complete the look. In my case, I chose a simple squared MDF panel for the bottom molding. This was left over from my bedroom paneling, and I like the simplicity. To install, simply cut to size and install with adhesive and nails. Caulk the seam between the panel and the trim, to cover any gaps. Make sure you cut 45-degree mitres at the corners where they join up.

For the top, I chose a dado rail with a simple profile. I did not want to compete with the paneling itself but rather complement it. I found some nice MDF dado rails at B&Q and was able to purchase them by the piece, so I do not have too much excess.

I installed the dado rail over the top of the paneling and sitting just above the edge of the panel. This leaves a slight gap behind it. You could also install the dado rails to the wall, flush against the top of the paneling. But it if there are any tiny differences in height, due to the floor not being perfectly level, this will show. Installing the dado rail on top will cover any slight inconsistencies. You can then fill the gap behind with a bead of caulk or silicone. You also want to add a bead of caulk where the dado rail sits on the paneling on the front.
In my case, because of the wall I built, I needed to ensure the dado rail is aligned with the top of the wall too.
One note here: Mitre the corners of the trim for a neat and professional look. Mitering can be confusing, so take your time. I will write a post on this in the future, as it is definitely a skill that takes some practice.

Paint the Paneling
The final step is to paint the paneling. If your MDF is already primed, you can go straight to painting. If not, take the time to prime it for the best paint finish and a lasting result. My panels, dado rail and trim were all pre-primted. The shoe molding around the wall niches is raw wood and needed to be primed.
You can see from the pictures that I painted in a few different steps, as I had the different pieces for the install. It is more efficient to paint all at once, but it is not always possible.
Choosing a paint colour can be a little daunting. I always try several samples, but I really cannot tell from a small sample. For this project, I bought a sample pot of our chosen colour and painted an entire panel, which I propped in the bathroom and lived with for a few weeks before buying a full tin of paint. Fortunately we loved the colour, so we did not need to do a lot of experimenting. I chose a satin finish, with a bit of a sheen for the paneling, in a paint made for bathroom conditions.

I originally thought we would go with a dark green, but in the end, we chose a lovely aubergine from Benjamin Moore, called Nightfall Sky, that complements the wallpaper beautifully. Oh, how I do love purple, and this colour is bright enough for the room, while also delivering some major cozy vibes. So, so pleased!
And I love Benjamin Moore paints. They are just so so good. They have only recently come to the UK and are still a bit hard to find, and they are not cheap, but the quality is so good that it is worth the extra cost and effort. Some of the Leyland shops in the UK carry Benjamin Moore, but not all of them, so check before you go.


That is a wrap on how to install wall panels. High impact for a reasonable amount of work. Next week, I’ll share a bit more on the wall niches I designed for over the toilet and extra storage I am building into the eaves. And, I’ll be focused on second second fix in the coming week or so, now that I have all the parts and the tiled wall is extended to fit the riser.
Happy DIY-ing!








Leave a Reply