
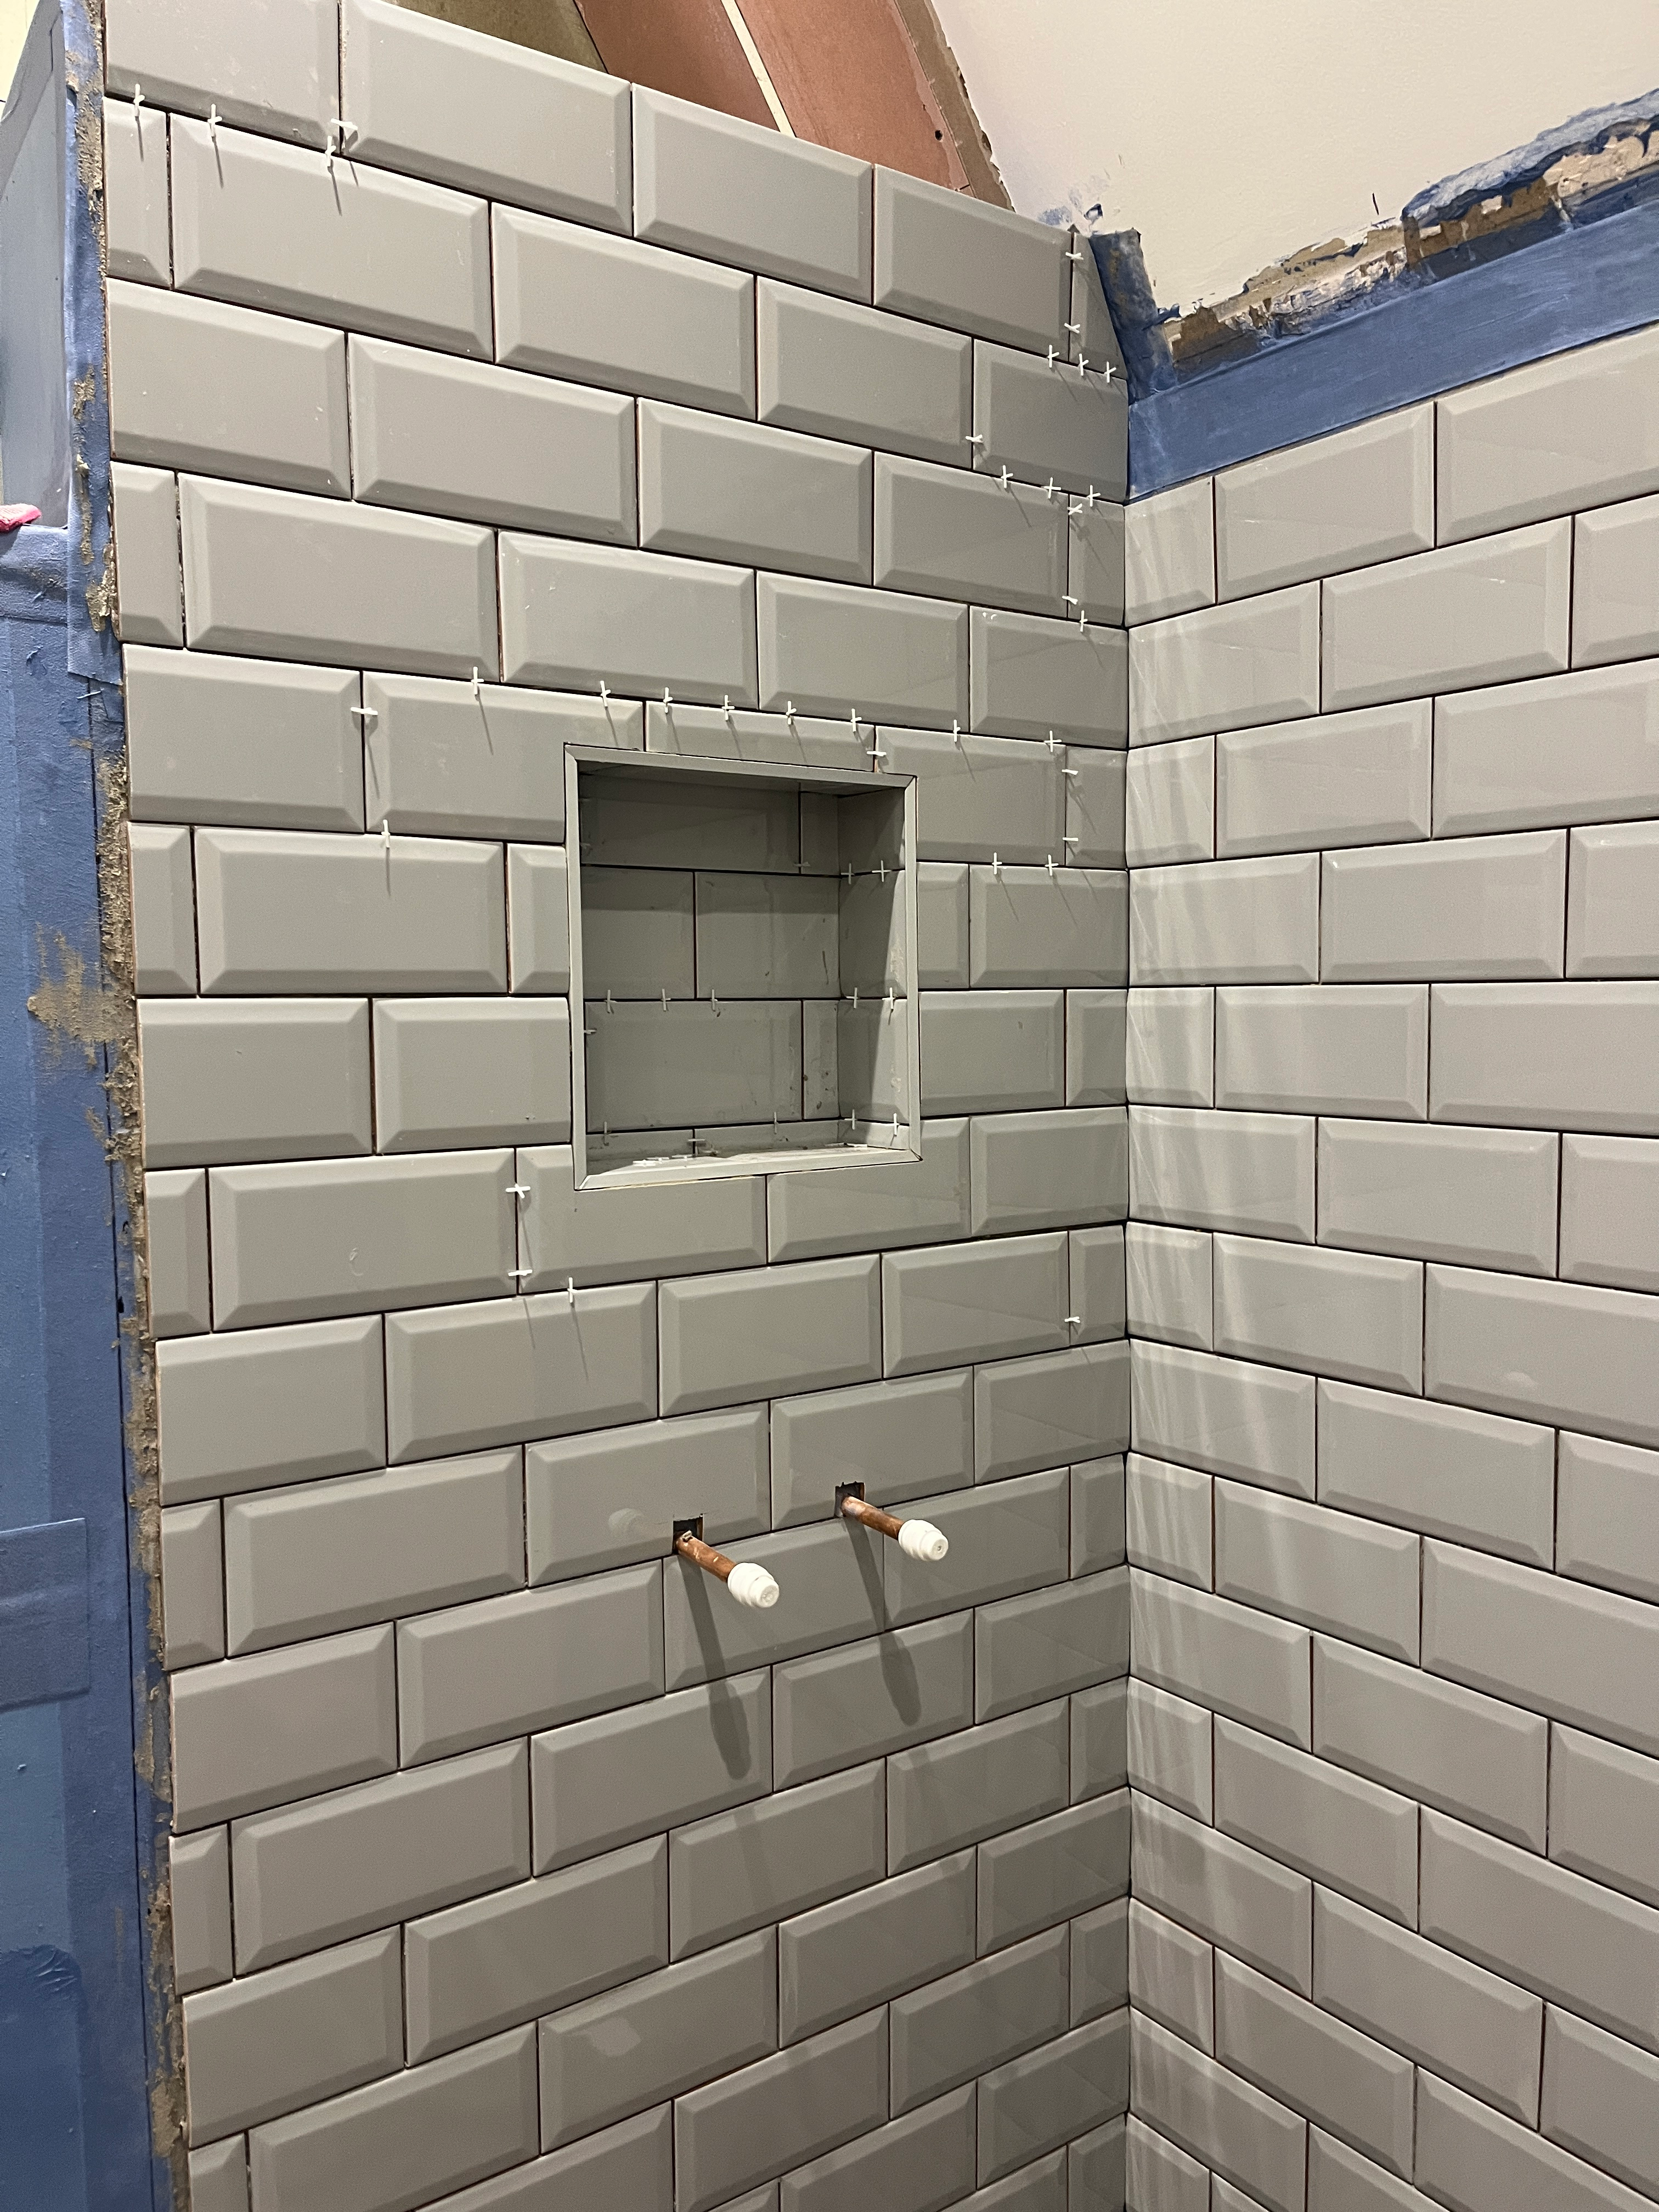
The time has come for one of the most significant upgrades to the bathroom renovation: changing the tub to a shower, complete with glossy grey metro tiles and glass doors and walls. I am excited about this transformation, but it is also a very visible aspect of the new bathroom. So I must get it right. Today I am sharing how to tile a shower in the bathroom, which will be a significant project. Slow and steady will win the day.
I’ll start by saying: removing tile from walls is much more relaxing that installing it. I actually found the effort to tile a shower with metro tiles to be one of the hardest jobs I’ve taken on in the bathroom renovation. And this despite having taken a tiling course and successfully installed the floor tiles. I had thought the floor would be the more difficult job of the two, but it was not!
But not to worry! While it is challenging due to the precision required, the effort to tile a shower is highly achievable. With patience, precision and practice, you too can tile a shower and upgrade your bathroom.
Let me show you how.
A Good Foundation
I started my tiling journey by laying the floor tiles. It went really well, and I am so pleased with the result. This gave me a good foundation for how to tile a shower. But while I will benefit from the experience of tiling the floor, the walls are quite different. And they offer an entirely new set of challenges. In the end, slow and steady is an understatement, as it took me two weeks to tile a shower area in my bathroom. And my shower is only 100x80cm, no not that big. Imagine if I was doing the entire bath!

Key Considerations To Tile a Shower
First, in the shower, I am using smaller, thinner tiles, with a repetitive brickwork pattern. The somewhat random pattern of the floor had its challenges, but the wall tile layout requires absolute precision in terms of level lines both horizontally and vertically. Also, because the tiles are smaller, any deviation will show more prominently. And there is less place to hide any problem areas in the shower, due to the glass doors and prominent position in the bathroom. It is one of the first things you will see as it sits directly across from the door.

Another challenge is the three dimensional area with open boundaries in the shower. The floor is a flat space, with very clear boundaries made by the walls. In the shower, the shower pan gives a boundary, but it is only a visual boundary, not a physical boundary. (I did consider hanging the paneling before tiling to provide a physical boundary but decided against it in the end.) We also need to ensure perfectly level tiles from wall to wall, and especially where they meet in the corner.
So quite a few challenges to overcome as I tile a shower. But, we also have a simple layout that repeats, so we do not have some of the issues we had with the flooring in terms of figuring out which tile goes where.
I find in these cases that the best approach is to just tackle the project head-on and see where we get to. So let’s get to it with how to tile a shower.
Are You Considering a Bathroom Upgrade?
Get a step-by-step guide and tons of tips and tricks from my own experience renovating my bathroom. From demolition, to water-proofing, tiling, and installing fixtures, this is your ultimate guide through the process.

Step 1: Ensure a secure and level surface for tiling
The success of any tiling project is 100% dependent on the surface you are tiling on to. Read last week’s post about creating a stable, level and waterproof foundation for the shower tiles for more info on this step. And pay close attention to any country-specific codes and requirements. For example, in the UK, it is required that you tank any area subject to significant water, like a shower. And honestly, even if it were not a requirement, tanking is just a good idea.

Step 2: Dry Layout the Tiles to Determine Placement
Just as with the floor, you want to test out tile placement before laying the first tile. It is a bit harder on a wall, since the tiles will not stay in place on a vertical surface without adhesive. Good measurements are critical here.
In the tiling course I took last summer, I learned a great technique to tile a shower, or any space for that matter. Take a long batten of wood, such as a roofing batten, and on one side, mark an H for Horizontal in a marker or pencil. Starting at one end, hold a tile horizontally against the batten and flush with the end. Add a spacer, and mark the edge of the tile + spacer on the batten. Repeat this several times, until you have a length of wood with the tiles and spacers marked out. Essentially, you are using a stick of wood to visualise the horizontal row of tiles, so you can mark your layout on the wall.

On the other side of the batten, do the same thing but vertically. Mark it with a V, and then measure the tile vertically with a spacer on the wood. Repeat until you’ve got several tiles marked.
Now you are ready to start trying your tile placement.
Measure the centre of each wall to be tiled. Place the measuring stick on the wall, starting at the centre point and mark the tiles until you reach the end of the wall. Repeat on the other half of the wall. If the layout works, without small slivers of tile at either end, make a note of where to place the first tile in the centre of the wall.

If the layout does not work, shift the measuring stick so the tiles start slightly left or right of the centre point. Keep trying different layouts until you find one that works for you.
Remember, if the tiles are laid in an alternating pattern, you should mark out two rows to make sure the tiles look good on both rows and they end in a good place on either end of the wall.
Do the same with any other walls, lining up the tile placement at the corners as well. You want to ensure the layout works across all the walls, not just the one you will start with.
Once you have the horizontal tiles measured, repeat for the vertical tiles. Adjust as you did with the horizontal rows, until you find the ideal starting place. Mark this as well, with a plan to start tiling close to the bottom of the room and work your way up.
A Few Considerations With Your Layout
- It might take a few different tries to get the placement right. For me, I was not able to completely avoid some small tile cuts, but because the shower door will be installed at the edge, I decided it would probably not be too noticeable. Generally, you want to avoid any tile cuts that are smaller than about one-third of the total tile size, if possible. I do have a small tile on one edge, but it will be covered in part by the frame of the shower door, so I think it will look okay.
- Consider any specific obstacles that you need to tile around. You want to ensure the tiles work around these obstacles and do not result in any strange tile cuts. Think electric sockets, windows, etc. For me, I needed to consider the shower niche, which is eye-level and very visible. I used this as a centre point to work around for tile placement. It was important to make sure there were no tiny tile slivers or strange cuts that would look odd.
- Don’t be afraid to try several different layouts. Better to try a few options to find the right one. Just clearly mark your tile placement and differentiate between the various layouts, maybe with different coloured markers for each one.
As with the floor, the dry layout took some time. I spent an afternoon working on this. Better to take your time here. You want to get it right.
Step 3: Prepare All Tools To Tile a Shower
Preparation is key before you start actually tiling.
First, take your measuring battens and use them as a guide for placing the first row of tiles. You typically want to tile a shower starting close to the bottom of the wall, a few rows up from the bottom. Place the batten against the wall at the starting point for your first row, and ensuring it is level, nail it to the wall with a few nails. You do not need to overdo it, 3-4 nails is more than fine. This is temporary, you will remove it after the tiles have set. The batten will serve as a ledge to hold the tiles in place and help keep them from sliding down the wall until they set. This is especially important as you add more weight above each tile with every subsequent row.
Next, get your bucket trowel and tiling trowel ready, and lay out a stack of your tiles nearby. Make sure you mix up tiles between packs, in case there are colour variations between each box. I worked with four boxes at a time, randomly choosing tiles from each box as I went. You also want your spacers close by and ready to be used. In my case, I was using 2mm crosses for the spacers on this project.
You also want to have a spirit level and if possible, a laser level ready for use. I have a laser level from my dad but it only measures horizontal lines. For tiling with metro tiles, I decided that a laser level that could show both horizontal and vertical lines would be worth the small investment. (Spoiler alert: I was right. I highly recommend adding this tool to your workshop if you plan to tile a shower.)

I purchased this laser level from Amazon. The level itself is great, but the tripod was of limited help, as it is quite small. In my view, the tripod is not critical; order just the laser if you can. You can always prop the level onto various items in the room instead. I was lucky in that we had a tall tripod that I could use for the higher parts of the wall.
Finally, when you are ready to start tiling, mix up a batch of adhesive. I used the same tile adhesive I had used for the floor: Larsen’s flexible tile adhesive in grey. As with the floor tiles, the colour of the adhesive did not matter for my tiles, but it might for you, depending on the tiles you choose. I strongly recommend you do not use the pre-mixed adhesives, they are not as strong as the adhesives you mix with water. And, I would avoid rapid-set adhesives. You want to be able to take your time and not feel pressed.
To mix the adhesive, add water to a bucket, then add the adhesive powder, following the recipe on the bag. Use a paddle mixer in your drill and mix it really well, ensuring all the powder is absorbed and mixed in. The consistency should be like peanut butter, and the adhesive should not slump or fall in on itself. As you are tiling on a vertical space, thicker is better, to keep the tiles from sliding down the wall.
Step 4: Lay Your First Row of Tiles
Now it is getting real! Time to start fixing your tiles to the wall.
Starting at the row that will be your first row, at the batten you installed, position your laser level if using to show the tile placement. Or mark the location on the batten. Once you spread the adhesive, you will not be able to see the starting point you marked on the wall, so you need to make sure you know where to position the tile.
Apply a solid bed of adhesive to the wall using the trowel. My approach is to scoop some adhesive from the bucket using the bucket trowel, then scrape it onto the tiling trowel, on the flat edge side. Wipe the adhesive over the wall, with the straight edge against the wall. Do not worry too much about even coverage, more adhesive is better at this stage. Cover a good area, usually two rows’ worth and as far vertically as is reasonable.

Once you have a good bed of adhesive, wipe any excess off the trowel, using the bucket trowel or the side of the bucket. Then, using the notched edge of the tiling trowel, place the notches against the wall at the base of the adhesive bed. Holding the trowel at a 45 degree angle, pull the trowel up through the bed of adhesive, creating a grooved bed that is fairly uniform in depth. Adjust any low spots as needed.
Make sure the grooves all go in the same direction. The grooves are there to push the air out from under the tile, so they need to run in the same direction.
Once the adhesive bed is fairly uniform with consistent grooves, take your first tile and press it into place. To tile a shower or any space, the technique is press and wiggle, to ensure good adhesion. So press the tile in place, give it a good wiggle, and then make sure it is level. If in doubt about the security of the tile, you can lift it back up and make sure the entire back is covered in adhesive. If not, add more and adjust your technique to be more generous on the adhesive bed.
Repeat the process across the row. Once you have laid the tiles in the first row, go back and add your spacers. You can also do this after each tile, as you prefer. I got into a good groove of laying a row, then adding spacers below and beside each tile, as I moved up the wall. I was working with small spacers, of only 2mm, so in my case, I placed each tile flush to its neighbors, then used the spacers to slide the tile into its proper place.

Once you’ve placed the first row of tiles, including spacers, move on to the second row and do the same. If you are doing a brickwork pattern like I am, use the vertical laser level line to ensure the tiles are evenly placed. You also can mark the halfway point on each tile, and line the mark up with the seam on the row two below.

After two rows are laid, it is a good time to check your work with the spirit level. Lay the level across the top row of tiles and ensure it is level. Adjust as needed. If you are using the laser level, it should be spot on.
Check the vertical layout as well, to ensure it is plumb at the sides. This will be easier as you add more rows.
Finally, and very importantly, press the level against the surface of the tiles at various spots to ensure the face of the tiles is level with no tiles sticking out. I had considered using the leveling system I used for the floors on the wall. But I decided not to, as the tiles are quite small and thin, and it felt like it would not be necessary. In hindsight, I would have liked to have the system in a few problem spots, but overall, using the level against the surface worked well with these small, thin tiles.


Step 5: Keep Tiling, Row By Row
Once you have two rows laid, move on and up, row by row. Lay a bed of adhesive for two or three rows at most, to ensure it stays fresh and the tiles will adhere.
At this point, I recommend sticking with one wall. Get the wall done, then move on to the next wall, starting at the corner where the walls join and working away from the tiled wall. But as stated earlier, make sure you measured all the walls at the start, so you know the tile placement will work across all the walls.
Use the laser level and the spirit level to continually watch that everything lines up nicely. It is also a good idea to just step back occasionally and look everything over with a fresh eye.

Once you have completed a wall, move on to the next one, starting at the bottom row, aligned to the tiled wall. Start at the corner and tile outwards, ensuring the rows match up at the corner where the tiles meet. If needed, move to step 6 and cut any tiles before moving on to the next wall.
When you meet up with an obstacle, like the shower niche, work around it, leaving space to return later. Be careful though, that you maintain all spacing and that you are always tiling off of another tile. Do not randomly start tiling an area without working off a tile. No matter how good your measurements are, this is very risky. (More on this shortly.)

Step 6: Cut Tiles as Needed
It is almost guaranteed that you will need to cut some tiles to fit into the space. At the edges, including the corners, and around any objects in the space, like wall niches, wall sockets, windows, etc.
I shared the tile cutter that I purchased when I tiled the floor. This little gem of a tool has been wonderful to have. If you can afford it and have the space for it, I highly recommend it. And B&Q offers free next-day delivery in the UK, making it an even better deal!

Alternatively, you can hire a tile cutter, and you can also choose a manual cutter instead of a wet saw. A manual cutter would have worked well for my metro tiles, but since I already had the wet saw, I used that.
I covered the ways to measure and cut tiles in the floor tile post, so check that out for tips and tricks. In my case, the cuts for the wall tiles were a bit more uniform, and there were a lot more of them. I took measurements for the four different cuts I needed for the edges of the two walls, and I batch cut them all at one time. As well, I cut a few more than needed, just in case.
To mark the tiles, I used a Sharpie pen, and while it is supposed to be permanent, it wiped off quite easily. Test your tiles before marking them just to be safe, but glossy tiles should wipe clean quite easily.
The great thing with needing to cut multiple tiles of the same size is that you can set the guide rail on the cutter and make numerous consistent cuts all at once. Because the walls are not perfectly square, I did have to make some small adjustments as I went along to a few corner tiles, but not too many.
Once the tiles are cut, affix them to the wall before moving on to the next wall.
Step 7: Tile Around Any Obstacles
Once you have the walls tiled, return to any obstacles in the room. Depending on the obstacle, there may be different ways of tiling them. In my case, I needed to tile around the pipes and the recessed shower niche.
Because the niche is highly visible and at eye level, it was critical to get it right. And tiling a niche is not an easy task. I’ll share the steps on this in a separate post in the coming weeks, as there are quite a few steps, and this post is already quite long!

Step 8: Remove the Spacers and Clean the Tiles
Once you’ve completed the tiling, let the adhesive cure according to the set time on the bag. I worked over a two weeks to complete the shower tiles, which is longer than it should have taken. But I ran into some issues which I will share in a moment.
Suffice it to say, my tiles had plenty of time to cure.
Once cured, remove all spacers. If using the crosses, you can pull most of them out by hand, but you might need to use pliers to pull some of them out. If using the leveling system, see my flooring post for tips on removing these spacers.

Clean out the space between the tiles if there is any dried adhesive. You want the grout lines to be as clear as possible for the grout. Try and do this as you go along and while the adhesive is still wet, but you will probably miss some and need to clean it out after it has dried. I used a small flat-head screw driver and was very careful not to scratch the tiles.
Wipe the tiles down, removing any stuck-on adhesive, dirt or other debris.
Step 9: Grout
As with the floor tiles, I still need to apply the grout. I decided to wait and do it all at once, on both the floor and walls. Because I am planning to use the same colour grout, a silver grey, I want to mix up one batch and do it all at once. I will share this step next week, as I need to get it done before anything else can move forward.
Some Important Considerations and One Huge Caution
As I’ve alluded to, it was not all smooth sailing with my wall tiles. Learn from my mistakes. There are lots of tiling tutorials out there, but few share the potential mistakes you could make. I am happy to share my mistakes, so you can learn and hopefully not make them yourself.
If you are tiling more than one wall, make sure you start tiling at the corner for all walls after completing the first wall. You want to start your tiling next to the completed row on the tiled wall. You never want to start a new group of tiles that is not attached to the original set of tiles. This is very risky.
Do not rely solely on the measurements you took for each wall. to start a new wall.
Do not rely on the laser level to start a new wall.
And do not even rely on the batten you installed for your starting row on the new wall.
No, learn from me, and start your next wall right beside the installed tiles on the first wall. If you need to make cuts, which you probably will at the corners, do it now. Ensure you are tiling the next wall and all subsequent walls by building off of the first wall.
If you guess, or eye it, you may make a tiny mistake that will have big consequences.
Ask me how I know …

You might remember with the floor tiles, I wanted to lay all the whole tiles all at once, and then cut the necessary tiles and lay them in another session. Certainly efficient, maybe even a good idea in theory. But sadly, doing this for the wall created a very big issue for me.
You see, I counted on my measurements and tiled the two walls separately, leaving space for the cut tiles in the corner and on the sides. I carefully watched the laser level to ensure the rows were lining up, and I assumed all was good. Everything lined up to my batten too.
But all was not well.
A few days after laying a majority of the whole tiles on both walls, I came back to the project and measured and batch cut the necessary tiles for the edges and corner. I mixed up some adhesive and started laying the missing tiles, and that was when I realised it … the rows across the two walls were off by 1-2 millimetres. A tiny amount, but enough to be noticeable and definitely not the look I was going for.

I will admit, I almost cried. I had gotten almost all of the two walls tiled, and things looked good!!! At least until they were joined up in the corners. I walked away completely defeated, and I came back the next day to fix the damage. Which required removing the tiles on one wall, which damaged the tile backer boards and required re-boarding in some places.

This mistake cost me time, energy and resources. Fortunately, I had plenty of tiles, so that was not an issue. And I had spare backer boards. I cut out the damaged boards, installed new boards, and seamed and tanked the area. Because I needed to order more of the seaming tape, combined with the time to remove the tiles, re-board the area in several places, and the drying times for the tanking, I lost about five days in the process.

So, the shower took a lot longer than it should have, and it was rather frustrating.
But, in the scheme of things, I was able to fix the issues and complete the shower finally. I must say, when I started the bathroom renovation, I found tile removal to be almost fun. That was before I had to remove my own hard work. I’ve changed my mind on that one!
All’s Well That Ends Well
The challenges I faced tiling the wall were discouraging, but I learned a valuable lesson. Always tile off another tile, never go freestyle. No matter how good your measurements might be.
And, I ended with a great result. The tiled walls look amazing and already add a great feel to the bathroom, even without grout.

Next up: grouting the floor and shower tiles. I will be back next week with this final and crucial finishing step for tiling, as well as some additional tips and tricks I’ve gained through this two-week tiling saga.
Honestly, I cannot wait to be done with tiling for awhile! It was not quite the glamorous job I thought it would be! But it is done, and now I can move on to other fun things.
See you next week.
Happy DIY-ing!








Leave a Reply