
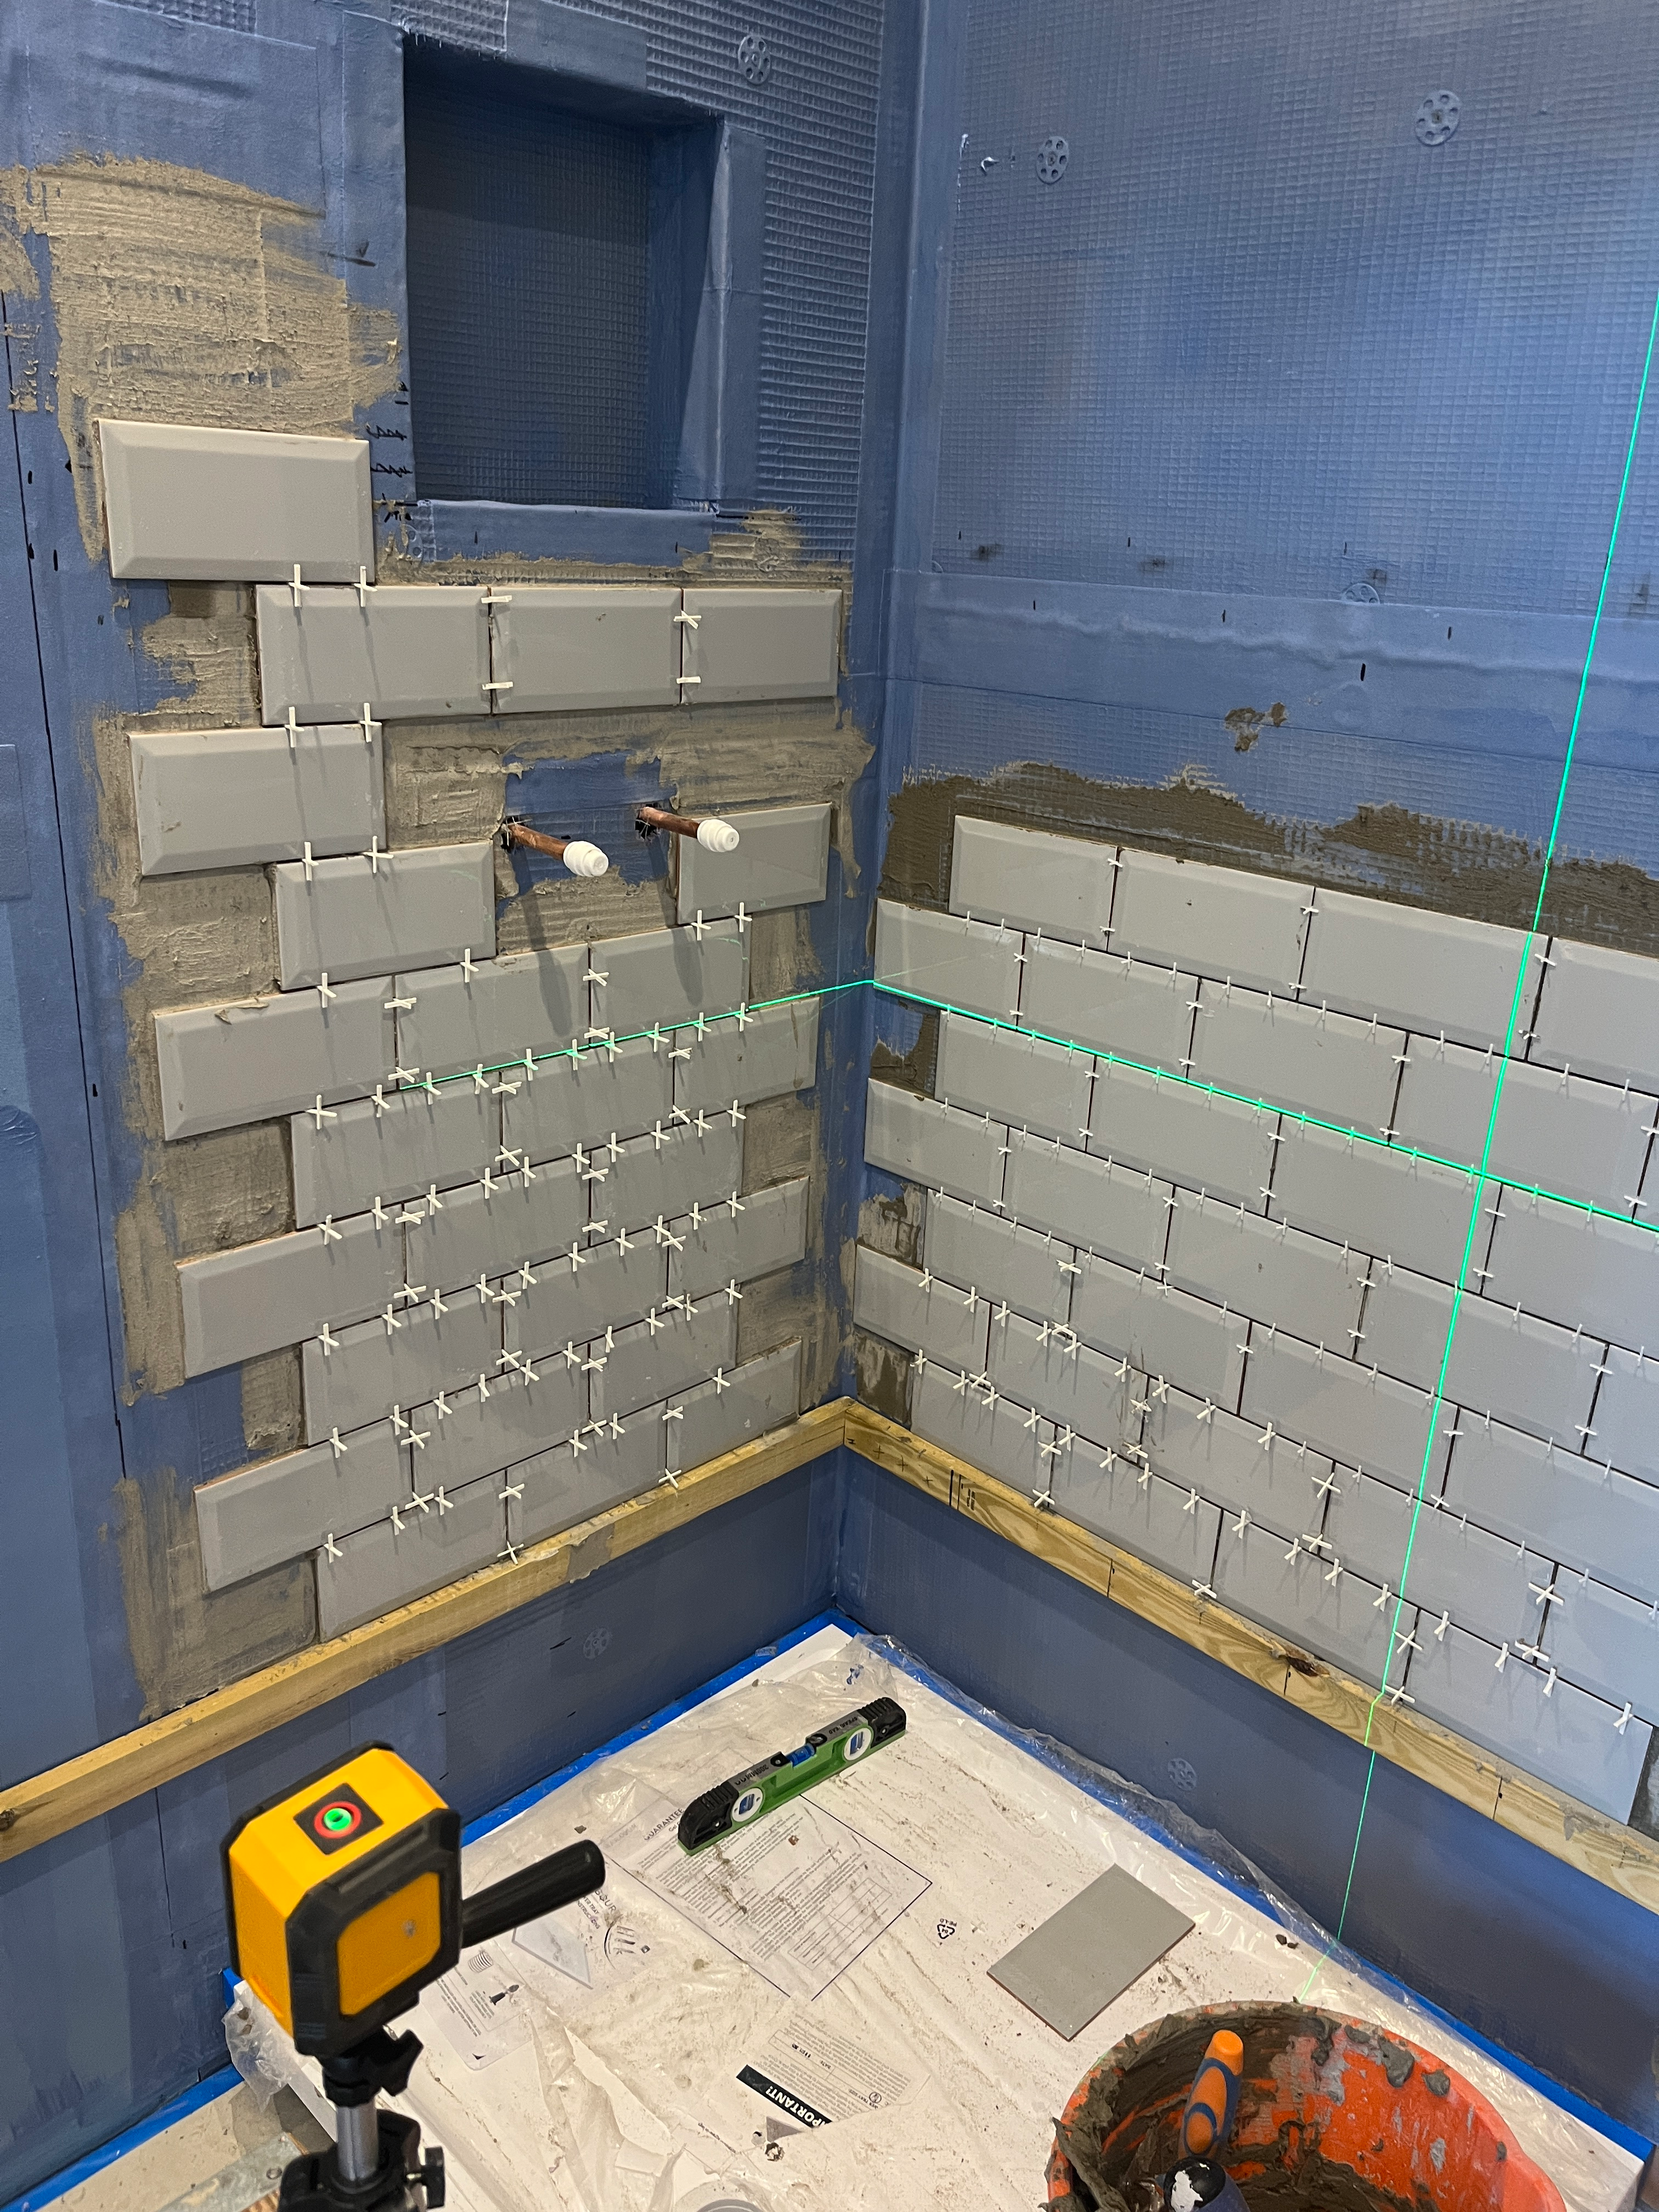
Well, something was bound to go wrong in the bathroom renovation. I am just so frustrated that it was such a rookie mistake! In tiling the shower, I failed to get the corner tiles to match up. When renovation goes wrong, it can have all sorts of knock-on effects, but there are ways to manage through.
As I shared last week in my post about tiling a shower, the tiles on either wall were off by 1-2 mm. A small amount, but it was enough to be noticeable. Not the professional look I was going for! I ended up ripping out one wall of tiles; fortunately I had not completed the wall and had not yet done many of the intricate cuts.
But, the damage was done. The wall needed to be re-boarded, re-tanked and re-tiled. And I lost about five days in the process. Not to mention that when renovation goes wrong, you also go through all the feelings of ignorance, frustration, and defeat.

Last week, I shared the process for tiling a shower, but I did not go into much detail about the mistake I made. I mentioned it, and I shared the fix, but now, I want to dive a bit deeper. How do I overcome when renovation goes wrong? Hopefully, some of my tips can keep you from making the same mistakes.
When Renovation Goes Wrong
Today, let’s return to a frequent topic on this blog: when things go wrong. As a principle, it is really important to me to share both the good and the bad of DIY. I could paint a rosy picture of the beautiful finished work and the steps to get there. I could neglect to tell you about the mistakes, the misses, the errors. All in pursuit of sharing some perfect little story of my accomplishments.
But that is not how life works, is it? Life is all about the mistakes. And in the same way, when renovation goes wrong, it is all about what we can learn from the experience and how we can improve.
The mistakes I make in my DIY projects are some of my best lessons. You can bet that I’ll never again make the mistake I made on this tiling project. Or the other errors – big and small – that I’ve made in my DIY journey. Because, while it is defeating when a renovation goes wrong, it is also helpful.


Now, maybe you think, why should I take advice from someone who makes a mistake like that? You are right to have doubts. But not just about me. About everyone! Even the most professional tradespeople make mistakes. It is really about how willing they might be to share those mistakes and how they learned from them.
Well, I am here to share. Openly, honestly, without papering over to make me look better. The purpose of this little space on the interwebs is to empower all of us to try new things. And to learn deep and lasting lessons when things do not go as planned. Which happens more than people care to admit. If I only painted a picture that everything always worked out perfectly, when you met your first failure, you might give up. Which is the last thing I want!
So, let’s dig into this tiling failure and take away some key learnings that will hopefully help you in any DIY project you might take on and importantly, when your renovation goes wrong. Which it inevitably will.
What Happened
As you may know, I am tiling the shower area in my bathroom renovation with grey beveled metro tiles in a brickwork pattern. There are two walls to be tiled, above the shower pan. I took measurements and worked through numerous layouts, trying to ensure a pleasing layout, without too many small cuts. I also needed to work around the shower niche I installed, so the tiles would look good here. The niche is at eye level and could really detract from the whole room if there are odd tile cuts here.

After much trial and error, I figured out a layout that could work, although it was impossible not to have a few small cuts on one outside edge. But because the shower doors will be installed here, it might be okay, as the tiles will be partially covered by the railings. Honestly, I could not figure out another way that worked around the various obstacles in the space.
I then began laying the first row of tiles across the two walls. Because I wanted to ensure the tiles lined up as I hoped, I then tiled up to the shower niche on the left wall, before moving over to tile the right wall.
Are You Considering a Bathroom Upgrade?
Get a step-by-step guide and tons of tips and tricks from my own experience renovating my bathroom. From demolition, to water-proofing, tiling, and installing fixtures, this is your ultimate guide through the process.

I left gaps at the edges and corners, where I needed to cut tiles. And this was my downfall. Because while the tiles looked like they lined up across the two walls according to my laser level and my calculations, in fact they were off by 1-2 millimetres or so. Not a lot, but enough to be noticeable.
In the end, I had to tear out one wall of tiles, which damaged the tile backer boards in some places and required re-boarding before starting over with the tiles.

The Technical Learnings
Complete a full row of tiles across all walls
This might seem obvious, but to me, it was not. After all, I was using a laser level, so I assumed all was fine. But the line on the laser level is easily 1mm, so being off by a millimetre or two should not be surprising. A 1mm difference is big with tiles that are only 100mm high.
Also, I had wanted to get all the full tiles laid out, then go back and make the cuts all at once. This is what I did on the floor and it worked well in that space.
However, in the case of smaller tiles on the wall, meeting up in a three-dimensional space, it is critical to work across the entire space and ensure complete alignment. I know that now.

Use a laser level, a spirit level AND your own eyes
The laser level is a great little tool, but you cannot rely on it alone. At the end of each row, check all dimensions with the spirit level. Horizontal, vertical and depth of tile placement. Also, step back and just observe the work in its entirety. Does everything line up? Any glaring issues? Your eyes will give you important insights too, in terms of how things just look in the room.
By checking at each row, you can catch issues before the tile has cured. You can still move a tile or remove it and replace it. If you wait until the wall is finished, it is harder to fix the tiles and you may damage the wall behind. As I know all too well!
But even when using all the measurement tools in the world, you must tile off of tiles, to ensure everything really matches up. More on that below.
Honestly, I relied too much on the laser level. I did use the spirit level and my eyes, but because I did not tile the corners, it was hard to see the discrepancy since the tiles never met up until it was too late.
Tile Off of Other Tiles, Do Not Go Freestyle
No matter how good your measurements are, do not start a new section of tiles that are unconnected to what you have already done. With every tile you lay after the first tile, ensure you are basing those tiles on the ones you already set. And the more tiles you can base yourself on, the better.
At the shower niche, it would have been easy to do one or two tiles off the corner and come back later for the others. But instead, I stopped and measured, cut the tiles needed, and affixed them, to get a good base for the next row.
In a few places, I did skip tiles for cutting later, but I always made sure I had something to tile off of.

Ensure a truly flat surface
Even the smallest bumps and cavities will have an impact. Despite my best efforts, there were a few of the washers that did not get embedded deeply enough in the JackoBoard. They were sitting just a little proud of the surface. I assumed the tile adhesive would cover it, and in some cases it did. But in a few cases, I needed to replace the washer and ensure it was flush or slightly below the surface. This was harder than you might think, because the washer was covered in seam tape and two layers of tanking agent. Better to get it right the first time.

Spacers and tile leveling systems are your friends
I used a tile-leveling system with the floor, and it worked wonderfully. But for the walls, I only used spacers. In hind sight, I might use the leveling system on the walls next time I do a tiling project. The wall tiles I chose are thinner and smaller, so I felt I could easily keep things level. And for the most part, I did quite well. But there were a few tiles where having the leveling system could have helped ensure the most even and flat surface.
Adding a leveling system to such small tiles will require a smaller plastic spacer shaft than the one I used for the floor. The system does come in multiple sizes so that could work well.
Cut Your Tiles as You Go
I wanted to do all the cutting at one time, thinking this would be more efficient. In theory, it would be, but in reality, this is what created the most issues for me. Because my walls join where there are cut tiles, I left these areas open and cut them at the end, after the full tiles were installed across a good portion of both walls. It was then that I could see where I was off and the tiles did not meet up.
Had I done a few full rows across both walls, including cut tiles, I would have seen the issue and been able to fix it without too much damage.
And honestly, I should have known better. But, I just did not think it through. A difficult lesson to learn, but it is fixable. So I try to stay positive.

The Upsides
I am an eternal optimist. Where others say a glass is half full or half empty, I say there is a glass half full with plenty more to come!
Likewise, there are always upsides to any mistake when renovation goes wrong. Beyond the deep learning I gained, I had a few important wins:
- By taking the tiles off the wall a few days after the original install, I could see that I was using a good amount of adhesive and there were no loose tiles. The tiles were really stuck on. My technique was working and I was creating a stable and waterproof layer with the adhesive and tiles. Yay!
- After I had boarded the stud wall and started tiling, my dad suggested that I add some insulation in the wall cavity. It was a bit late to be able to do much here. But then, I made a mistake and I needed to remove the damaged boards and start over. With the wall opened up again,, I could take the time to add some insulation, which will help dampen any sounds from the pipes and also keep them warm in the colder months. Another win! Thanks Dad!
- Once again, as with the floor tile, I seemed to order too much tile. It looked like I was going to have three full boxes of tiles left over. Until I realised my mistake and had to take a wall out and redo it. Thank goodness for ordering overages. Although I really do need to work on my maths, because I still had 1.5 boxes left over even with the mistakes.

The Emotional Learnings
When renovation goes wrong, there are some important internal learnings that should not be missed as well.
Let me be honest, I was defeated after this mistake. It took a few days to get back to it. I questioned my abilities and my sanity for even trying such a project. And yes, I even questioned if I am smart enough. After all, I took a tiling course to help prepare me for this project. I should have known better.
But the fact is, we all make mistakes. And the saying, “hindsight is 20/20” is so true. It is easy to think I should have caught this. And maybe I should have. But in the moment, it can be hard to see everything clearly.
What is important is not to be defeated for long. With some time away from the wall, as well as a few good nights’ sleep, which always helps give me perspective, I was able to return to the project and find a way forward.
A few tips here:
Strike a Balance
There is a balance between taking time away and getting started again when renovation goes wrong. Important for me is to not take action immediately. Often, the emotion and the sense of failure can make me envision drastic action. In this case, my first thought was that I needed to rip everything out down to the studs and start over. On both walls.
Fortunately, I did not do that. After calming down and thinking it through, I realised that I only needed to take down some tiles, not every tile. And, not every wall board was ruined. I actually only had to replace the boards in a few areas.
Get Some Perspective
As well, it is important to keep everything in perspective. Yes, this was a disappointing mistake. But, it could have been a lot worse. I could have gotten it all finished, grouted and ready for use, only to realise it was wrong. Or, something much worse could have gone wrong. It is all about perspective. And optimism! 😊
A friend reminded me that as DIYers, we do not do this regularly, and we cannot hold ourselves to a professional standard. We have to go easy on ourselves when these things happen. And we have to just do the very best we can.
Surround Yourself With Support
In difficult times, we all need our support network. In my case, I had my lovely husband reminding me how well everything was going and encouraging me in spite of the mistake. I also had all the results from over the last months, with pictures to prove how far I have come. And anyone who sees what I am attempting is so impressed. They do not see the little things that I pick up on. They see a pretty near perfect wall of tiles.
These little reminders and bits of encouragement helped me to pick myself up and carry on.
Make sure you have a good support network, whatever that might be.
Onward and Upward
I wish I did not have to write this post, and more important, that I did not have to redo part of the wall. But in the end, all’s well that ends well. I am grateful for the learnings and that I was able to fix everything. I hope my failures have even been some small help to you, dear readers.
Onward and upward, let’s keep going. Next week, I promise to finally share the grouting for all the tiles, and I also owe you a tutorial on how to tile a shower niche. Then, we can move to installing the bead-and-butt paneling to the walls and preparing for second fix, when we can finally get the fixtures in place. Exciting times!
Happy DIY-ing!








Leave a Reply