
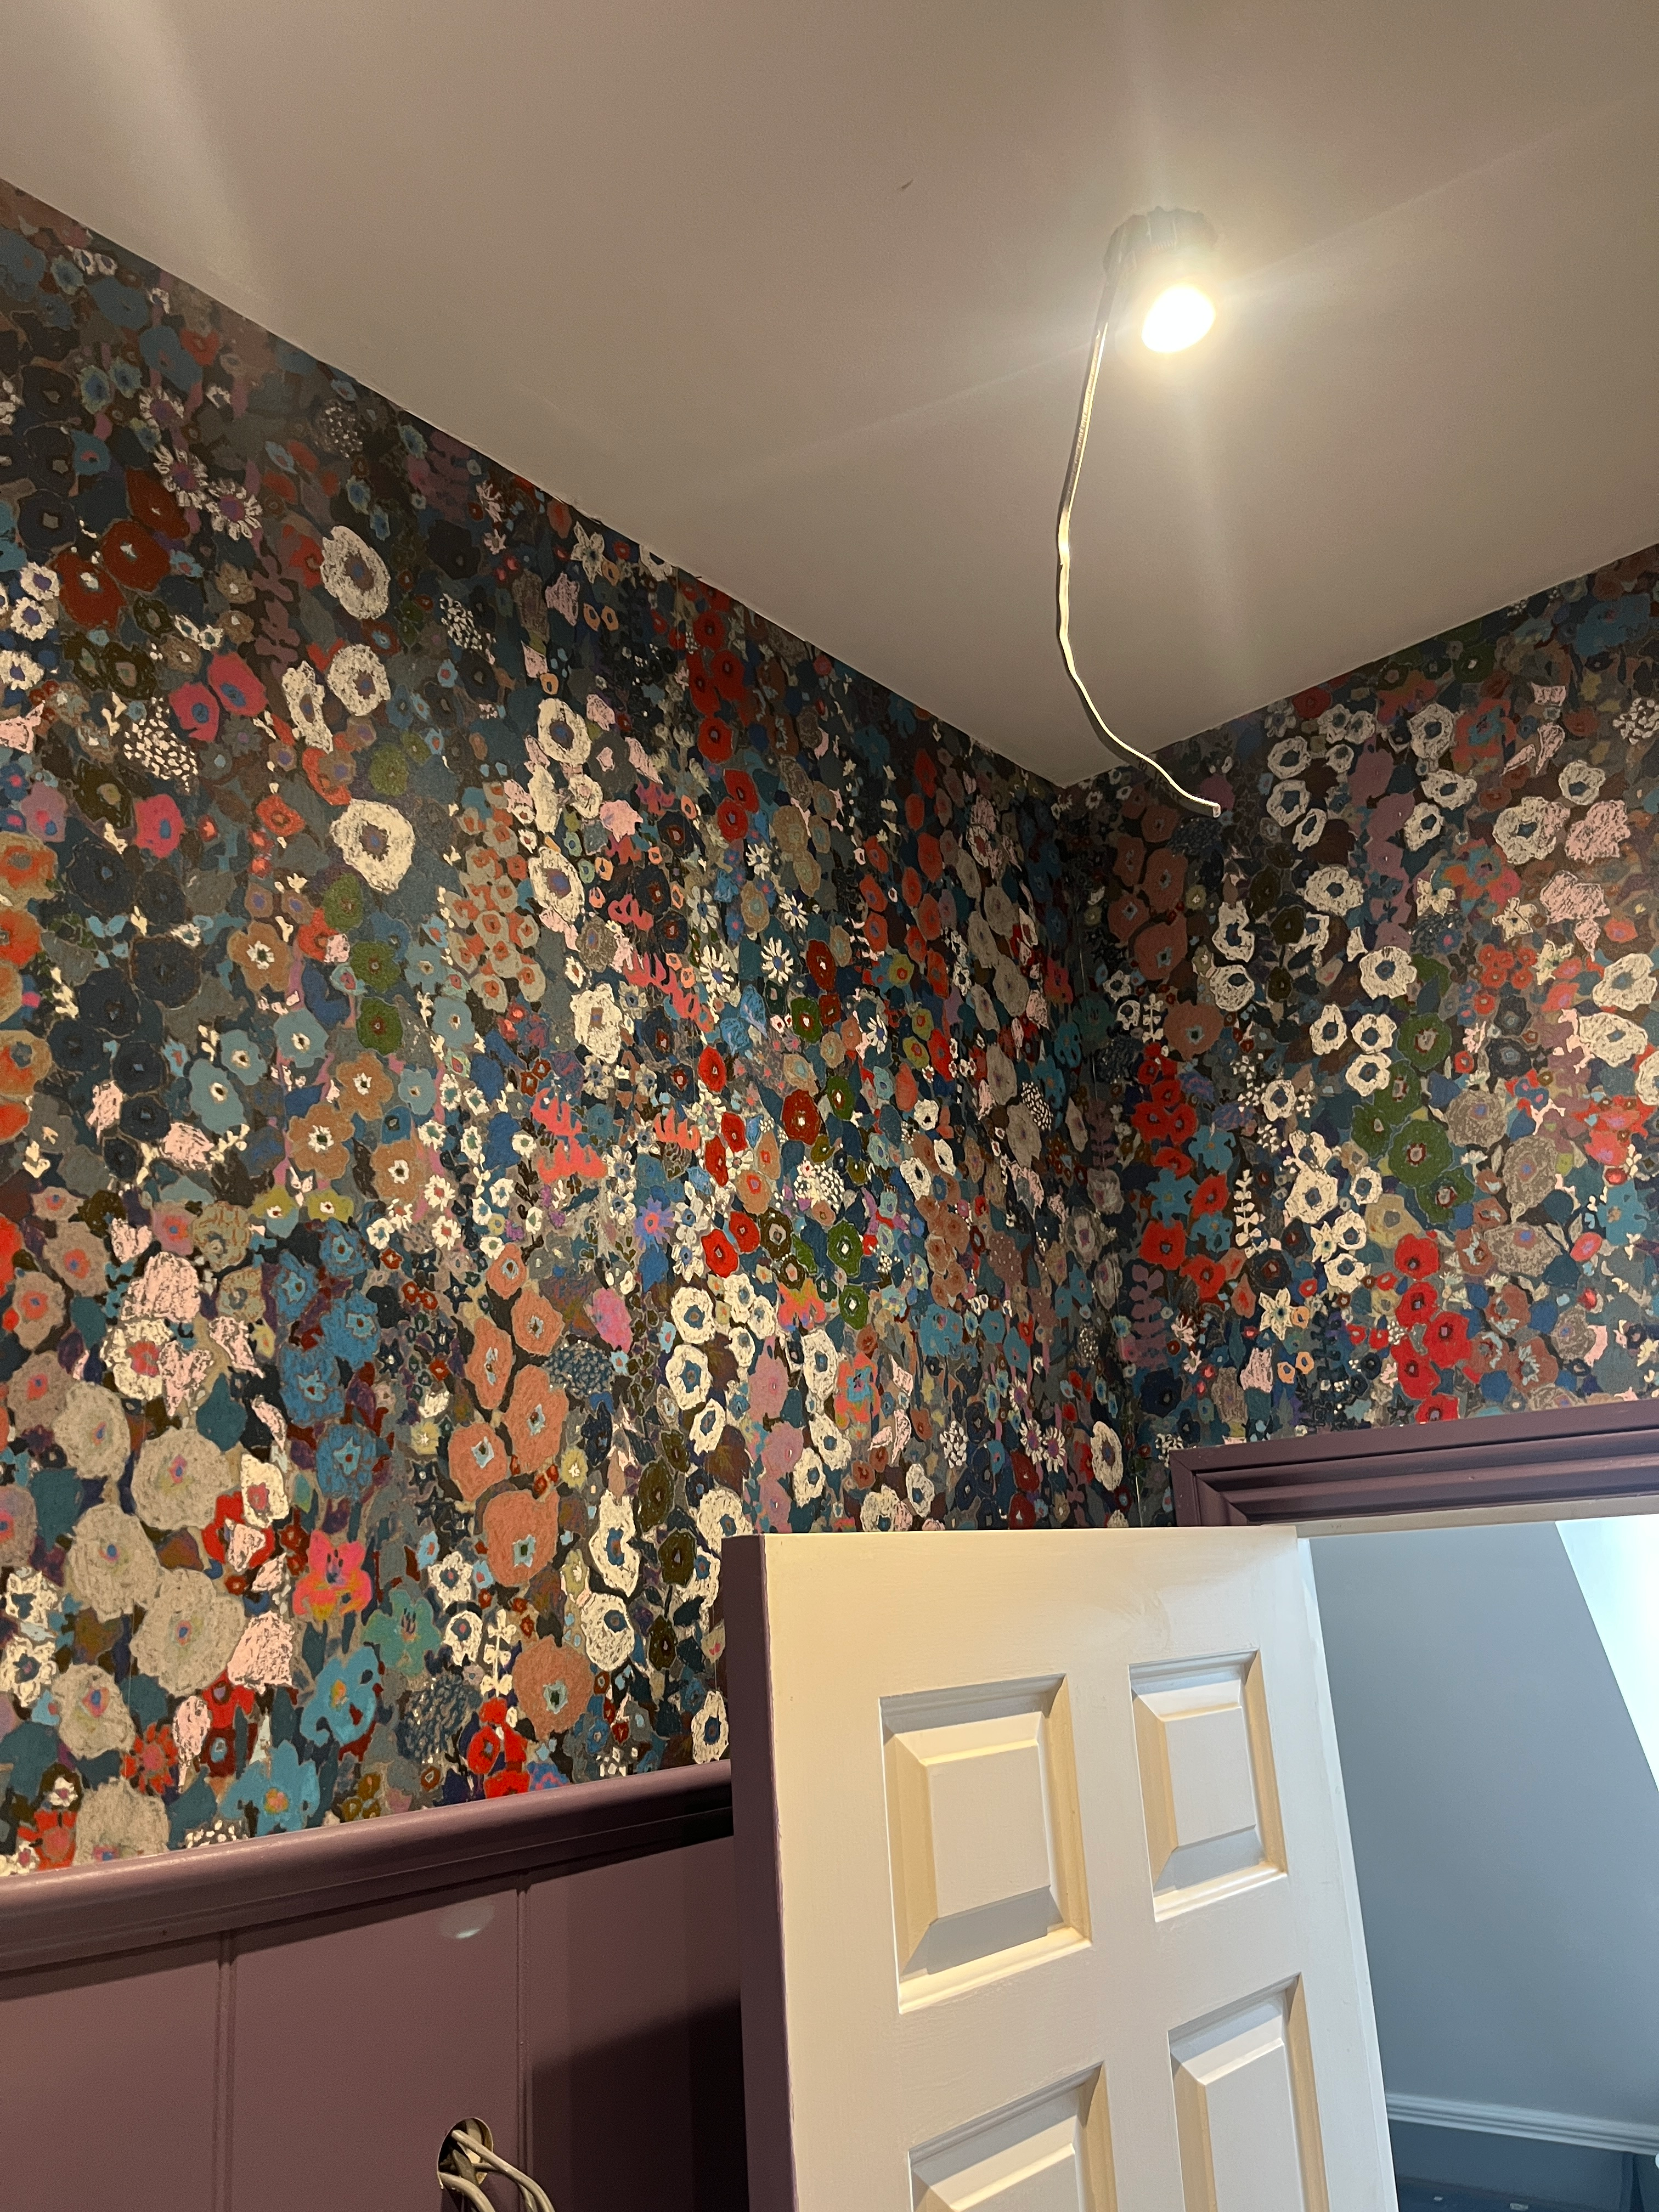
The bathroom renovation all began with wallpaper. I saw the most beautiful wallpaper in a friend’s bathroom, and I knew I had to find a place to hang wallpaper in my own home.
The wallpaper? House of Hackney’s Hollyhocks in the winter colourway.

The room? My guest bath. In all its dated, ugly, orange glory.

If you are new to this space, check out the post on my bathroom renovation plans. For those who have been following along, after a long process, I’m finally reaching the end of the project. Decorating and finishing touches are the only things stopping me from checking this project off my to-do list.
Are You Considering a Bathroom Upgrade?
Get a step-by-step guide and tons of tips and tricks from my own experience renovating my bathroom. From demolition, to water-proofing, tiling, and installing fixtures, this is your ultimate guide through the process.

Today, I am excited to share a tutorial on how to hang wallpaper, in case you have found the dreamiest design and are looking for a place to hang it in your own home.
I’ve never had an opportunity to hang wallpaper before, but I remember my mum hanging wallpaper throughout our home when I was younger. Honestly, I’ve never really loved wallpaper, preferring paint to change a room. It is much easier and highly changeable, vs. wallpaper.
But the Hollyhocks paper converted me, at least for the guest bath. And I am pleased to say, the process to hang wallpaper is quite enjoyable, and not terribly difficult. I’m actually thinking about the next opportunity to apply this newfound skill!

Supplies Needed
As with most of the projects in this bathroom renovation, there are some very specific supplies required to hang wallpaper. Fortunately, they are not very expensive and are easily obtained. However, they are quite unique so not terribly useful for other projects.
You probably already have a bucket and spirit level. The specific items to hang wallpaper that you might need to purchase include a smoothing brush, paste brush, seam roller, wallpaper paste, and the wallpaper, of course. You may also choose to use wallpaper liner, which is almost like hanging wallpaper before wallpaper. More on this in a moment.

Screwfix carries a great little wallpaper supply kit that is not too expensive, and you can also find similar kits on Amazon. I also got my wallpaper paste at Screwfix, but check the requirements for your wallpaper, because some types are already pasted. For these, you just need to soak the paper in water to activate the paste. Today, I will be sharing how to hang wallpaper by brushing paste onto the paper and then hanging it.
An Important Consideration: The State of Your Walls
Before you jump in to hang wallpaper, you need to consider the state of your walls. The wall is the foundation for your wallpaper, and if it is in a bad state, your final result may not look good. Remember, wallpaper is just that: paper. It can hide some imperfections, but it will simply magnify significant imperfections by showing through the paper. Consider cracks in the plaster, holes, uneven walls, or other damage. It would be devastating to spend the money on lovely wallpaper and take the time to hang it, only for it to look terrible.
In my case, I had removed a large glued-on mirror which pulled away some of the plaster across one wall. I also had to re-board the wall in the shower, and there was a slight elevation from one board to another.

After repairing any large holes in the wall and sanding everything down, I took the first step of painting Zinsser Gardz on the walls. This stuff is quite good, helping to hide some imperfections. It is made specifically for porous or problem walls, and it helps hide some of the imperfections. It did not do much to help the one wall seam, but it certainly helped smooth out the uneven plaster and the space where the adhesive had pulled parts of the plaster off.
With the walls painted with Zinsser, I next looked at lining the walls with wallpaper liner.
Wallpaper Liner: An Important Step
I discovered wallpaper liner when I was researching how to hang wallpaper. I had never heard of liner paper before, but this is ideal if your walls are not in perfect shape. The name says it all: You are lining the walls with paper before you hang wallpaper.
You can choose varying thicknesses, depending on how bad your walls are, and this can help smooth out the surface before you hang wallpaper. The thicker you go, the more it can hide. But again, this will not solve huge issues. It is, after all, only paper.
Also, the thicker you go, the harder it is to work with, so keep this in mind.
I chose 1400 grade lining paper. In hindsight, I probably could have used 1200 grade, but I certainly needed something a bit thicker. The options range from 800 to 2000 grade, with the higher numbers representing the thicker grades.
How to Hang Wallpaper Liner
The great news is that if you choose to add wallpaper liner as a base on your walls, you will get some great practice before installing the actual wallpaper. It is essentially the same approach as wallpaper, with a few small adaptations.
You should ideally apply the wallpaper liner in the opposite direction you plan to hang the wallpaper. This helps ensure you don’t create too many overlapping seams. So if your wallpaper hangs in long lengths from top to bottom, which is the typical way, you should hang the wallpaper liner horizontally, from side to side. This is a little harder, because you are working against gravity, but it is really not too bad.
Set Up a Station
Before you start applying the wall paper or lining, set up a station to spread out the paper for pasting. I set up my two saw horses and laid an old piece of plasterboard across them. They do sell wallpaper pasting tables, but this seems a bit excessive to me. Unless you do a lot of wall papering, just create a table from what you have lying around.
Note, it will get messy, so avoid using the dining room table! Or cover it well.
Next, mix up the wallpaper paste. The paste I bought came in a tiny bag and said it would cover 10 rolls. I had two rolls of paper so I figured it would be more than sufficient. The paste looks like it is freeze dried. It is in flakes, and you add water to it. It sits for a bit and thickens into a nice gelatin-like consistency that brushes on well. Follow the instructions on the bag, and make sure you have no lumps, as these could show through the paper too. I made a batch from about one-fourth of the bag, and it was perfect for the wall paper lining. I used the rest for the wallpaper and had plenty left over.

Measure Your Starting Point
Decide where you want to start. I suggest choosing a less visible wall, not the one across from the door that is the first thing you see. For the lining, this will not be visible after you add the actual wallpaper, but always better to start in a discrete area.
Mark the placement of the first strip of lining. Take the width of your lining paper and subtract 3-4 mm. Measure this amount from the ceiling down the wall and mark it over several parts of the wall. Connect the lines using a spirit level and ensuring a straight line. (If your ceiling is not perfectly level, do not worry, but make sure the line itself is level.)
My liner paper was 53cm wide, so I drew a line 50cm from the ceiling and parallel to the floor.
You want a bit of overlap onto the ceiling, which you will cut off later. This is why you draw the line a bit shorter than the width of the paper.
Cut the Lining Paper
Next, measure the wall from edge to edge, right to left, assuming you are hanging the paper horizontally. This will be the length of your first piece of lining. If your wall is extra long, you might decide to divide the wall into two and cut two pieces of lining with a seam. Just remember, it can be a bit unwieldy to hang wallpaper horizontally, because you have to work against gravity, holding up paper with paste on it.
But you also do not want too many seams, which could show through the wallpaper once hung.
Paste the Lining
Once you have your first length cut and your guidelines drawn on the wall, lay the paper out on the table with the backside facing up. You probably will not be able to fit the entire length, so just lay out what you can and gently fold or roll the rest of it up. Do not crease it, but gently overlap it onto itself.
Using the pasting brush, coat the backside of the paper, making sure it is smooth, lump-free and covering the entire piece. Once you coat the exposed paper, fold it over on itself, paste side to paste side and clean side to clean side. Again, do not crease it, just gently overlap it. Keep pasting until the entire length is pasted.

Now, depending on the thickness, you want to let the paper sit for a few minutes. Follow the directions for your specific lining paper. Based on the thickness I had chosen, I let my paper sit for 10 minutes. This lets the paste soak in to the paper and helps soften it a bit so it is easier to work with.

While my paper was softening, I measured the next length and marked the next wall. You want to do a single row over the entire area to be papered, up at the ceiling, and then come back and do the second and subsequent rows below the top one. I needed to do two rows plus part of a third row, because I was only papering the top third of the room.
Hang the Lining
The lining is quite forgiving, so as you go to hang it, keep it layered over itself to make it easy to manoeuvre. Take the edge and place it against the corner of the wall, with a bit of overlap. Start unfolding it and pressing it in place across the wall, and get it roughly pressed on so the paste holds the paper in place. Then go back over it with the smoothing brush, pushing any bubbles, creases or lumps out.
Adjust the paper as you go. You can gently push and pull the paper to get it in place. Make sure you are following the level line so it hangs evenly. And make sure you have a bit of overhang at the side corner and along the ceiling. This will help ensure a nice smooth edge at the end.

Use the seam roller along all the edges, to make sure the edges are stuck down.
Once the first piece is hung, is level, and there are no bubbles, lumps, or creases, move on to the next piece. Again, work in a single row along the top of the room, until you get back to where you started or until you’ve papered the entire area.
When starting the next piece, line the edge up to the previous piece so it sits alongside the edge with no space and no overlap. You do not want it sitting on top of the last piece, as this will create a raised seam that might show through the wall paper once it is hung.

If you are starting the second piece in a corner, you can add a bit of overlap and just cut it off after.
Once you’ve done the full row, go back and start the second row, lining the top edge of the paper to the row above. Again, no overlaps, make sure the seams butt against each other. This is why it is so important to ensure a straight and level line at the outset, so everything matches up.
I got into a good groove of measuring, cutting, pasting, resting, hanging, with something always happening while other steps were waiting or resting. It only took a few hours. But this is a small space, and I was only doing the top third of the wall.

The final step with the liner is to trim off the overlapping paper at the ceiling. Use a very sharp blade or scissors to cut the paper where it meets the ceiling and any other overlapping areas. My blade was not sharp enough so some some of the edges are a bit ragged. I smoothed them out, and this will be covered by the wallpaper. But it was not ideal. I changed blades halfway through, once I realised that was the issue.
Once you’ve hung the wallpaper lining, you want to let it rest and properly dry. I did the liner in an afternoon and evening, and came back to do the wallpaper another day.

Hang the Wallpaper
Now for the fun bit that will dramatically change the room: hanging the wall paper.
I must admit, I was a bit nervous. The House of Hackney wallpaper was not cheap. I certainly did not want to ruin it. But, having hung the liner paper already, I felt like I had a good understanding of the process and a good method to work with.

I followed the same process at for the liner, but hanging it vertically, which was much easier:
- Mark the wall so you have a level hanging line to guide you. In this case, with the liner paper added, you are marking the liner, so just be careful that any marks could show through if you are hanging a light wallpaper. This was not a problem with the bold and busy wallpaper I had chosen.
- Measure the wall and cut the paper needed. Remember to include some overhang on both the top and bottom.
- Paste the paper, using your pasting station. Remove any bubbles or lumps, and cover the entire piece.
- Let the paper rest as required. This is less important with wallpaper, unless your directions tell you to do so.
- Hang the paper, following the level lines. Remember to allow for an overlap at the ceiling and floor; this helps ensure you account for any uneven areas and the paper is hung straight.
- Repeat, hanging each section to sit up against the previous section. Make sure you keep everything straight and level. Pattern match as needed. (See below for more details here.)
Some Important Tips and Trick When Hanging Wallpaper
Unlike the liner paper, the wallpaper is patterned and needs to be matched. It also is very visible, so you want to ensure absolute precision. I discovered a few tips and tricks as I went along that might help you.
Pattern Matching
Pattern matching is the process where you make sure the seams line up perfectly, so the pattern continues uninterrupted. This is especially important in big, bold patterns like the one I chose.
In addition to my DIY projects, I also am a dressmaker, so I am already quite familiar with pattern matching fabric when sewing clothes. But I have to say, I’ve never seen anything so complex as the pattern matching for the House of Hackney Hollyhocks wallpaper. Since I’ve not hung other brands of paper, I do not know if this is typical, but it certainly seemed a lot harder than needed.
The instructions had you cut the roll of paper into four sections, at the specific line noted on the paper. You needed to keep the paper in order, applying it to the wall in the order noted. You needed to work from left to right, or clockwise in the room, which meant I needed to start at the angled wall. I made a mistake and cut the first piece wrong, due to the angle, which set me off at a deficit in terms of paper to match. I was able to use it later, but it created issues with the pattern matching.
With my wallpaper, you were instructed to hang the first piece, then the second, and so on. But, for the second and every other piece, you needed to rotate the wallpaper for it to match up. I needed to turn piece two upside down and line it up with the first piece. And the same for the fourth piece. And so on.
A little complex, but not terribly difficult, and the seams lined up perfectly for the first few pieces. However, then the pain began. Because I was not hanging a full wall, I cut the pieces at the top of the paneling. This meant that once I hung the first four pieces, I only had partial rolls, and I needed to pattern match by eye alone.

I tried keeping the rolls separated and ordered, and conceivably, the paper should just continue to follow the same approach, but it was not so easy. I needed to continually search for the right strip of paper that would match the previous seam, and because the pattern is very busy, it was actually quite hard.
Harder than the Tetris experience I had with laying the floor tiles!

And, because it was so specific, I ended up with lots of random bits of paper and not enough long lengths that matched. On the last wall, I had to do some patching because I did not have a full strip of paper that matched AND would cover the full area.

Fortunately, the seams do not show, and you cannot tell it is patched. In hindsight, perhaps I should have specified the lengths of the roll of wallpaper when I ordered it. The House of Hackney paper is printed to order, so that may have made things easier. But, I had not yet decided on the height of the wall paneling and therefore the wallpaper when I placed the order. So lesson learned for the future.
I do have lots of little lengths sitting around, which feels a bit wasteful given how expensive the paper is. But I have a few ideas of way to use these little bits, so stay tuned. I might have some interesting ideas to share in the future on this.
How to Patch Wallpaper
In case you run into a similar situation as me and need to patch some paper together, it is actually a lot easier than you might think.
First up, find a piece that matches the surrounding area, and make sure you have some overlap. You can butt a seam up against a piece, but having some overlap can make a really precise match. A few centimetres is more than enough.
Paste the paper patch and put it in place, with the overlap as well. Then, using a straight edge and razor, cut a line. Make sure you are cutting into two layers of paper: the paper already hung and the new piece. Peel off the excess of the top layer, and then lift the top layer to expose the paper underneath. Peel off the overlap below, so the two edges sit perfectly flush with one another. Smooth out the paper, and use the seam roller to ensure the edges are smooth and adhered to the wall. The edges should not overlap, but abutt each other tightly.
Addressing Wallpaper Shrinkage
Sometimes, once the wallpaper dries, it might shrink a bit. Or, in the corners, where the wall might be uneven, you can end up with some tiny gaps. You can try to patch these with the patching technique. Or, you can use some coloured markers and try to cover over any gaps. This is what I needed to do in the two corners.
The End Is In Sight
With the wallpaper hung, I can now start to see the end of the project. My plumber was back this week to install the basin. There were some concerns that it was too large and would create a cramped space once installed. We debated installing a bi-fold door which would give us more wall space to move the basin down, but in the end, it did not give us that much more space to make it worth the cost and effort. In the end, I am very comfortable with the location and flow in this small room.

I’ve also been applying silicone to ensure a completely waterproofed room, as well as doing some of the finishing bits, like fixing some of the skirting boards and completing the built-in shelf. I still need to figure out the lighting, but that will come.
I am loving the result. The wallpaper with the paint colour we chose works beautifully and creates a warm and cozy vibe, and the heated floor is an absolute treat. The fixtures look great, and once I can get the finishing touches done, I think I am going to absolutely love this space!

I hope to share the final reveal in the coming weeks, as I finish up the little bits that are left. Stay tuned, and huge thanks to all of you who have been following along, sharing feedback, and bringing all the good vibes. This has been quite the effort, and I could not have done it without your kind support and encouragement.
Happy DIY-ing, and Happy Christmas!








Leave a Reply