
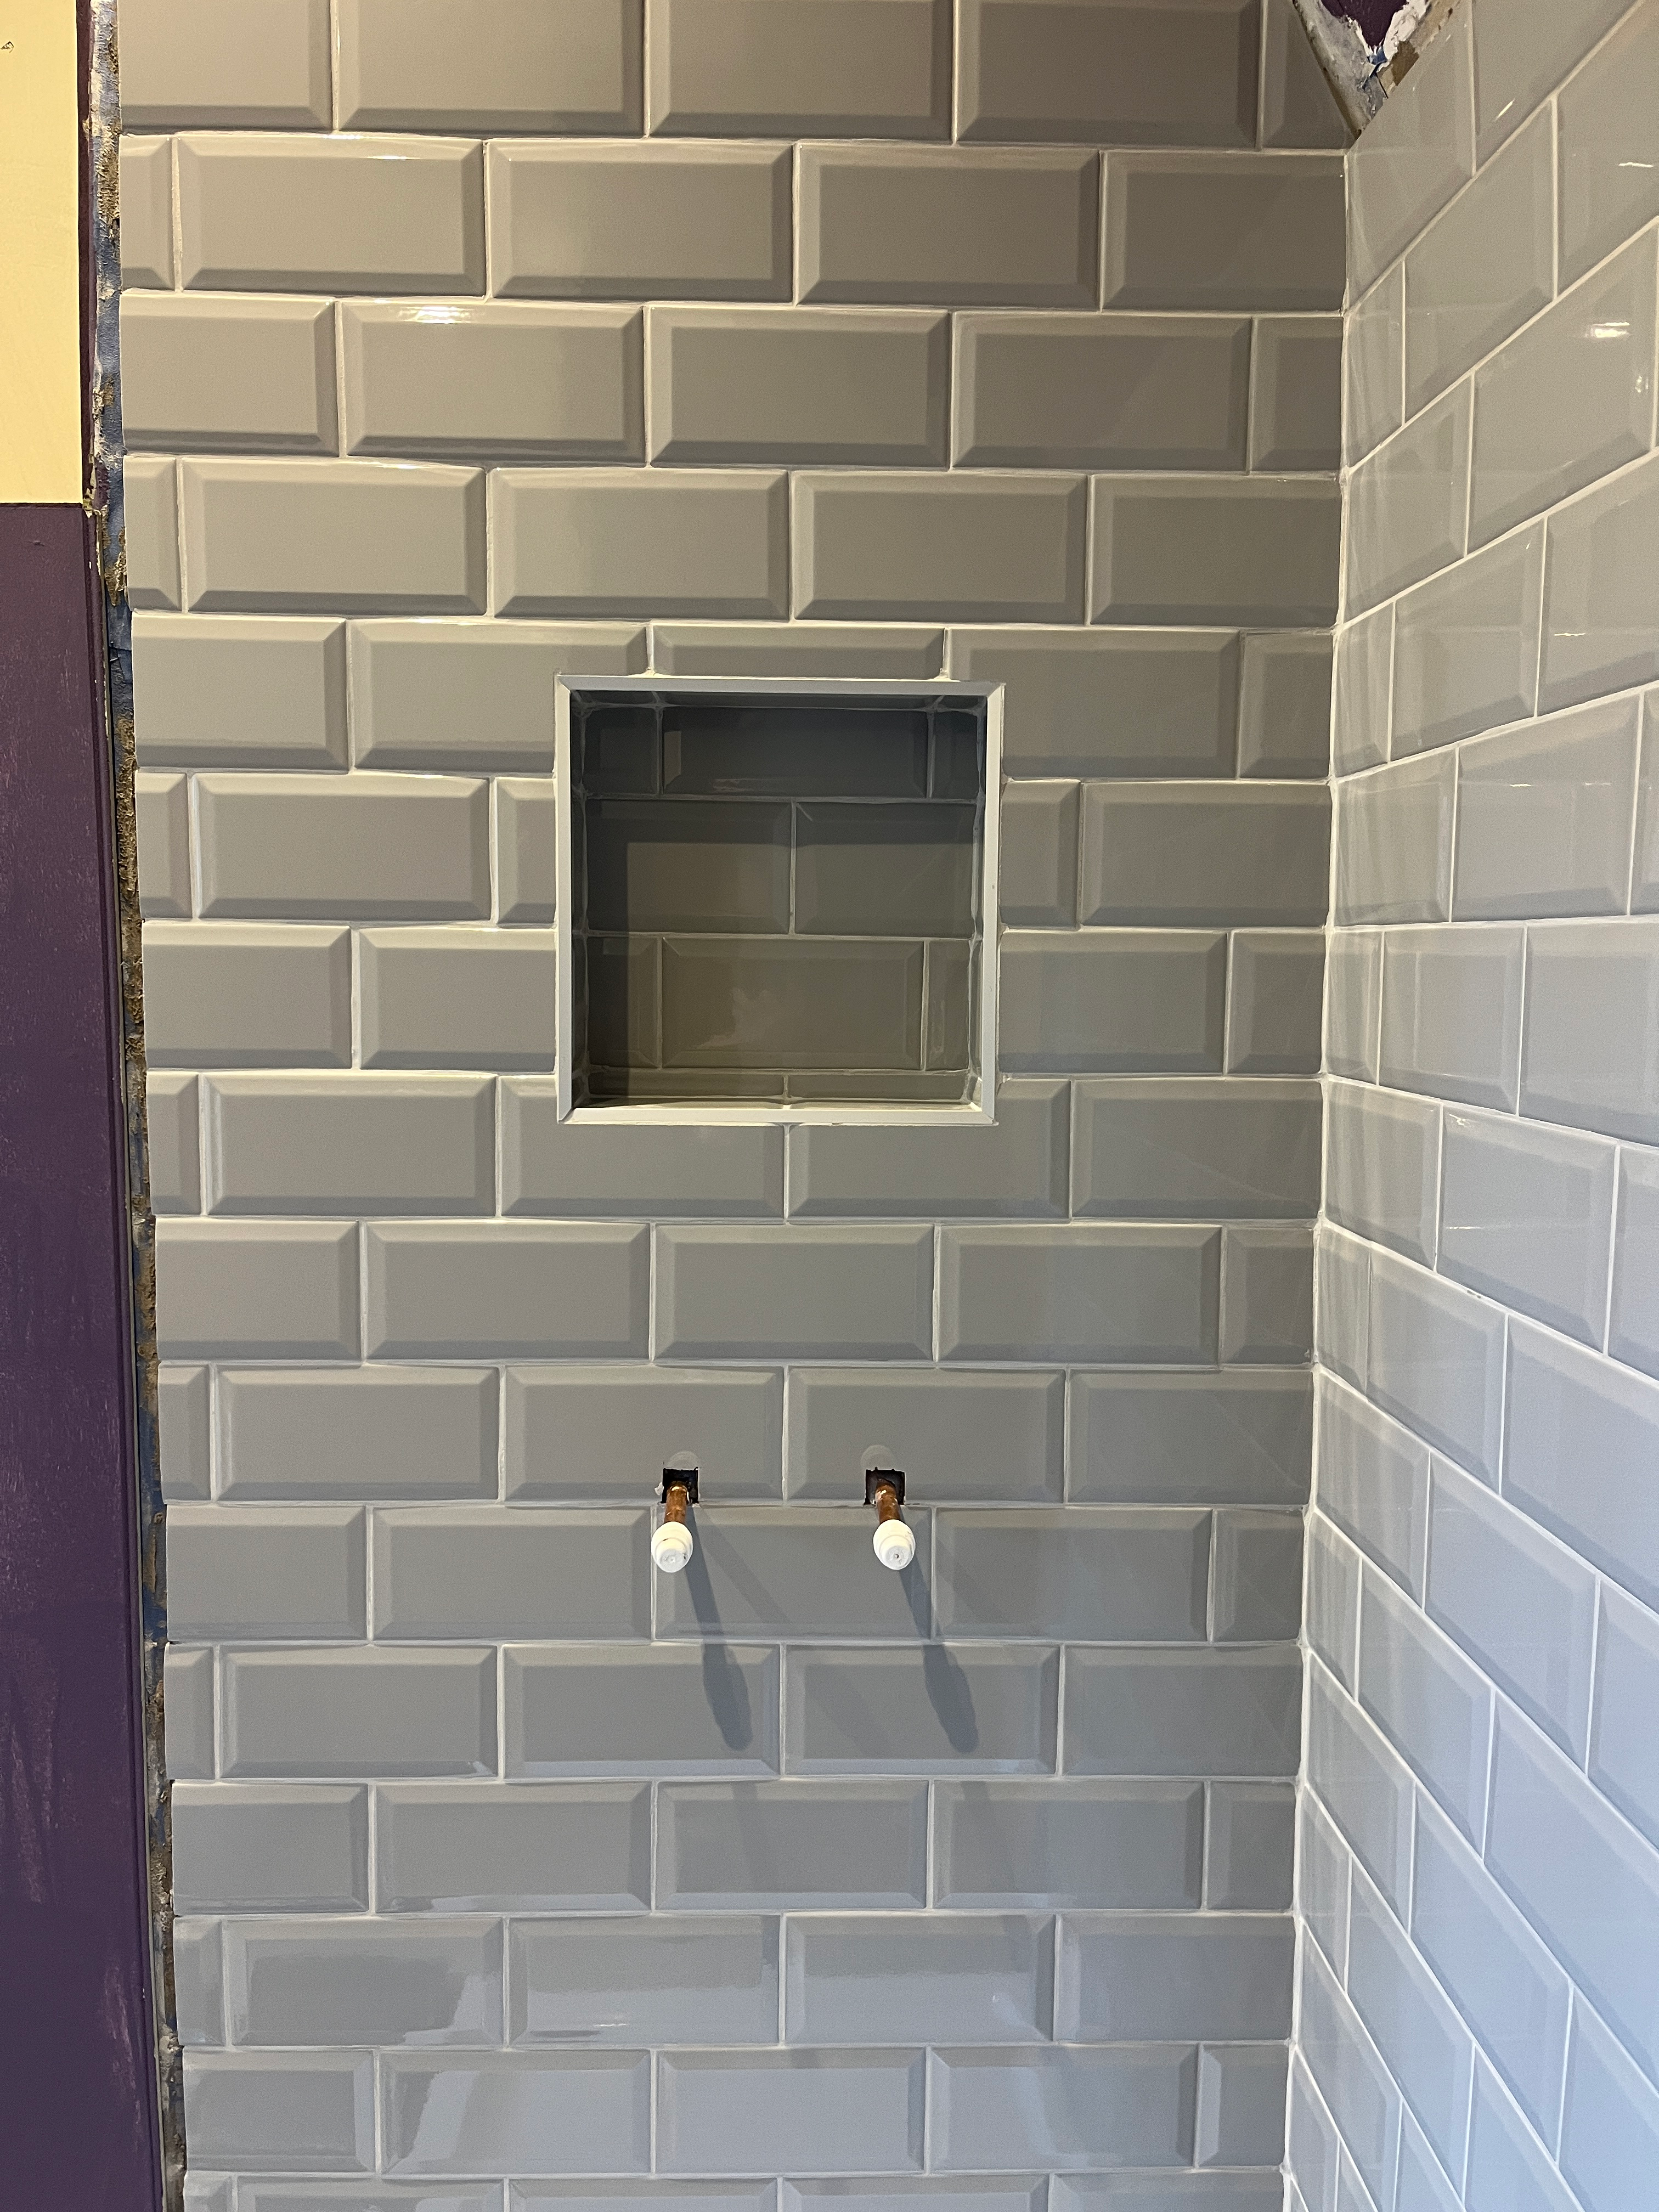
Over the past few weeks, I’ve shared the steps for tiling a shower. From preparing the walls, to laying tiles and grouting. During the process, I also added a shower niche for bathroom products, which will help ensure a clean, clutter-free space while also adding much needed storage. Today, I am sharing the details of how to add a shower niche in your own bathroom renovation.
I seriously debated omitting this step when I was planning the bathroom renovation. It adds some extra complexity and it is highly visible, so you need to ensure absolute precision. I was not sure I could do it. But, practicality won out. I knew we needed a good space for shampoo, soap, etc. And a niche is the perfect addition.
Adding a shower niche is not simple, but it is doable. With patience and the right steps, you can do it. And it is sure to give you the space you want in your bathroom renovation.
Are You Considering a Bathroom Upgrade?
Get a step-by-step guide and tons of tips and tricks from my own experience renovating my bathroom. From demolition, to water-proofing, tiling, and installing fixtures, this is your ultimate guide through the process.

Starting With a Good Foundation
As with everything in the bathroom renovation, you want to start with a good foundation. In my case, since I was building a stud wall, it was the perfect place to add a shower niche. I simply planned for this in the design of the wall.

If you are working with walls that are already in place, you will want to cut a hole in an existing wall, between the studs. For all the tips for cutting into a wall, check out my tips from when I built recessed storage into my walls. It is the same approach in the bathroom, although you may be cutting into cement board or need to work around dried-on mortar if you’ve already removed tiles from the wall.
The shower niche should be placed at about shoulder level, so you can easily see the products and reach them. It should be centred in the wall, or placed in a location that makes sense visually. In my case, I might run into an issue once I add the shower riser, but there really was no other option, since my walls are not large. I could have added the niche to the back wall, but I wanted to add it into the stud wall construction. Also, I did not really want it on the wall facing the door, where it would be more visible.
I centred the niche over the pipes where the taps will be. I ensured there was good stud blocking on all four sides, so I have a place to screw the actual niche into and make sure it is secure.
For the actual niche, you can build a simple box out of plywood and cover it in tile backer boards. Ensure it is square and you will want to seal all seams and make sure it is water-proofed. In my case, I saw that JackoBoard actually offers an option made out of their tile backer boards. It comes in multiple sizes, and offers a simple and easy solution for installing a shower niche. While it may be a bit pricier, I decided it would be a good way to go.
I ordered the 350 x 350mm JackoBoard shower niche, in a 100mm depth, from ProTiler tools, when I ordered the JackoBoards. It really is a good solution, as you get a perfectly square box ready for install. And honestly, once you consider the costs and time for building your own box, it probably is no more expensive to purchase the pre-made one.
Installing the Shower Niche
To install the shower niche, follow the same process as for installing tile backer boards. Put the niche in place, between the studs you built up. Ensure it is level and flush with the surrounding tile backer boards. Screw it in place with the screws and washers used with the tile backer boards. And finally, add seam tape and tanking to ensure it is water-proofed.
In my case, I added the shower niche first to the stud wall. Then, I added the tile backer boards over it and cut out a hole around the edges of the niche. I seamed the edges and tanked the entire wall, including the niche.

You can follow the same approach I did for adding the surrounding tile backer boards. Or you can cut the boards and add them around the shower niche, without covering it and needing to cut out the opening. I chose the way I did so there would be less seams, which feels more water-tight. Either way, make sure the edge of the niche is either behind the tile backer boards or plush up against it, so you have a seamless edge that you can seal with the tape and tanking agent.

Tiling the Outside of the Shower Niche
When it comes to tiling the shower niche, you want to do this after you have tiled the rest of the wall. Save the niche for the end. You will tile all around the niche, but save the cuts around the niche and do them all at once, to ensure precision.

You want to tile the outside of the niche first, before you do the inside. Starting on the bottom, measure out the tile cuts, which will usually require an L-cut at the corners. To measure, hold a tile up in place in the bottom left corner, remembering to use a spacer to get placement exactly right. Mark the cuts on both the horizontal and vertical. You want to ensure you cover the wall and edge behind, so mark the cuts so there will be no wall showing. Even if that means a very slight overhang of the tile into the niche. Better slightly too much tile than seeing the wall at the edge of the tile.

Do the same on the bottom right tile, marking it as well.

The height of the two cuts should be the same, assuming your tiles are level and aligned. This height also should be used for any tiles in between the two corners, so you have a uniform height across the bottom of the wall niche. I did not have any middle tiles on the bottom, just my two corner tiles which met in the middle.

To cut the tiles, set the guide rail on the tile cutter and cut just the height of the two corners, as well as the number of tiles needed to span the bottom of the niche. The tiles spanning the middle require a horizontal cut only, at the same height as at the corner.
Mark everything so you know where the tiles go when you get ready to lay them. By cutting them all at once using the same mark, you will ensure a level edge on the bottom row.
Next up, do the same for the top of the niche. Measure the top left and right corners, and then cut the tile heights for both, as well as the tiles that span the top of the niche. Mark everything and set them aside.
Because of the brickwork pattern of my tiles, I had one tile in the centre on the top to cut, along with the two corners.
Now, take your bottom left corner tile and top left corner tile. Make sure the width of the cut is the same for these, again so you get a uniform cut across the left side of the niche. Set the guide rail on the tile cutter and cut these tiles, as well as any tiles that line the left side.

Repeat on the right-hand side of the niche.

Once you have all the tiles cut, you can go ahead and lay them using the tile adhesive and following the same approach used for tiling the rest of the shower. Add spacers and ensure the tiles are fixed securely.

You may need to use some painters tape to hold the tiles across the top of the niche in place while the tile adhesive cures. The tape will ensure they do not shift or fall and break.
Tiling the Inside of the Shower Niche
Once you have completed the outside of the niche, it is time to tile the inside.
You want the tiles inside the niche to line up to the outside of the niche. It should look like a continuation of the line of tiles, just a bit recessed. Paying attention to the tiles and how they run, mark up the tile cuts for the back wall first. You may need to cut the height of the tiles to line up, and you will probably need to cut the width as well. Measure everything out, and then make your cuts.
As with the outside of the niche, batch cut your tiles, so the heights and widths match up. Whatever you need to cut on the back wall, you also need to do for the sides, so ensure everything is cut together, using the same guide rail, for absolute precision.
For the bottom and top, also line these up with the rows above and below the niche. Cut as needed.
Make sure you mark everything so you know which tile goes where.
Affix the Tiles Inside the Niche
Once your tiles are cut and ready for laying, you want to start with the back wall. Affix the tiles using spacers and tile adhesive, starting on the bottom row and working up. Make sure the tiles are even with the outer tiles and are level.
Depending on the size of your niche, you may find it easier to back-butter the tiles rather than laying a bed of adhesive on the wall of the niche. Back-buttering is where you add the tile adhesive to the back of the tile instead of to the wall. Like buttering a piece of toast. It is the same approach, just on the tile instead of the wall. Be generous with the tile and add the grooves with your trowel, just like on the wall.
Once the back wall is laid, move to the sides, bottom and top of the niche. Here, you need to consider the edges of the tiles. You can mitre the tile edges so they meet up and then grout them. This is quite advanced and requires significant precision on all sides. I want to try this one day, but with my beveled metro tiles, I was not sure this would work very well. Also, the inside of the tiles is a terracotta colour, so if mitred, I was not sure this would look good.
The second and slightly easier option is to add tile trim. You can purchase metal or PVC trim in various styles and colours, depending on the look you are going for. I first chose a square-edged chrome, but when I tried it out, I found it a bit too dramatic. Next, I tried a thin, flat grey metal edge that blended in with the tiles, and it worked much better.
You want to cut the trim with mitred corners, perfectly matched to the length of the edges of the niche. In my case, I have a square niche, so 4 pieces all the same size. To cut metal trim, I used my metal shears, after marking the cut with my mitre box and hack saw. You can also cut the trim with the hacksaw, but I found the metal snips to be faster and just as accurate.

Cut away the second edge of the trim as needed, as this gets laid in the tile adhesive and is not visible.
Once your tile trim is cut, lay a bed of adhesive on all four sides of the niche. Press the edge trim in place. Place the tiles all around, butting up against the edge trim, which will hide the tile edges. Make sure your cut edges of the tiles go into the tile trim or against the back wall, so they are less visible. Use spacers, and make sure everything lines up to the outside tiles. If needed , use tape to hold the tiles on the top in place until the adhesive cures.

Grout the Shower Niche
Once the tile adhesive has cured, you can grout the niche, following the same process as you did with the other tiles. I grouted the niche at the same time as the rest of the wall. I did find the niche a bit more difficult to grout, as the tools were too large to really get into the corners and edges. As a result, my grouting is not quite as neat inside the niche as it is outside. I did use a small flat-head screwdriver to scrape some of the excess grout away, being very careful not to scratch the tiles.

Add Silicone to All the Edges
To ensure absolute water-proofing, add silicone to all the edges of the shower niche. I added it along the trim pieces, as well as in the corners, and where the sides meet the front and back of the niche. I purchased silicone to match the colour of the grout, a silver grey, but use whatever colour works for your own space. To ensure smooth and uniform silicone and grout lines, I also purchased this excellent tool from Screwfix.
A Water-Proofed Shower Niche for the Win
And that is how you add a shower niche to your bathroom. I am always looking for ways to add more space to my small flat, and a shower niche is a perfect way to do just that. It prevents you from having bottles of soap and shampoo stacked along the edge of the shower or having to hang some wire shelf that constantly falls down. A highly recommended addition to any bathroom renovation. Just take your time and be as precise as possible. And you too will have a great new storage solution in your bathroom.
Happy DIY-ing!








Leave a Reply