
I live in a small flat, and space is at a premium. Because of this, I am on a continual search for more space to store things, and I love to come up with clever ways to add more storage to my home. If you have the same need, today’s post may be just what you are looking for,. Let me show you how to add extra storage into any space.
I’ve reorganised spaces to make them work better. I’ve been known to add more storage into previously dead spaces, like under the angled ceilings in my kitchen. And, I’ve even cut into walls to make the most of dead space high up in the closets.


Today, I am sharing my space-saving tricks to add more storage in the bathroom renovation.
I’ve been working on a complete renovation of my small guest bath over the last few months. Starting from a full demolition, I’ve re-boarded the room, built new structures to hide pipes, tiled the floor and shower, added wall paneling, and even moved the washer/dryer into the room. It has been a real transformation.
Are You Considering a Bathroom Upgrade?
Get a step-by-step guide and tons of tips and tricks from my own experience renovating my bathroom. From demolition, to water-proofing, tiling, and installing fixtures, this is your ultimate guide through the process.

At 2×3 metres, my guest bath is a small space. And I’ve gotten the most out of it, by replacing the tub with a shower and making space to move the washer/dryer from the kitchen into the guest bath. Prior to the renovation, there were very few storage options, but this won’t work. I need storage in every room, and I’ve found some great ways to add more storage even in this smallest of rooms.

One of my favourite storage additions is building into walls and otherwise unused space. In the bathroom, I’ve added wall niches into the stud wall, to provide space for bath products, loo role and other essentials. Today, let me share how to add your own wall niches in any room, in case you too are looking to add more storage solutions.
Adding Wall Niches to the Stud Wall
When we were deciding on the layout of the bathroom renovation, we knew we would need to hide the waste and water pipes for the toilet and shower. We could have built a low counter, mimicking what was in the room previously. Or, we could have just built a wall to the ceiling to cover everything.
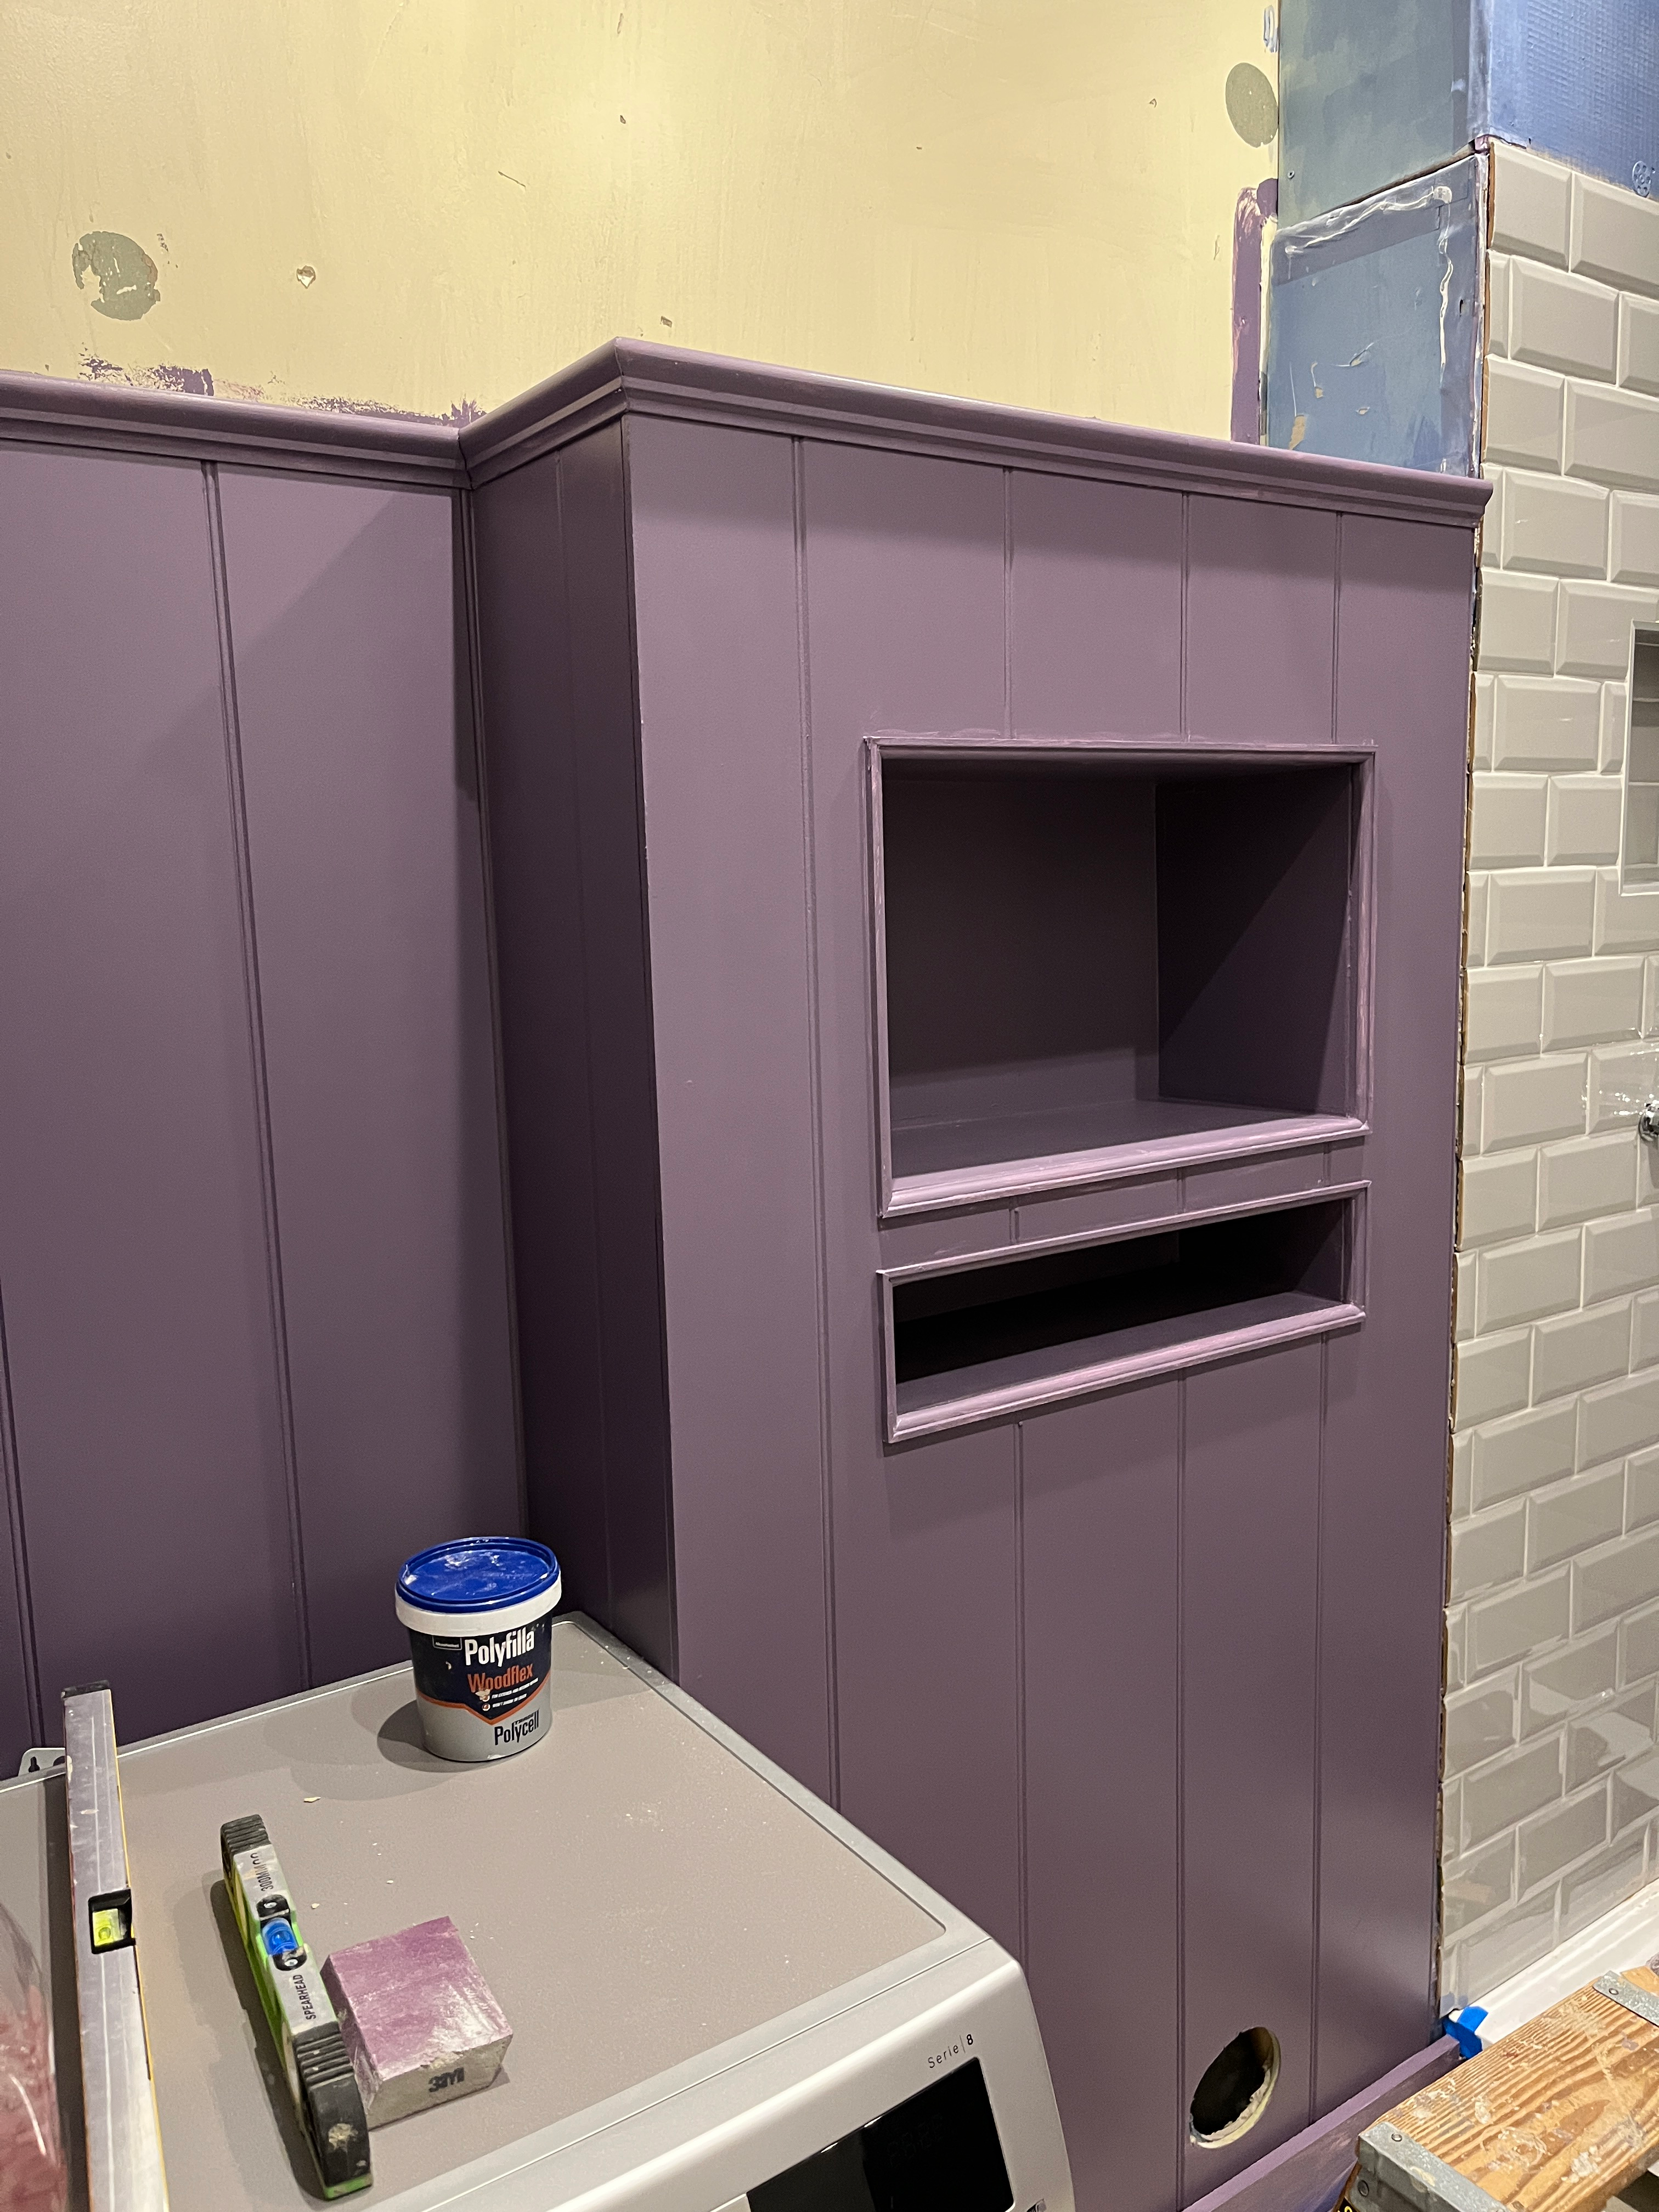
Instead, I decided to build a higher wall that would align with the paneling installed in the rest of the room. At 180cm high, there was significant unused space behind the new wall. The pipes only require a small amount of the space.
So it was an ideal place to add a few storage units. And since I was constructing the stud wall myself, I was able to account for these additional storage spaces in the build.

It was a fairly simple project. When I designed the stud wall, I drew out the measurements on the wall, so I could see how everything would look in real time. I aligned the top of the wall with the height of the bead-and-butt paneling. I ended the wall 63cm before the left wall, to allow space to install the washer/dryer.
Within the wall sitting outside of the shower, I drew out several options for wall niches. I made sure they were at a height far enough above the toilet and centred over where the toilet would sit.

The wall is large enough that I was able to add two niches in to the space. I made one large enough to hold bath products and supplies, measuring a few bottles to ensure the right height. While I wanted to use all the space, I did not want it to be so large that it overpowers the room. Or, if I decide to add doors, I don’t want a door that will be unwieldy and difficult to open in such a small space.
Once I had drawn in the large niche, there was still enough space for a second niche to hold loo roll. I drew out a long narrow niche just below the large niche, measuring the height of loo role to get the dimensions right. I ensured the width of both niches were the same, for a pleasing symmetrical look.
Once I had the dimensions right and drawn on the wall to ensure the right scale and feel, I built the stud wall. Here, it was just a matter of making sure I built out the spaces to frame the niches. You want a solid base and top rail to frame the niche, as well as studs on either side of each niche.

Do not forget to account for the wood to build the actual niche. In my case, I used 12mm plywood, so I needed to make sure the framing was 12mm wider all around. I actually missed this out, so my niches are smaller than planned. More on that in a bit.
As you build the frame, ensure the area is perfectly square, so your niche will be square as well.
Cut the Wood for the Box
Next up, you want to build out the box for the niche. I recommend using plywood. Depending on the size of the niche, you can choose 12mm or 18mm (1/2 inch or 3/4 inch). I would not go thinner, as you want a stable, strong box that can hold all the stuff. Shout out to Leylands for stocking smaller cuts of plywood that can fit into my car. They are more expensive, but when you do not need a full sheet of plywood (or when the cutting facilities are down at the B&Q preventing you from buying a sheet of plywood), this is a great option.
Cut out the top and bottom pieces, based on the measurements of the frame. My top and bottom pieces were 610mm. For the depth, I wanted it to sit flush with the plasterboard, so I could board over the box edges with the bead-and-butt panels. You also need to account for the depth of the backing you will add to the box. In my case, 6mm plywood. That meant my panels needed to be 263mm, the depth of the stud wall plus plasterboard, minus the 6mm backing. Alternatively, you could have the edges of the ply showing and use edge banding. If so, the depth of the box needs to account for the plaster board and paneling, or whatever you are covering the wall in.
For the side pieces, you want to take the measurement of the frame and subtract the width of your plywood times two. In my case, using 12mm ply, I subtracted 24mm from the side measurements, to get side panels of 368mm. This is because the sides sit within the top and bottom pieces, so you need to remove this height from the sides.
I cut all the panels using my Kreg Rip-Cut, ensuring straight, even cuts for all four pieces per niche.
Assemble the Box
I assembled my boxes with pocket holes, using my Kreg jig. This is a very secure way of assembling boxes or shelves. Use corner clamps to ensure square corners and test everything with your speed square. Depending on the size of the box, use two or four pocket holes per side.

I drilled the pocket holes into the wrong side of one side of a box and had to redo them. Fortunately, these are hidden by the surrounding stud wall, but pay attention to which piece of wood you should drill into and which side. This is a really simple mistake to make, and I’ve done it before. I’m sure I will do it again! To avoid making the same mistake, it is good practice to assemble the wood with the corner clamps and mark the placement for the pocket holes. Then remove the boards and drill the holes as marked. This will ensure no stupid mistakes!

Once the holes are drilled, put the sides back into the corner clamps, ensure everything is square and screw in the pocket hole screws. Ensure you use the right sized screw, which is determined by the depth of the wood.
Once the frame is built, add a backing to it. I used 6mm plywood. To cut the right size, I placed the box onto the wood and traced along the outer edge with a pencil. I then cut along the line with my jig saw, sanded down any rough edges, and nailed it to the back of the box, flush to the edges. Make sure you account for the thickness of the backing in your overall measurements, removing it from the depth of the panels.
I cut and assembled the boxes one evening after work. They did not take long at all. Even with my mistake on the pocket holes.

Install the Box
Once the box is built, slot it into the space you’ve framed for it. It might be a tight squeeze, so use a rubber mallet to help coax it into place. But as long as you measured carefully and everything is square, it should slot right in. If not, adjust the frame or the box as needed.
In my case, I had also installed a back stud into the wall, parallel with the base stud for the box. This gave the back edge of the box something to sit on and ensure absolute stability. Screw the box into the studs, countersinking the screws. The box should be stable and not move around. Ensure it is level, and use shims to adjust as needed.

Depending on how you plan to finish the box, there are a few steps you can take. In my case, before adding the boxes, I added plaster board over the entire stud wall, marking the box opening carefully. I then cut out the plaster board flush with the edges of the frame. I used seam tape to cover the raw plaster edges and then tanked the entire surface. After, I slotted the box in to the space. Then, I added the paneling over the plasterboard, with the niche cut out flush to the sides. This covered over the raw edges of plywood. It was tricky to get the cut-out in the paneling perfect. But I was able to adjust it with sanding and then used some shoe molding to further cover the edges and give it a nice finish.


Alternatively, you could use edge banding on the edges of the niche. In this case, just make sure the edges sit flush with whatever the surrounding material on your wall is, whether plasterboard, paneling, tile, or something else.
Remember the Size of the Plywood
As mentioned earlier, when I was designing the niches, I framed out the size I wanted and completely forgot to account for the thickness of the plywood. This was not really a problem with the large niche. But for the smaller niche for the loo roll, it resulted in a niche that is just slightly too short to accommodate the rolls. Fortunately, you can turn them on their sides and they fit. Not ideal, but at least it can still work. Learn from me on this. Remember to account for the thickness of your plywood in the original measurements. Consider both the top/bottom and sides, as well as the addition of the back panel in your measurements.
The Finishing Touches
As with all plywood builds, you need to sand the wood down a bit. Prime it with a primer, then paint it in your chosen colour. Make sure you caulk all the seams too, for a clean finish.
In my case, my cut-out in the plywood was not perfect. It also felt a little unfinished. I decided to add a small piece of shoe molding all around the edges. The profile is similar to the grooves cut into the bead-and-butt panel, so it adds a nice feature. I installed it with mitred corners, using adhesive and small finishing nails.

I primed the molding and boxes and then painted everything in the same aubergine as the panels. I am undecided if I will add doors. Once the room is finished, I will decide. (Honestly, I have so many doors to build for several projects, including the closet expansion, the appliance garage and now these niches. Perhaps I need to plan a weekend door-building extravaganza!)
And that is a wrap on additional storage in the small guest bath. I love these additions, both for their utility, but also how they break up what could be a slightly overpowering wall in a small room. They were fairly simple to build, although having to build a wall from scratch did make it slightly easier than working with an existing wall.

Next week, I’ll be back to share another space-saving project: building a cupboard into dead space behind the walls. This addition is bringing a linen closet to our small space without taking up any existing space in the room. Stay tuned for another potential way of increasing space and storage with a cupboard.
As always, happy DIY-ing!








Leave a Reply